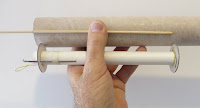
It looks like the upper bead of glue is being applied to the outside of the body tube. It obviously goes inside, but no glue bottle is going to reach that far in.
GOTCHA: Putting a ring of glue at the back end of the tube now won't do any good. That low glue bead would be pushed forward by the upper ring not leaving much to adhere the low ring.
TIP: Apply one bead of glue far up inside the tube (with a dowel or scrap stick from the balsa fin sheet) for just the forward centering ring. Don't worry about the rear ring right now, Apply a rear glue fillet around the rear ring after the mount is in place.
The instructions also have you glue on the fins before the mount is glued in.
TIP: It's easier to get the engine tube flush with the end of the main air frame tube without the trailing fins on the model.
 The mount was set beside the body tube and a dowel marked to apply a bead of glue inside the tube. I try to set the glue bead just before where the upper ring will end up.
Here's the mount in place, both tube ends are even.
The short launch lugs in place.
The rear lug is 3/8" from the rear of the main air frame.
The top of the upper lug is 4" from the top of the tube.


No comments:
Post a Comment