I set the engine mount beside the body tube with the bottom of the yellow tube extending 1/4" below the end of the main airframe tube.
This gives me an idea of how high the upper glue ring should go inside the tube.
Draw a line around a dowel a little below the upper ring final position. You want the upper centering ring to contact the glue and slide forward to its final position.
A ring of glue is set around the top of a dowel.
Set inside the tube up to the drawn pencil line on the dowel. Roll the glue in a line around the inside of the tube.
TURN the engine mount to even out the interior glue fillet. The low end of the yellow tube should be even with the bottom of the main airframe body tube.
The rear ring gets a glue fillet applied drop by drop using a few Q-tips.
Inside the engine mount tube is the elastic shock cord, rolled up inside to keep it out of the way while gluing in the mount.
TIP: Initially, don't use a lot of glue - less glue allows for slight adjustments when the fillets are applied using clamps. This is shown in the next post.
The fins lines on the body tube have the filler primer scraped off for a better glue bond.
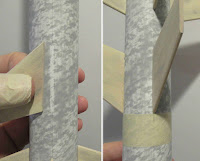
TIP: After the first fin is glued in place, a wrap of masking tape is rolled around the tube set against that first fin leading edge. This gives you a straight line to set down the other three fins at the same height.


No comments:
Post a Comment