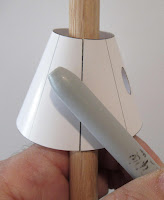
The Mars Snooper kit was always a challenge with three shrouds that required a good fit and had to line up for the long launch lug to slide through. This assembly will take a few daily posts.
Think of the dowel as a hand on a clock. The dowel is rotated in an arc counter-clockwise while pressing into the shroud.
I also use the dowel when gluing on the tab, it gives me something to press against. Pressing the burnisher against the dowel also rounds over the glue tab and shroud edge.
TIP: Try using less glue when gluing together cardstock shrouds. It will dry faster using less. Just be sure you have a uniform film of glue that covers the entire contact area.
Dry fit all the centering rings before applying any glue!
TIP: You'll get a better fit by sanding an angle onto the edge of the rings. Sand the same angle as the sides of the shroud it will fit into.
The slight edge slant can prevent distortion of the cardstock shroud. Sometimes you can see a ring impression if too much placement pressure or glue is used.


No comments:
Post a Comment