Friday, March 31, 2023

Estes EAC VIPER #0820, BT-55 Upscale, Part 14, More Decal Placement


Here's both sides of the the purple stripes joining up at the top and bottom of the fin.

In the picture on the right you can see the overlap and two layers of the translucent stripe decal. The ends should have a slight overlap. It's really not that noticeable.


I don't use an overall clear coat on my models.
I do use some Future clear acrylic on the ends of decals like the overlapping purple stripes.

Dip a Q-tip into Future and wipe off the excess on a paper towel.
Roll the clear over the decal ends. Lightly wipe off some of the excess Future.
A small amount of Future will seep under the decal edges and seal the ends.


The vertical EAC decals go on two opposite fins. 
Notice the side edges of the decal are curling up after initially placing them. 

Roll out the water under the decal with a Q-tip. Keep pressure on the decal and the curling edges will eventually stay down. This is typical of home print decals.


Mentioned earlier - 
The upper launch lug is in the way of the horizontal tube wrap decal.

Set down the edge, tucked into the lug glue fillet.
Roll around the decal. Tuck in the other end.

Use a razor blade to cut the overlap.

Thursday, March 30, 2023

Estes EAC VIPER #0820, BT-55 Upscale, Part 13, Purple Fin Stripes


Here's how the yellow paint looked after the tape was pulled.


This model coloration was interesting. While it looked great in print, it would be a very difficult model for a young builder to duplicate. 

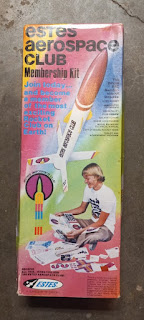
The EAC Membership Kit contained a sticker sheet with fin logos and the tall ESTES AEROSPACE CLUB that runs down the body tube. Not included are the Purple stripe fin decals and the upper purple tube wrap.

I drew up many more fin stripes as it might take some practice to get the placement right.


Set right on the yellow/white mask line, the purple stripe.
Try a dry fit (no soaking yet) to see how is sets and overhangs.

  
Soak and transfer the stripe. Slide it right up to the yellow/white paint mask.
Roll over the ends.

You can trim the overhang at the mid point of the leading edge using a simples slice of a razor blade, but . . . 
Trimming with a razor blade might slice into the balsa fin.


I found it easiest to lift the overhang and trim it off at the appropriate angle with small scissors.

Try to cut the stripe end just past the middle of the rounded leading edge.
More in the next post . . .

Wednesday, March 29, 2023

Estes EAC VIPER #0820, BT-55 Upscale, Part 12, Yellow Masks


I cut the yellow outside edge off the fin template for a masking tape height guide.

Set the template into the root edge. You can see the Scotch tape mask  underneath the fin template.
The tape overhangs the leading and trailing edges for now.

Flip over the fin and turn down the overhanging tape onto the back.

Flip the template and add another piece of tape to the other side lining up the top and bottom over the rounded edges.


Here's how the top looks.
Make sure the two tape ends are even and roll over evenly on the top and bottom.


The yellow mask on the four upper fins -

Lay the long sides down first.
Follow with the end mask pieces. I use five pieces on the top of each fin making up the rounded leading edge.

The bottom of the fin is "rounded" using three pieces.
The top round leading edge requires more pieces of tape because of the steeper angle of the front of the fin.

Tuesday, March 28, 2023

Estes EAC VIPER #0820, BT-55 Upscale, Part 11, White Undercoats

Here's the upper launch lug after the first white undercoat.
The lug is a bit fuzzy after the filler was sanded down.

The fuzzies were removed with some light sanding with 800 grit. They won't be noticed after the next white spray coat.
The lug is actually straight, there is some camera distortion.

After the first white undercoat, 
The entire rocket gets a light sanding with 800 grit.

Why not 400 grit? 
Some brands of 400 grit sandpaper will show scratches under the paint on the finished model. 
The picture shows the before and after. 

This between coat sanding pass is to smooth out glue boogers and rough spots that show up after paint is applied. Notice the small glue blob at the middle of the root edge.

Over most of the model you end up just dulling the gloss. Don't sand through to the tube or bare balsa.

Take a look at the open ends on the top and bottom launch lugs.
TIP: If you see fuzzies, clear them by rotating a sharpened dowel or pencil point.
You will be compressing the fuzz against the inside wall of the lug. It can reduce some binding against the launch rod during the initial boost.

Monday, March 27, 2023

Estes EAC VIPER #0820, BT-55 Upscale, Part 10, Fin & Launch Lug Gluing


The rear fins are glued .35" from the end of the tube. Two fins are centered around the engine hook.
.35" was pencil marked in one location. 
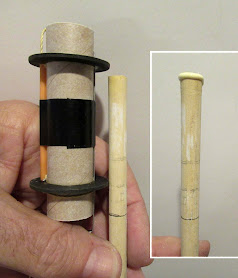
For consistency, I wrapped some cardstock around the tube at the pencil mark. The other marks were made against the cardstock edge.


I do two-step glue fillets.

On the left is the first Titebond Original wood glue fillet.
The dried fillet shown is a bit rough.

After that dries, a second fillet is made using Titebond Quick and Thick glue.

GOTCHA: The upper short launch lug is glued .35" from the top lip of the body tube.

Look close at the picture. 
There's a problem with the purple wrap band decal. It runs into the upper lug.
If I were to build this model again, I'd set the upper launch lug at least 3/4" below the top of the tube so I could do a complete wrap of the purple band.

GOTCHA: Look at the ESTES AEROSPACE CLUB decal running down the body. There were two name stickers on the sheet, I mistakeably drew up the longer sticker. While I used the longer decal in this build, the PDF was corrected for the shorter length decal. 


Here I'm rounding over the edges of the launch lug glue fillets.
This was glued in place before I realized the lug would be in the way of the wrap decal.

Sunday, March 26, 2023

Estes EAC VIPER #0820, BT-55 Upscale, Part 9, HD-EM Gluing In The BT-55

With the engine casing in place holding the block against the top bend of the hook,
Now you can apply a glue fillet to only the top of the engine block joint. Remove the casing after the glue fillet dries.

Feed the loose end of the Kevlar into the tube from the rear. Slip the already tied loop over the rear end of the tube and  and over the hook. Slide the loop up against the ring.
DON'T GLUE THE TIE LOOP IN PLACE! 

After a few flights you can slip off the loop, pull out the line and check the condition of the Kevlar. Kevlar is flame resistant - not flame proof.
Eventually Kevlar will get charred, break and need replacement. This mount design allows you to check and replace the line if needed.
 
The end of the engine tube and main body BT-55 tube will be even with the engine hook overhanging by 1/4".

To set a line of glue inside - I measure a glue applying dowel by setting it beside the finished engine mount. Notice the pencil line below, at the end of the engine mount. The pencil line is my depth gauge.

The top end of the dowel is set just below the upper ring. This insures the top ring will hit the line of glue when the mount is slid in place.

A ring of glue is run around the top of the dowel.

The dowel is inserted from the bottom. Try not to touch the wet glue against the inside tube wall until the pencil mark is even with the bottom of the tube. 
Roll the glue line around the inside keeping the pencil reference line even with the end of the tube.

The mount is slid in place until both tubes are even.
A glue fillet is applied around the bottom ring/tube joint.

Several wraps of masking tape is folded around the Kevlar line to prevent a "zipper".
Don't press the tape around the line yet - 

Slide the layers of tape down the line so the middle of the tape is over the edge of the body tube.

Now press the tape securely over the Kevlar line.

Saturday, March 25, 2023

Estes EAC VIPER #0820, BT-55 Upscale, Part 8, Heavy Duty Engine Mount HD-EM

I needed a 20/55 engine mount and went with my Odd'l Rockets Heavy Duty Engine Mount. (Of course, I did!)


The construction of the mount is a little different than a standard engine mount.
The body tube is a Odd'l Heavy Wall BT-20.
The Engine Hook is Spring Steel, 3" long. You'll see why it is 1/4" longer coming up.
The centering rings are custom cut, from black Letramax, stronger than standard white card stock.
The Kevlar is 135 lb. strength.


First, the Kevlar line is tied tight around the BT-20H tube and removed.


A notch is cut in the upper end of the tube and the engine hook slipped in.

A centering ring is slipped over on each side. Look at the first picture to see the slight difference between the two.
The wider engine hook slot (allows hook movement) goes to the bottom.

On the other side, the plastic guide tube slides into the two round holes. You might have to enlarge the round holes a bit.


A wrap of electrical tape goes completely around the tube holding down the hook and small tube.

Glue fillets are applied on both sides of the centering rings.


Note the engine block goes under the top bend of the engine hook. That's why the the hook is 3" long. It's a more stable and stronger mount. The upper end of the hook can't move at ejection or tear down the body tube.

Slide the engine block ring in from the bottom, dry - no glue yet. Push it in place using an engine casing. When the block hits the top bend of the hook, the bottom of the casing locks under the low bend of the hook.

Thursday, March 23, 2023

Estes EAC VIPER #0820, BT-55 Upscale, Part 7, Step 2 - Filling Seams & Balsa Grain

STEP 2:
I use what I've found to be the best filler/primer from Duplicolor. Catalog #FP101.

Here's two fins, before and after the filler/primer sanding. I've sanded with 400 grit removing most all the filler/primer. Anything that wasn't filled after  sanding of the CWF, the filler/primer is left in any remaining balsa grain.


The inside of the tube is protected from filler/primer overspray with rolled up paper in the bottom, also used for a spray paint handle.

The top of the tube gets a some masking tape pieces. 

A single, fairly heavy spray of filler/primer follows. 


Here's the tube after sanding down the filler/primer. 
You can see some grey filler/primer was left in and filled what was left of the remaining seam.
Again, the tube is left a bit fuzzy. This will disappear after the first light white undercoat is lightly sanded with 800 grit.
The Apogee plastic nose cone had a slight molding seam. That line was scraped down earlier and sanded with 400 grit.
The mold line only needed one shot of filler/primer and sanding to surface.

Estes EAC VIPER #0820, BT-55 Upscale, Part 6, Step 1 - Filling Seams & Balsa Grain

I see forum posts about a builder doing six or seven spray and sanding of filler/primer to fill the balsa and tube seams. It shouldn't be that difficult.

I do a two-step process that fills the grain and tube seams. 
Thin out Elmer's Carpenter's Wood Filler with water. For more info: CLICK HERE

Here's STEP 1:
Brush on one side and let dry. Don't panic if the balsa warps! 
Brush with the grain first. Then while the filler is still wet, brush against the grain to force the filler into the pores.
The balsa will level out when the other side gets it's coat of CWF.

On the left is the balsa after the CWF dries. It will dry with noticeable brush strokes.

I first sand with 220 grit to remove the brush strokes (take off just the top) then 400 grit to do final smoothing.
Don't sand all the way through the CWF, leave a very thin beige layer. If you see the pinkish balsa you've sanded too far. 

For the tube seams:
Dip just the tip of an old knife blade in the thinned CWF. Wipe the backside of the blade off over the lip of your thinned CWF container. You won't need the CWF on the back of the blade.


Set the blade in the tube seam and move it back and forth. This should leave CWF in the seam. The blade directs the filler into the bottom of the gap. You should be able to fill an inch or so before dipping again. 
Dip, wipe off the back of the knife and apply the next inch.
I remover the bulk of the seam filler using 220 grit on a sanding block. I haven' t taken the filler down entirely yet.

Follow with 400 grit to take the filler down to the tube surface.
This will leave the tube a bit fuzzy. The fuzzy surface will be gone after the next step.

The second filler step using a spray of filler/primer is next. 

Wednesday, March 22, 2023

Estes EAC VIPER #0820, BT-55 Upscale, Part 5, Squaring Up The Fins

I had to go old school on this one - Oh, the horrors! 
Actual templates, tracing and cutting out the fins.


After cutting out the fins, they are stacked as evenly as possible. The edges aren't even or clean.

On the right is the same side of four stacked fins after sanding with 220 grit on a block.


On the left, more follow-up sanding with 400 grit.

A side view. When stack sanding fins, try to get the sides as square as you can at 90 degrees.


The smaller forward fins taper to a point at the top.

After stacking and sanding, the thin tips aren't even.
These were cut even with one pass over all four fins at the same time.
All the eight fins - 

The first run of the kit instructions said to round the leading, outside and trailing edges. The root edge always stays square.
The second run instructions said to round the leading and trailing edges only.

I'll be rounding the leading, outside and trailing edges.

Tuesday, March 21, 2023

Estes EAC VIPER #0820, BT-55 Upscale, Part 4, Cutting the Main Tube

I know - Some of you already know how to do many of the steps on a simpler build like this. There are new builders joining the blog everyday. If you are like me, you need to be reminded a few times to drive a point home. Just ask my ex-wife.

The original kit had a BT-50 tube that was 9 1/2" long. Multiply 9.5" by the scale factor of 1.36 and the upscale BT-55 tube should be cut at 12.92" long.
It's not difficult to cut a body tube and it should be part of your skillset.

Wrap a piece of cardstock around the tube at the 12.92" mark. trace around the top edge with a pencil.

Trace around that pencil line with a new, sharp knife blade. 
DON'T TRY TO CUT WITH A SINGLE PASS OF THE BLADE!
Using moderate pressure on the blade, you may have to go around the tube three times to cut through.


Chances are, the cut line will be a bit rough.

Simply square up the tube end with a sanding block with 220 grit sandpaper.

Check the edge by sliding in a nose cone. Look close at the tube end and the shoulder lip of the nose cone. Turn the nose cone, making sure the tube end is square.

Monday, March 20, 2023

Estes EAC VIPER #0820, BT-55 Upscale, Part 3A, Decals & Color Matches!

In a comment, Andrew wrote:
"I remember reading somewhere that Testor's Panther Pink (which is purple, not pink) and Testor's Boyd's yellow were good matches to original colors. They came in the small rattle cans. Not sure if those colors are still manufactured."

My response:
Thanks for the information. The best purple match I found is Ace Tropical Pink. The Testor's Boyd's Yellow is available, looks like it is catalog #1214. When you add shipping charges, it's too expensive for a single build.


I'm overthinking the Yellow/Orange paint and decals - more edits.
Here's the yellow on a fin "E" logo and the yellow outside fin edge. I was concerned that a (translucent) yellow decal would wash out when set over white paint.


Here's a fix - I hope!
I did a very thin orange outline of the yellow flipped "E".
This gives it a subtle yellow/orange tinge and sharpens the edges. The yellow paint on the outside edge of the fin is already defined by the vertical purple stripe.

You probably didn't notice the outline until you see the enlargement.
There are usually compromises when making a clone and printing your own decals.

Sunday, March 19, 2023

Estes EAC VIPER #0820, BT-55 Upscale, Part 3, Parts

This will be another spare parts build. I've collected too many extra parts over the years.


From the left, going clockwise - 
The original kit had 1/16" thick balsa for the fins. This upscaled build will use 3/32" stock.
An Odd'l Rockets 12" parachute kit
The nose cone is a "Place holder" until I can order the longer BNC-55061 (5.98" long exposed)
The BT-55 tube at 12.92" long (or very close to it)
An Odd'l Rockets Heavy Duty Engine Mount for the BT-55 airframe
Two short 1/8" diameter launch lugs, around .34" long
 A 1/8" wide elastic shock cord, pulled from a retired build.

Saturday, March 18, 2023

Estes EAC VIPER BT-55 Upscale, Part 2, Decals & Fin Templates

I drew up the BT-55 size decals and fin templates. These will be a very close upscale.
There were some corrections made. By the time I get to applying the decals, I'm sure there will be more edits.

Patreon members - 
Don't request the decals and fin templates yet!
As mentioned in previous builds, you can rarely use the first decal print. Color changes are likely when trying to match available spray paint.

EDIT: Changes have already been made - 
I couldn't find a close Yellow-Orange spray paint. Rusto Tuscan Sun is close, but has to be ordered. The shipping price was more than the can of paint! Most vendors require you to buy a box of six spray cans.
The areas on the decals that are orange (the flipped "E" under the rocket logo) will end up being yellow. This will make it easier for anybody else wanting to build it. A simple yellow is easier to match.

Friday, March 17, 2023

Estes EAC VIPER BT-55 Upscale, Part 1, The Logo & Fixing The Name


In April of 2022, I built the second (and final) model available only to the members of the Estes Aerospace Club - the E.A.C. Firecat. 
To see that build: CLICK HERE

In the 1970s, I was a member of the Estes Aerospace Club or E.A.C. I built the first "club exclusive" VIPER rocket.
It was around 15" tall, a BT-50 model flown with 13mm motors.

I remember not being able to find paint that matched the purple and yellow-orange ink on the stickers. 
More on that coming up.


I decided to do a BT-55 based, slight upscale.
Chart by Jim "K'Tesh" from the Rocketry Forum

To get the scale factor - 
Divide the diameter of the upscale size BT-55 (1.325") by the diameter of the original BT-50 (.976) to get the Scale Factor of 1.357. I rounded up to 1.36.
Every dimension of the original kit parts is multiplied by 1.36 to get the new larger part  lengths.

The original kit BT-50 body tube was 9.5" long. The upscale BT-55 tube ends up at a length of 12.92"
The original BNC-50Y nose cone will eventually be replaced with a (very close) BNC55061.

Onto that weird font - 
Take a look at the original Estes Aerospace Club logo. It's a combination of mostly lower case letters. But, the "T", "P", "L" and "B" are reduced capital letters.
Shrinking those capital letters to the height of the lower case letters also reduced the 
weight or boldness of those upper case letters. 
I re-set the logo letters and made those small capital letters a bit bolder. (See "Fixed") 

The original balsa fin stock (BFS-20, 1/16" thick) will be replaced with 3/32" thick balsa.
The parachute will stay at 12" diameter, maybe 15".