Now you can apply a glue fillet to only the top of the engine block joint. Remove the casing after the glue fillet dries.
Feed the loose end of the Kevlar into the tube from the rear. Slip the already tied loop over the rear end of the tube and and over the hook. Slide the loop up against the ring.
DON'T GLUE THE TIE LOOP IN PLACE!
After a few flights you can slip off the loop, pull out the line and check the condition of the Kevlar. Kevlar is flame resistant - not flame proof.
Eventually Kevlar will get charred, break and need replacement. This mount design allows you to check and replace the line if needed.
The end of the engine tube and main body BT-55 tube will be even with the engine hook overhanging by 1/4".
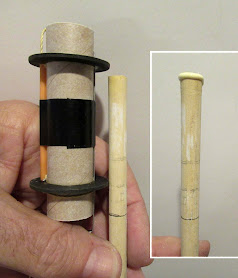
To set a line of glue inside - I measure a glue applying dowel by setting it beside the finished engine mount. Notice the pencil line below, at the end of the engine mount. The pencil line is my depth gauge.
The top end of the dowel is set just below the upper ring. This insures the top ring will hit the line of glue when the mount is slid in place.
A ring of glue is run around the top of the dowel.
The dowel is inserted from the bottom. Try not to touch the wet glue against the inside tube wall until the pencil mark is even with the bottom of the tube.
Roll the glue line around the inside keeping the pencil reference line even with the end of the tube.
The mount is slid in place until both tubes are even.
Don't press the tape around the line yet -
Slide the layers of tape down the line so the middle of the tape is over the edge of the body tube.
Now press the tape securely over the Kevlar line.


No comments:
Post a Comment