This illustration (second stage) implies that both parts of the epoxy mixture are squeezed our of the tubes onto the fin tabs. MIX the two part Epoxy before applying to the model. Wear gloves! You might have an Epoxy allergy or could develop one from exposure over time.
TIP: I didn't apply epoxy to the fin tab, then slide in the fin. That would squeeze out epoxy onto the outside surface of the model. You might end up with a strong fillet, but it would be a mess to clean up.
I neatly applied epoxy into the slot, then slid in the fin tab.
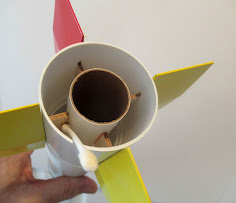
Yellow glue was used for fillets where there was a wood to Kraft tube joint. The glue was applied using a Q-tip.
Epoxy was used inside where the fin tab contacted the plastic outer fin can tube.
Here's the finished lowest fin can. Notice the gap between the upper end of the root edge.


Did you end up adding fillets to the fins of the lower and middle sets as called for in the instructions? If so, how did you do it without making a mess?
ReplyDeleteHi Tomas,
DeleteI didn't add fillets. The real rocket has gaps where the fin root edge butts up against the raised rings. There were glue fillets on the internal joints, not on the visible outside of the model.