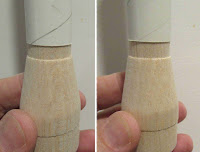
The adapter shoulders weren't flat.
This next step isn't necessary, it's just something I do.
That extended "nub" was cut down with a fine razor saw. The rough edge was sanded with 220 grit.
400 grit was set over my index finger tip and the edge rounded for an easier fit into the body tubes. This end clean was done on all five nose cones and two adapters.
The smaller inside shoulder edges weren't very sharp.
The body tube end was "roughed up" with 220 grit. The tube is slid down to the edge and the body tube turned and pressed into the balsa. The rough tube edge "sands" the inside corner of the shoulder, sharpening up the balsa edge. The picture on the right shows the "after".
The small BT-5 sized nose cone shoulders weren't sharp.
TIP: I brushed some CWF filler over the edge and onto about 1/8" of the recess shoulder. Leave the filler off the top off the nose cone so you have something to grab onto with your fingers.
Press the nose cone down onto the body tube and turn the nose cone forcing the filler into and over the shoulder edge.
Partially pull the nose cone out of the tube and let dry. Notice the new raised ridge around the shoulder lip.
After the CWF filler dries, sand off the ridge so the nose cone sides are even with the sides of the tube. You should now have a nose cone that is the same diameter as the body tube with a smooth seam between the two parts.


No comments:
Post a Comment