
TIP: WAIT before gluing on the upper "Z" side pieces.
If they aren't fitted against the body, the landing skid fit will be loose!
Gluing of the Z pieces will be covered in Part 17.


The dowel hole in the skid piece isn't cut at an angle.

My kit was built a while back, it was a "PP" or pre-production kit. The instructions weren't finalized.
In my instructions, the front landing gear drawing wasn't full size. I re-drew the skid on a PDF available to Patreon subscribers.
The dowel was easily cut using the full size drawing. Don't cut the bottom of the "down" dowel yet, leave it long. It'll be trimmed to size after the bottom skid is glued on.

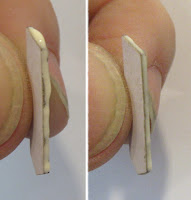
The Y and Z cardstock pieces are laser cut. After sanding off a little of the ash, I sealed the edges with some wood glue.
On the left is the glue bead right out of the bottle.
On the right is a smoother bead. I simply wipe off some excess glue using the side of my finger.
Let the glue bead dry and sand smooth with 400 grit.
If you could compare a rough painted laser edge and a glued sealed painted edge you would notice the difference.

Set a small rat tail diamond file at the needed angle and lightly cut into the sides of the hole. It won't take much filing.


Here's the bottom of the hole with the dowel at an angle.
Glue in place and cut to the flat side of the skid bottom.
This will be sanded even after the glue dries. More filling will be needed at the sides of the hole.
No comments:
Post a Comment