The Motor Band is made up of three layers of cardstock, the third layer has evenly spaced holes in it.
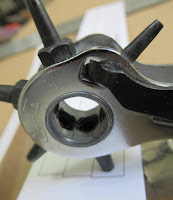
Step 7 of the instructions say simply: "Cut small holes out of third motor band." I prefer to use my rotary punch.
Test on scrap area to get a feel for how the punch will cut. Usually you have to have a second layer of cardstock underneath the punch area for a clean cut.
Shown above on the right,
If you can't see the inked edges around the cutter tube, try light pressure to be sure of the punch position. Remove the punch and check.
If you are happy with the position, set the tube on the light recess and finish the punch. This allows you to slightly move the punch tube if you didn't get the position right the first time.
To round out and true up the circle edges -
TIP: Use a smooth sharpened dowel. Wet the dowel tip and wipe off the tip leaving the wood just slightly damp.
Gently turn the dowel in the hole.
I dowel form the holes on both sides.
The final side of dowel forming is the side that will face out on the finished model. That leaves a clean taper on one side of the strip.
TIP: I make a practice of gluing the printed sides in. Printed words and inked lines can sometimes wick through and be seen after spray painting.
The motor bands didn't wrap completely around the tube!
The picture on the left shows the first motor band. The ink line is where the wrap should have been cut. I left overlap thinking this could happen.
The second overlay wrap didn't meet up.
That leaves the third wrap with the holes not completing a full turn.
It's not difficult to patch a cardstock gap. But, the third wrap holes will end up unevenly spaced where the ends meet up! This would require a re-draw.
To be honest - I was disappointed with the weak, floppy fins, substituting basswood for the balsa launch shoes pieces, and the motor wrap ends not meeting up.
I've spent too much time correcting and beefing up the kit supplied parts. I'll return to this build another day.
This Friday - A full build that I did finish! The new Estes B.O.S.S.


No comments:
Post a Comment