

Here's a place where I didn't follow the instructions.
You are directed to sand an angle on the outside of the wing edges, then glue the drive on the other side. I did some dry fitting and this didn't give you a very wide gluing surface. .
I was concerned - the warp drives would be the first things to break off on a hard landing.


I preferred to have the open "slot" on the warp drive assembly hidden on the inside less to fill.
Instead of sanding the angle on the side as shown above,
I sanded an angle on the bottom. You can see the parts contact in the inset picture before the angle was sanded.
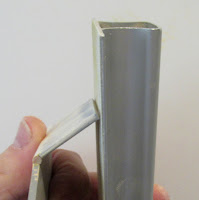
Here's the angle I used,

The block is almost parallel to the bottom face of the wing.

Here's my new fit -
No gaps at the top or bottom of the joint.
This will be very little to fill.
Chris, it appears that you glued the pod on opposite of the instructions. The printed instruction photo shows the vacuum formed gap to the outside, but yours appears to be toward the inside. That would change the angle to be sanded.
ReplyDeleteHi Anonymous,
DeleteYep, I did glue them on the inside. I thought it would make a stronger joint. That's the first thing that hits the ground on recovery. It's not a big deal to me - this kit went through quite a few design changes to make it a flying model.
Make sure to steer clear of any "rivet counters" (a type of modeler who may be overly concerned with minute details -- down to the point where they'll point out an inaccuracy of a model that doesn't depict the *exact* number of rivets present on the real subject). They will point out that:
Delete* the way the nacelles attach to the pylons as per instructions is "more accurate"
* the leading and trailing edges of the wings and pylons should be a bevel -- not square or rounded
* the dowel used at the joint between the wing and pylon is not correct.
* etc.
Hi Naoto,
DeleteSpeaking of "rivet Counters" -
There was a guy called MicroMeister on TRF. He came down hard on my once when I home printed decals for my Fliskits MMX Honest John. I wanted the MMX version to look like the HoJo I first saw in the 1969 Estes Catalog with the HONEST JOHN name decal down the side of it.
He wrote something along the lines of: "How can you possibly do that to a scale model! The original H.J. didn't have the name printed down the side!"
I answered: "Who cares? You paint your rockets your way, I'll paint my rockets my way."
I would've been tempted to come up with a B.S. story that the model wasn't a representation of an actual operational article, but a representation of a miniature displayed at the manufacturer's booth at a trade show. If someone says "that's B.S. -- Douglas never had such a thing" -- you could respond with, "you misunderstood me, the manufacturer I was referring to was Estes/Centuri"
Delete