The cardstock was dry fitted many times. You have to double check all sides to make sure it is evenly spaced.
Look close, you can see a pencil line traced on the outside of the long straight fold. That gave me a guide line to sand off the filler/primer (under the tab glue area) for a better glue bond.
To prevent some of the rise, I glued the rear small tabs down onto the underside. The rear tab area is flat against the wing anyway.
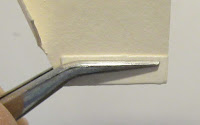
Tweezers held the glued tab closed as it dried.
First - The front of the lip was glued to the balsa edge underneath about halfway down on both sides. After it dries, this lets you lift the "shell" and apply glue to the underside tabs. for the next glue step
TIP: Don't try to glue the entire card stock top all at once!
You will be better off gluing in sections.
Second - Apply a line of glue to the tabs under the sides.
When gluing card stock, you don't need a lot of glue! More glue takes longer to dry. A (full tab coverage) skin of glue grabs and dries quicker.
It's a balance. Enough glue for lining up and working time, but no so much glue that will make the cardstock pucker when dried. More on this step tomorrow -


No comments:
Post a Comment