Pick an end and mark the BT-20 body tube Front and Rear.
You can do a wipe of CA glue on the top (nose cone) end of the BT-20 tube only - All other tube ends will have glue applied later. The CA glue edge would seal the tubes - wood or plastic glue won't soak in.
At the top is the slit for the engine hook.
Notice there are more than one mark going around the tube at the centering ring and Mylar retaining ring locations. I like making three or four marks so I know the rings are perpendicular to the tube.
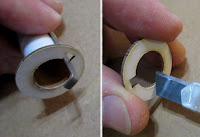
The fit of the flat 5/50 centering rings were too tight on the BT-5 engine mount tube.
I've never checked the shroud line length on a premade parachute.
The two adjoining chute "corners" were matched up and the center area of the shroud line loop stretched tight.
Each shroud line loop was a different length, two are shown here. This could make for a lopsided parachute.
I cut off the shroud lines and replaced them with #10 embroidery thread.
I know - the parachute would work fine as is, right out of the kit bag.
I'm single and have time for very important rocket nerd things.


Surface/part prep like this cannot be emphasized enough. Most kit manufacturers go to great lengths to ensure reasonable quality control but you can always get a "Friday" part. Check and test fit each individual part before even thinking about glue.
ReplyDelete