

The instructions imply that the rear centering ring is even with the low edge of the body tube.
The picture shows a dry fit, no glue yet.
If you recess the lower ring about 1/16", you can add a glue fillet along the bottom joint.


I like to use a dowel to apply the inside ring of glue for the upper centering ring on the mount.
Set the dowel next to the mount and mark just below the lower ring. With the glue bead (in the tube) slightly below its final position, you will push the glue up creating an interior fillet.
Don't use too much glue - the tube could shrink in as it dries leaving a "Coke Bottle" ring depression.
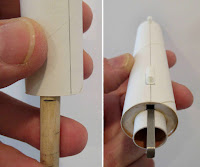
On the left I'm rolling the glued dowel around the inside of the tube using the pencil mark as a depth gauge.

Turn the mount as you slide it into the glue ring, making a more even interior fillet.
The engine hook is in line with the two launch lugs.


There is two small dents where the adapter was twisted off the mold tree.
I fill them with a dot of medium CA glue. A drop of CA will take a few minutes to dry before sanding to surface.
Note the adapter is slid out a little so it won't be glued into the tube yet.
No comments:
Post a Comment