

Hold the stickers by a light and you can see the border edge cuts.
As mentioned before,
I now peel off a sticker and douse it in a small dish of water.
Apply some water to the area on the rocket where the sticker will go.
Set down the sticker, check alignment without squeezing out the water under the sticker surface.
Burnish and remove excess water only after you are sure of the correct position.

Before setting down the long arc decals -
Find the center point at the top of the arc. If the top of the arc half is not slightly overlapping the center line you might end up with a gap where the ends should overlap.
Take your time . . .
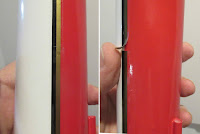
The long vertical lines are two pieces on each side.
Plan for a little overlap at the midpoint of the line.
I built three Quad Runners - two for flight (body tube seams not filled) and one for show (extra smooth and all seams filled)

I made a fin template cutout to guarantee equal positioning of the four Quest logo blocks. One logo goes on each right facing fin.
TIP: Notice the Scotch tape around the sides of the cutout. The cardstock template can get wet when checking the sticker position. The tape stops the excess water from soaking into the template.

I didn't take any finished pictures of the Quad Runner.
These five models were already boxed up when I realized I had forgot the pictures.
So - the best I can do is show all five builds, relaxing in my easy chair.
Nice chair :^)
ReplyDeleteWith the new EnerJet version of this kit, and 2 MMTs, are they interchangeable? I see you built both. My original version had a glorious flight on 4 D16 Q-Jets!
ReplyDeleteHi Unknown,
DeleteHi Paul,
The mounts aren't interchangeable. You pick one and glue it in place permanently. The Quad Runner on four, D16 Q-Jets would be amazing!