Thursday, February 29, 2024

New Way Nike Ajax Build, Part 13, Gluing On The Upper Fins & Tunnels


I used a tape wrap for a baseline when gluing on the upper four fins.

Three fins below, four fins on the upper body. 
It's a bit confusing as to how they line up, 4 over 3.


The tunnels were set on the tube centered between the upper fins. Trace their top and bottom ends with pencil.


In the right side picture, notice the tunnels extend just over the top of the tube. 


After the glue dries,
Sand the overhanging tunnel ends even with the top edge of the tube.
This will make a tighter fit with less of a joint gap between the tunnels when the nose section is slid in.


Here's the front end showing the ends flush with the end of the tube.
 

Wednesday, February 28, 2024

New Way Nike Ajax Build, Part 12. Interstage Support Details


The interstage supports are laser cut from thin cardstock.

TIP: Look close - you can see some rough edges. You can sand the edges smooth with careful passes with a sanding block.
Left is before, right is after sanding with 400 grit.
As shown in the instructions:
Glue the strip end first and let dry.
Notice the shape of the support piece. You want to glue the strip to the "flatter" side of the balsa piece. The bottom has a sharper angle.

I use very little glue to adhere the cardstock in place. Enlarge the lower picture to see the even fine line of glue centered down the outside edge of the balsa. This glue line shouldn't have much squeeze out, if any to clean up.

TIP: Run a small line of glue, then remove the excess by running your finger at about a 45 degree angle down the sides. this gets the remaining glue to the center of the fin.

These are glued down the three fin lines from the booster fin lines. as shown in Step 12 of the instructions.


TIP:
The upper ring also has laser cut ridges. 
Sand smooth, then rub in a thin coat of wood glue into just the edge to seal it. After it dries, sand smooth with 400 grit.
I applied glue a second time and sanded.


Tuesday, February 27, 2024

New Way Nike Ajax Build, Part 11, Lower Fins Gluing


TIP:
I like to line up the engine hook and launch lug positions.
When launching, set the launch lug to the back side of the model for better photos from the front. This also allows you to bend the igniter (starter) wires forward away from the launch rod and engine hook.


Viewed from the rear, 
This is how the fins line up - three on the booster, four fins on the "main stage". (It is a single stage model.)

The instruction explanation is a bit confusing, just keep this view in mind and you can figure it out.
The pressure sensitive (sticky back) ring goes around the BT-55 lower tube at 2 3/8" from the bottom.

Start and finish the wrap at a fin position. Cut off the excess. This joint will be covered by a fin.

Note I used a wrap of tape for an edge guide to insure a straight wrap and the ends would meet up.

With the trailing edge of the fin even with the end of the body tube, mark the notch position. 


Cut a very shallow notch with a sharp knife. You don't have to go very deep with the cut.

The gray primer/filler was scraped away for a better glue bond. After scraping away the primer, you'll have to redraw the pencil lines for the fin alignment.

Monday, February 26, 2024

New Way Nike Ajax Build, Part 10, Engine Mount Gluing


The instructions say to apply glue 2" up, inside the rear of the BT-55 tube.
Considering how high the mount sits, that would be pushing glue up farther than I'd like above the upper ring.
I apply a bead of glue like this using the end of a dowel. 

With the engine mount set next to the body tube and the engine hook bend even with the end,

That puts the glue dowel applicator mark about 2 1/2" above the end of the tube.
Apply a ring of glue around the top end of the dowel. Set the dowel in the tube up to the 2 1/2" pencil mark and swirl the glue bead on the end inside the tube. Slide the mount in. 
This glue ring will only contact the upper ring.


To remove excess and smooth out the glue ring, 

Tape a Q-tip to the dowel to reach that deep ring/tube joint.


The lower ring gets a fillet of wood glue. 

Smooth and remove excess glue with a Q-tip.

Sunday, February 25, 2024

New Way Nike Ajax Build, Part 9, Tunnels Shaping

I thought the balsa tunnels would be too weak when trying to sand the trapezoidal shape into the sides. (See last picture below.)
I cut them out of 1/16" thick basswood using a kit supplied balsa piece for a template.
Here's four of the upper body pieces below the original kit piece.
GOTCHA: Well, got me anyway! I cut the lower, longer tunnels were fine cut from basswood. They fit a straight  tube surface well. 
On the upper, shorter pieces, the kit supplied balsa is more flexible. The balsa strip is easily pressed into the adapter dip and over the nose cone shoulder curves. I ended up having to cut notches in the upper basswood strips and "cracking" the wood slightly to fit the angle changes. More on this later.
If you want an easier build, stay with the balsa strips supplied with the kit. But, the balsa grain is more difficult to fill.


The strips are sanded to a trapezoid shape, shown below.

I marked the tunnel sides with a soft pencil. This gives me a better contrast, I can see what is sanded off.

Use a sanding block to keep the side corners sharp.


Looking from the back end, here's what you should end up with - 
The basswood is stronger and will hold up to more aggressive sanding.

Friday, February 23, 2024

New Way Nike Ajax Build, Part 8, Centering Rings


Instructions typically tell you to run a line of glue around the tube, then slide the ring into the glue.

TIP: This is unnecessary and you run the risk of the rings freezing in the wrong position. 
Dry slide the rings in place, then apply a glue fillet to either side of the rings.  
One flat face side of the thick 50/55 centering ring will be visible on the finished model. 
Apply a thin coat of glue on the flat face and let dry. This seals the exposed face. Sand the ring face flat with 400 grit on a block.

Slide the rings into position with the glue sealed, sanded face down. Apply fillets to both sides.

The assembly is glued into the BT-55 with the thicker ring (sanded flat) face even with the tip of the tube.


I used some CWF in the joint between the ring and BT-55,
This was sanded smooth with 400 grit.

Thursday, February 22, 2024

New Way Nike Ajax Build, Part 7, Filler/Primer


Note the edges at the top and bottom of the balsa adapter. You'll see a raised ridge of CWF.

I brush on CWF a little over the shoulder lip. While the filler is still wet, the adapter is slid into the tube and turned. This makes a raised bead of filler. 

When this is sanded with a block, it makes a more defined shoulder edge on the finished model.


All the sanded balsa pieces then got a fairly heavy shot of filler/primer.
The forward fin shows the filler left in the remaining balsa grain after sanding with 400 grit.

This is a two-step fill, CWF and sand then filler/primer and sand. There shouldn't be any grain left. Like anything else, a new technique takes practice.


Here's the booster BT-55 tube.

CWF was used first on the tube seams, followed by sanding.

On the right, the picture shows how much of the filler/primer is sanded off leaving the gray primer filling any remaining tube seams.

Wednesday, February 21, 2024

New Estes 2024 Catalog Now Online


The new Estes 2024 Catalog is now online!

To see it: CLICK HERE


From YORF, Turbofireball did all the research on new products and discontinued items - 
Thanks Turbo!

New items:
Tri-Flyer Starter Set #0647
Roto Rocket Starter Set #0648
Olympus Mega Starter Set #0642 (available direct only, no hobby shops)
Green Eggs Starter Set #9990 (available direct only, no hobby shops)
Mini Alpha Launch Set #2458
Mini Bertha Launch Set #2469
Mini Max Launch Set #2445
Star Hopper Launch Set #2427
Long Ranger Kit #0814 (was Hobby Lobby exclusive)
Roto Rocket Kit #1322
Tri-Flyer Kit #1323
Saturn V Kit #1969
Mini Alpha Kit #2098
Mini Bertha Kit #2099
Mini Arcas Kit #2441
Power Patrol Kit#2481 (rerelease)
Vapor Kit #7294 (rerelease)
Space Shuttle RTF #9991
F15-4 Bulk Pack (available direct only, no hobby shops)
Launch Rail Launch Pad #2311 (available direct only, no hobby shops)
100 lb. Aramid Cord #3140 (available direct only, no hobby shops)
200 lb. Aramid Cord #3141 (available direct only, no hobby shops)
300 lb. Aramid Cord #3142 (available direct only, no hobby shops)
Pro Series Parts Assortment #9987 (available direct only, no hobby shops)
Cosmic Ray Bulk Pack #1112 (available direct only, no hobby shops)
Cosmic Cargo Bulk Pack #1752 (available direct only, no hobby shops)
D12-5 Bulk Pack #1786
Mini Launch Pad & Controller #2244 (rerelease)
Sanding Bar Sandpaper 180 Grit #2323
Sanding Bar Sandpaper 300 Grit #2324
Sanding Bar Sandpaper 400 Grit #2325

Discontinued items:
Gnome Kit #0886
Terra GLM Kit #7292
Xtreme Kit #7306
220 Swift Kit #0810
Mars Longship Kit #7296
Gnome Bulk Pack #1749

Catalog error:
MAV Rocket Kit incorrectly listed as #7297 (correct #7283)

New Way Nike Ajax Build, Part 6, Wood Prep & Fills


The laser cut inter stage supports should have the edges trued up with a sanding block. If they aren't squared up the cap strips (cardstock) won't glue on straight. Without sanding square the sides, no pieces will be true when glued to the body tube.


Here's all the balsa pieces that got CWF fill. 
It's quite a bit of sanding.


After the CWF is sanded down, the pieces were stuck down to some cardboard for a shot of filler/primer and more sanding.

Notice the root edges are pressed against each other to keep the filler/primer off an area that will be glued later.

Tuesday, February 20, 2024

New Way Nike Ajax Build, Part 5, Booster Fins

Instructions say to sand both sides of the sheet before using a knife to remove the fins. 
I don't see any reason to sand while the fins are still on the sheet. Back when fins were die-cut, this sanding helped the fins release from the sheet. 
You'll be sanding the face of the fins after the two halves are glued together anyway.

The lower fins come off two separate sheets of balsa. Sometimes there can be a slight difference between the thicknesses of the two kit balsa sheets. 

Before you lose track of which fin came off which sheet - 
You can check a matched thickness by dry fitting the two sides and feeling the joint with a fingertip.


After matching up the thicknesses,
Glue the two halves together and set a weight on top to keep things even.


After the glue dries, you can sand the flat faces.
Start with light passes of 220 grit, smooth with 400 grit.

Monday, February 19, 2024

New Way Nike Ajax Build, Part 4, Engine Mount


Here's all the parts for the engine mount,
A standard 20/55 mount.

Check the centering rings. This is the same ring, flipped over. 

Pick the cleanest side to be the low ring, the one you can see from the bottom view of the rocket.

On the left side - 
The retainer ring is centered between the two centering rings.


In the right side picture - 
TIP: I've set the upper ring a bit lower than suggested in the instructions. The ring is glued on just over the upper bend of the engine hook. This makes for a stronger mount.


The finished mount -
There is an engine block set glued above the upper bend of the engine hook.

Sunday, February 18, 2024

New Way Nike Ajax Build, Part 3, More Parts


New Way rockets are known for their square tube designs.
Their kits also include sandpaper, Q-tips and emery boards.
To the left are small fins and tunnels laser cut from 1/16" thick balsa.

I thought those long tunnels would be very hard to shape and fill using the soft balsa.
I bought some 1/16" thick basswood and will cut out new strips.

EDIT: There's a reason these kit supplied tunnel strips are balsa. While basswood is denser with no real grain to fill, the upper, shorter tunnels easily conform to the adapter/body tuber/nose cone angles.

Saturday, February 17, 2024

New Way Nike Ajax Build, Part 2, Parts


All the parts - 

At the top left are body wraps laser cut from peel and stick paper. On the right are pre-cut cardstock for the three interstage supports. You get extras if the first try doesn't work out.

In the middle are black print water slide decals, on the right are black squares cut from vinyl.

To the bottom are white print decals to go over the boosters olive drab paint.


Here's the contents of the parts bag,
Centering rings, engine hook, screw eye, two short launch lugs and elastic.

On the lower right are the control surfaces that glue onto the trailing edge of the upper stage fins.

Friday, February 16, 2024

New Way Nike Ajax Build, Part 1, Background

The New Way Nike Ajax is a clone of the original Estes kit.

Estes kit #1279 was introduced in 1976 and sold for $6.00. It was available until 1981. Designed by Wayne Kellner.

The New Way version is 30.75" tall
The lowest tube is a BT-55, followed by a BT-50 with the short tube at the top a BT-20.

Lower fin span is 6.75". 
Weight is 2.5 oz. 

Recommended engines - B6-4 and C6-5.

There are 15 fins (big and small) and eight tunnels. It's a challenging build with lots of wood grain to fill.

The build starts tomorrow - 


Wednesday, February 14, 2024

Estes Selling Kevlar?


Estes is finally selling Aramid Cord! 
Aramid cord is Kevlar.

Kevlar is fire resistant, not fireproof. 100 to 150 lb. Kevlar will degrade from ejection charge exposure and eventually break through after 10 - 15 launches.
What's the advantage to using Kevlar?
In LPR smaller body tubes it is attached to the engine mount. There isn't a tri-fold shock cord mount to block the ejection of your parachute or streamer.
I prefer Kevlar tied to an elastic shock cord. That tie point should be below the lip of the body tube (unless you use a "bumper") or you can get a "Zipper" where the Kevlar can tear down and through the body tube.

Saturday, February 3, 2024

Orlando R.O.C.K. Launch, February 3, 2024


The January ROCK launch was cancelled, today's weather report was promising. Many were ready to fly. Low winds and a high of 72 degrees.

First up for me was the EAC FIRECAT clone with an A8-3. 
Textbook flight landing close. Estimated altitude was 250'.


I hadn't launched the HONEST GOON in a while. It's a heavy model with that BT-70 diameter nose cone so I felt safe using a C6-5.

Probably got to 425' with a reefed chute bringing it back.


Carl Campbell launched his Odd'l Rockets F-18 Hornet twice with B6-4 motors.
I liked his paint variation, something he knew from his service days.


When it warmed up, the winds picked up to 10 mph. 
A few flyers had their rockets hang in the trees.
Kirby joined us today with his extension poles. I know he got two rockets down..


I have two Semroc (Centuri) ASTRO 1 rockets built, both with different catalog décor.

Todays flight was the 1971 catalog look with a B6-4. Altitude would be an estimate at 450 feet. Another "hillbilly hat" reefed chute helped keep recovery close.

To see the 1971 catalog look, CLICK HERE


Another B6-4 flight was the New Way SQUARED MAX.
Fast off the launcher to 450'. 

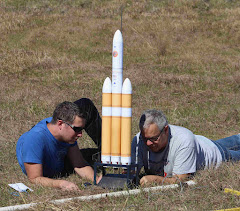
Here's Carl and his son Jason with a new RSR Delta Heavy. 
The strap on boosters hold D12-3s, the center sustainer a E9-4.

Launch was impressive, he didn't get simultaneous ignition of all three parallel motors. The side boosters separated early while the center flew straight up. Carl plans to augment the SRB attachment points.


Not shown, Fliskit MACME SHREW on a MMX Motor. 
Every launch should include one MicroMaxx flight.
For me, five up, five recovered with no damage. A good day with decent weather.