Showing posts with label Finishing. Show all posts

Tuesday, July 6, 2021

Estes Space Twister #7258, Part 6, Primer & Fin Gluing


With the engine mount glued in,
The body tube got a shot of filler/primer and sanding to surface. The three fin position lines were scraped for a stronger root edge glue bond.

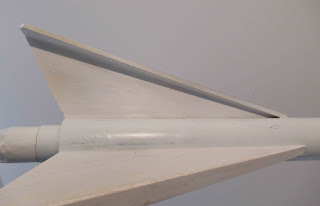
The picture on the right shows the fins glued in place.
Fillets were interesting - it's hard to smooth out a fillet on the inside top under the spin tab.
Look close and you can still see some balsa grain after the first shot of gloss white. There is also some roughness where the spin tab is glued on. 

I rubbed some CWF filler into the balsa pores. If you do this after spaying paint, used very little  filler and remove as much of the filler as you can. Sanding filler this late in the game - the filler dries harder than the balsa. You don't want to be re-sanding more than you have to. Sometimes the filler are will show after the final paint is dried. 


Here's the model after light sanding, ready for the second coat of gloss white. 

Sunday, September 20, 2020

Keeping Flat Finishes Clean!


On Facebook,. Tao Zero Rocketry posted this picture:

"Chas Russel brings up the Pod Bay Door's "Uprated Saturn 1B" for its first flight." 

Notice the white gloves.
Once at a club launch, somebody let me know: "Your rocket isn't scale unless it has a gloss finish!"

If I were entering a NAR Scale Competition, my entry would have a flat finish. 
For sport flying? I use gloss finishes. Flat finishes get dirty very quickly. That's why Chas Russel is wearing the gloves!

Monday, November 25, 2019

Rescue & Restore!

While not Model Rocketry related, I found these videos very interesting. Some people buy older, finished rockets on Ebay and restore them to flight.
This video is from a group called "Rescue & Restore" where old metal Tonka style toys are brought back to better than new condition.
To see the video: CLICK HERE


I've never watched the curing of a powder coat finish before. It goes from a flat finish to smooth gloss in an oven.
In the picture above, rivets are set using a clamp. Notice how the stick on decals are applied, using the tip of a knife blade - where have you heard that before? 
The video finish is worth waiting for - be sure to watch through to the end.

Tuesday, October 25, 2016

Semroc (Estes) Starship Excalibur Build, Part 25, White Coats, More Sanding


You know how frustrating it is.
You think your surfaces are smooth and your fillets well rounded. The grey primer coats show things and you end up with more  sanding.

Now the white coats come. I thought I'd be finished with this one by now!

The more details, the more finishing problems.

There are still some areas that will need smooth sanding.
This build has slowed me up! I usually do blog posts in draft form two weeks in advance. I'm falling behind on this one!

Tuesday, September 13, 2016

What Happened to Butrate Dope?

Remember Sanding Sealer?
In 1974 you paid 35 cents for a small jar.
Today, a 1 oz. jar of Aero Gloss Clear Dope retails for $9.49!!!

Butrate dope has gone out of fashion, it's hard to find at the dwindling brick and mortar hobby shops. Few people take the time to build "stick and tissue" Guillow's style models. Most all R/C planes are ARTF or RTF. Some websites now recommend using a glue stick to apply the tissue.

When I started, C engines were the limit, D engines were coming. You brush painted your rockets with Dope. If you only had A and B engines you were concerned about finished flying weight. NAR competitions were popular and everybody was reaching for the highest flight.

Spray paints are heavier than a dope finish. Brushed on dope never looked as smooth as a spray painted model.

Friday, March 4, 2016

Spot Sand and Polish TIP

Sometimes after the paint dries you'll find a raised speck of dust or a small blob of paint.
Sure, you could sand it all down and shoot it a second time, but you run the risk of it happening again.
Here's how I take them down and polish them out.

When I first started building rockets, the finest grit sandpaper I knew of was 400 grit. Later in life I found finer grades all the way up to 2000 grit! To polish a finish 400 grit is too rough.

To get by in a pinch, if you don't have any 1500 or 2000 grit - 
In the picture I'm "sanding" off some of the rough surface of some old, used 400 grit with a old piece of 220 grit.
The 220 grit removes a lot of the roughness and smooths the 400 grit down to somewhere between 1500 and 2000 grit.
If you go long enough, the 400 grit will feel almost like a piece of smooth paper, but will still lightly rough up a painted surface.


On the left I've wet sanded down some raised dust spots with the reduced 400 grit.

The inset picture shows the same area after polishing. The nose cone finish now looks like the paint is still wet.


I use Turtle Wax Polishing Compound. Apply the compound with a soft cotton cloth, I use squares cut from an old T-Shirt.
Wet the cloth, pick up a little compound and polish.

TIP: A trick to a wet shine is not to polish in just one direction.
Polish up and down, then side to side.

Monday, September 28, 2015

Flat Finish to Semi-Gloss? TIP

I wanted to paint the upper tube on the Estes QCC Explorer gloss grey.
I didn't have any gloss grey but I did have some grey primer. Grey primer is a flat finish.

Years back I painted a Estes Mosquito phosphorus orange. Phosphorus colors are flat, rough finishes. I wanted it smoother and a bit shinier.

I started rubbing the dried flat finish paint with a soft cloth.
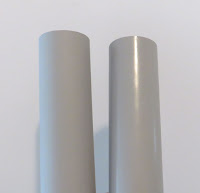
Here's the two upper tubes from the two QCC Explorers I'm making right now.

On the left is the grey primer, a dull no gloss finish.
On the right is the other tube after a brisk rubbing with a paper towel. I also ended up using some polishing compound to bring it to a higher gloss.

This is not a high gloss finish but a semi-gloss. I would assume a decal would stick better to this glossier finish.

This polishing tip might be a little tough to do in tight or inside areas. Be careful, you could scar a softer balsa wood fin or nose cone.

Wednesday, July 29, 2015

Polishing Plastic? Tips

Dale Bills wrote:
Chris, 
 I searched your building blog for any mention of how to polish and buff plastic parts such as the fins and nose cone in the Estes Pro Series II E2X Mammoth. The fins and nose cone are molded plastic. The fins are two-piece molded plastic that you glue together with CA. The nose cone is also injection molded plastic. After gluing the fins together, I had a few CA drips and finger touch points that I sanded off with #0000 steel wool. I also used the steel wool on the mold seam of the nose cone. 

Now, to avoid having to paint these black plastic pieces, I'd like to polish and buff them back to their original plastic shine (not high gloss, but an acceptable matte shine). Any suggestions on how best to do that?

Best to you, Dale  

My response:
Hi Dale,
A few years back I assembled a Magnum model for the Quest demo launches at a NARAM.
I was surprised how well the black plastic nose cone and adapter polished up without any paint.

I got there by using finer and finer grades of sandpaper.
A bead of medium CA was used to fill any recesses at the molding seam. That was sanded smooth with 220 grit on a block.
From there I went to 400 grit and all the way to 1500 grit.
(You can get the fine grits at auto supply stores)
Then polishing compound and final rubbing with a soft cotton cloth.

It ended up very smooth and with a good gloss black finish.
The picture at the right is my Magnum model from the Quest website.
Good luck and I hope this helps out - 
Chris Michielssen 

Tuesday, March 10, 2015

Estes Payloader II #3022 Build, Part 17, Future Shine Over Metallic Paint

I was actually excited to find the Rustoleum Metallic Red at a nearby Ace Hardware Store. This was the same brand of paint that gave me such great results on the Quest Stiletto. On that model I used the metallic black and silver paints.

This paint is very forgiving. Apply with light coats and no heavier finish coat.
I wish the paint dried and shined like the cap on the paint can.Because of all the tiny metal flakes in the paint you don't end up with a glossy finish. But under sunlight the paint shimmers.
I rarely use Pledge with Future Shine (or whatever they call it this month).
Some builder's brush it on thick and let it drip dry. That just didn't work for me.

The white paint on the body tube of the Payloader II was very glossy. The metallic red fins and nose cone weren't as shiny. I tried the Pledge on the red. I used a Q-tip dipped in the Pledge. Before "brushing" the excess Pledge was touched onto a paper towel. The Pledge is water thin, I didn't want to apply too much and get drips.
The nose cones were slightly pulled out of the tube so the Pledge wouldn't "glue" the nose cone in.

On the left is the red paint as sprayed and dried.
On the right is another Payloader II with the Pledge applied. Enlarge the picture and you can see the finish looks deeper and more glossy. The metallic specks show off even more.

I do use the Pledge on decals to seal the edges onto the surface. For me the trick is to apply enough to get a smooth gloss but not enough to drip.

Thursday, January 8, 2015

Before That Next Color Coat - TIP

After sanding and right before color coats - 
Brush down the surface with a soft brush concentrating on the nooks and crannies.

I don't use tack cloths, they can leave a sticky residue on models.
After sanding there can be sanding dust and small bits of paint on the surface. With the naked eye, you won't even see half of the leftover crud.

The soft brush will get rid of paint and dust specks you'd end up seeing on your final finished surface.

Saturday, February 15, 2014

Red River Rocketry Starliner DST, Part 8, Sanding The First White Coat


After the gray primer was sanded down a first light coat of white followed.
After the white has dried you'll be able to see any glue fillet irregularities.
The glue bumps usually show up where the leading and trailing edges meet the body tube.

Here you can see the sanded area at the top of the fin. The white has been sanded back and gray primer is showing through.
You can be as careful as you want but there will probably be Titebond M&TG "boogers" showing up under the first color coats.
Lightly sand them down with 400 grit and the next color coat will look smoother.
This is an extra step that could bring your finish to the next level.

After all this prep the model gets another light white coat then the final "wetter" coat of gloss white.
The model is painted and overall white. The decals make the model on this one.

Saturday, December 14, 2013

Estes Paveway III Build, Part 10, White Undercoat and Sand


After the first white coat the dried the fillet boogers were sanded down with 400 grit.


The same fillet sanding was done on the back end along with a little more sanding of the tail cone joint seam.
Another coat of white followed.

The back end is gray to just above the fin can.
This mask intersects the launch lug. I should have looked ahead and planned better. If the lug was glued about 3/8" higher the mask would have been easier, but I followed the kit directions.

A small strip of Scotch tape was placed. It's easier to work around the launch lug first and then go around the tube with a longer piece. The ends of the longer piece end on either sides of the lug fillet.


After the gray mask was pulled, here's the color separation.
It's pretty clean and will be covered with an aluminum band later on.
This is the great Fixall gray spray paint mentioned earlier on the blog.


Here's the back end view.
There are a lot of complex surfaces here, most got fillets of Titebond M&TG. It came out well.

Sunday, September 29, 2013

Primer Colors?

On the forums, there is always questions about primers.

From an internet search:

"Primer allows the final color coats to adhere better. Primer is designed to adhere to surfaces and to form a binding layer that is better prepared to receive the paint."


I've had the best results using Duplicolor Filler/Primer shown at the right. 
It's available at auto supply stores.
This Filler/Primer does two things, fills imperfections (after sanding) and primes the surface before a white undercoat.

From the Duplicolor website:
Filler PrimerDupli-Color Filler Primer features a hi-build automotive formulation capable of filling deep scratches and minor surface imperfections. A fast-drying, sandable finish allows for easy feather edging while providing a smooth and rust resistant surface that promotes top coat uniformity.
  • Improves top coat adhesion
  • High build formula
  • Easy sanding properties
  • Dry to touch in 30 minutes
  • Handle in 1 hour
This Filler Primer does a great job of "follow-up" filling of any remaining body tube seams and balsa grain.
After fine sanding the gray primer down, a white undercoat always precedes any color coats.

So, one way to go - After filling the balsa and body tube seams - 
Use GRAY primer/filler first then follow with a white undercoat (or white primer) to make the final color coats brighter. 

Most primers are used for car finishes, where a large area gets a single overall color.
BLACK primers can be used if the overall rocket color is black. If you use a black primer, fewer black final coats will be needed. 
RED primers are heavy fillers, made to fill scratches on car finishes, not normally for hobby use. Many builders use red Bondo Spot Filler on body tube seams with good results.
GREEN primers are used on bare metal to prevent rust.

Saturday, April 27, 2013

My Finishing Schedule Tips Part 2


3. Light white undercoats always follow.
Hold your dry, painted parts up to a bright light and look for any rough spots.
Dry sand the rough areas. You don't have to sand these all the way to the surface, just rough up the area. Don't wet sand yet. If any water can get down to the tube surface it'll swell up! The same goes for the wood surfaces. Dry sand for now. Wet sand (if needed) after the final color coats are applied.


4. I still follow the spraying advice from the old catalogs.
Use light coats first then finish with a final heavier "wet" coat. This has served me well over the years.
The heavier final coat is tricky though. Slow down the spraying passes over the model. Lay it on heavier, but not heavy enough to cause drips.

The models pictured here were painted using these steps. Future clear coats were not applied or needed.

My finishing techniques are just that, it's what works for me.
Too many factors can affect a good finish.
For instance, the quality of the balsa and seam width on the tubes. Spray paint formulations and compatibility of paints from the same manufacturer. Pile on top of that humidity, dust and insects that'll land on wet paint!

These two posts are simply food for thought. I would never tell anyone their finishing techniques are wrong.  If something works for you, keep doing it!

Friday, April 26, 2013

My Finishing Schedule Tips Part 1

On a forum thread there was talk about what goes into a good finish.
Some will use three or four coats of sanding sealer, sanding between coats. Followed by three coats of grey primer sanding between coats.
Then thin coats of paint, sanding between coats.
Then, polishing compound and wax. Decals are applied followed by a Future clear coat.

In posted pictures I've seen great results. This obviously works well for many.
If I had to go through this many steps, I'd probably never get a model done!

Here's my abbreviated steps to fill and finish:
1. I usually fill the wood grain and tube seams before the fins and launch lug are glued onto the model. You'll never be able to effectively fill and sand balsa grain near the root edge over a glue fillet.
CWF is water based and does not seal the wood. White glues will soak in and hold just as well on fins filled with CWF.
Brush the thinned CWF with the wood grain, then against the grain. This forces the filler into the grain pores.
Sand smooth with 400 grit. If you use sanding sealer it will quickly load up sandpaper. CWF doesn't clog up sandpaper.
If done properly you should only need one coat of CWF to fill the wood grain.
Any grain that remains will be filled with the grey filler primer.

2. I only use one thick coat of grey primer. Note I wrote one thick coat. First, lightly sand with 220 grit to remove most of the primer coat. Follow with 400 grit to smooth it out. I sand the grey primer until the tube color starts to show through.
Grey primer will also fill any body tube seams that remain after the sanded CWF. Note that CWF can be used on body tube seams. To fill body tube seams, mix the CWF thicker than what is used in balsa filling. Thicker CWF will adhere better and not be knocked out as easily when sanding the tubes.

Wednesday, March 14, 2012

Americana Spray Clear Acrylic

I tried the Future Acrylic clear coating a few times before.
Many rave about the results on forum posts. I was frustrated not able to get the finish others have written about.

I'm able to get a good gloss on a rocket by spraying a heavier final color coat.
You've got go be careful though, a little too heavy and runs can start.
Usually I'll do two light color coats and then the heavier final coat.

But after that - my decals were never protected. Never thinking a clear coat was necessary, the decals rarely lift or come off.

Still, I wanted to give clear coating a try.
I tried applying the Future with a spray bottle. After spraying the first time, there was bubbles and runs.
I was told to leave it alone and the bubbles would disappear when it dried. A paper towel was used to pick up the drips.
I probably tried too hard to get it smooth while it was still wet.
The Future dries quickly and my "dabbling" left an uneven surface on the ends and edges. I could see some glossy, smooth surfaces on the model though.

A foam brush was tried next with the same results.

On the Rocketry Forum, Jim Fustini posted about Americana spray acrylic:
"It is not exactly like Future, but it is an Acrylic clear coat. It gives you that "wet look" and it dries to a harder finish than Future. I bought mine at Michael's."

I figured I'd have better control with a spray clear acrylic.
Sure, Krylon has made a gloss spray acrylic for years but I've heard stories of the decals crinkling up when it is applied over them.

The Americana Acrylic was sprayed onto the recently refinished Red Max.
It was sprayed lightly first to test for any reaction on the decals. There was no reaction.
I finished up with a heavy spray of the clear like I would normally do on a final color coat. It didn't drip or run!

I ended up with the finish surface I'd been looking for - A smooth, clear wet look and protection for the decals.
The picture doesn't really show how shiny the surface is.

Many thanks to Mr. Fustini for this tip!

P.S. Don't blame me if this doesn't work for you, "crazes" the decals or ruins your model's finish. Test on scrap material before applying to your model. I'm just passing this on as a new clear coat product.

Friday, March 18, 2011

Pigasus! Reborn Part 3 Fin Positioning and White Spray


Here's a rear ham hock view to show the leg and wing positions.

You can see why I wanted the wing's root edge joint to be strong.


The open front end simply got a roll of paper to keep the paint out of the tube.


Here's how the backside was masked.

Gluing the engine mount, the rear centering ring was recessed 3/4" from the rear of the tube.

Masking tape was set sticky side out around the inside edge of the body tube. Paper towel pieces were stuffed into all recesses.

Friday, February 4, 2011

Patriot Downscale Build Part 7 Fin Edge Dressing


If there is any warping of the fins, iron over them with a dry (no steam) iron. This should take out any turns.

Cut out the fins on the thin line from the "smaller" side.

I try to design my card stock models so one side of the fin print is larger than the other. This insures full print coverage and eliminates any chance of misalignment of the backside of the fin.


After cutting, the edges will be almost "too square".

Round off the outside edges of the fin using your burnisher.
Rub over the sides to knock down the square edges.


This picture clearly shows the rounded leading edge and the three ply outside edge.


You can get a better rounded fin by applying a bead of white glue to the edges.

Apply glue and let dry.
Lightly sand over the glue with 400 grit.
Reapply glue again and let dry.

Sunday, November 7, 2010

New / Old Finishing Trim Material

At the recent Orlando R.O.C.K. NAR section launch we had two new fliers, Jason Dembroski and Art Almquist.
This is Jason with with his two stage Red Star from Red River rocketry.

Jason is a great builder and designer. He knows how to make smooth transitions and epoxy fillets.

The upper stage of the Red Star is stock, but he added a ringed booster made from the first stage of a Quest Navaho.


Take a close look all the black details.
I asked what he used for masking. He said he didn't mask at all.

Here's what he used:

If I don't have to mask, I won't! I'd rather use colored electrical tape or Monokote trim.

This black, self adhesive Contact paper is so much cheaper than anything else out there. With my 40% off coupon from Michael's, I bought a 6 feet X 18 inch roll for $4.47! This could be a lifetime supply.

PLEASE NOTE:
Other colors of Con-Tact brand paper might be "re-positionable, not permanant. This black, chalkboard material is permanant. Be sure to look for Con-tact Paper for Arts and Crafts.

Growing up, I knew the Contact Paper brand. But I only associated it with my Mother, covering a shelf or lining the bottom of a drawer.

Jason used the matte finish Chalkboard cover. It's very thin and the flat black with a slight texture looked great on this rocket.

I can see it being used on rockets like the Taurus, Skyhook stripes, bands on the Mark and even the trim stripes on the Hawk glider.

Wednesday, September 8, 2010

Freedom 7 Build Part 23 Fins


The steering vanes were glued to the outside edge of the main fin.

I used one glued fin and vane as the master. When gluing the vanes to the other fins I held them side by side to make sure the vanes were raised to the same height.


All the fins were set down on a smooth surface for drying, making sure the vanes were flat and even with the main fin surfaces.


Tape was set down sticky side up on an old cutting cardboard to hold the fins vertical for the gray primer coats. Set the fins far enough apart to allow easy spray coverage.

The fins are masked and painted off the model. Notice the back end of the fin hanging over the back of the board.