Showing posts with label Replaceable Kevlar Mount. Show all posts

Sunday, March 26, 2023

Estes EAC VIPER #0820, BT-55 Upscale, Part 9, HD-EM Gluing In The BT-55

With the engine casing in place holding the block against the top bend of the hook,
Now you can apply a glue fillet to only the top of the engine block joint. Remove the casing after the glue fillet dries.

Feed the loose end of the Kevlar into the tube from the rear. Slip the already tied loop over the rear end of the tube and  and over the hook. Slide the loop up against the ring.
DON'T GLUE THE TIE LOOP IN PLACE! 

After a few flights you can slip off the loop, pull out the line and check the condition of the Kevlar. Kevlar is flame resistant - not flame proof.
Eventually Kevlar will get charred, break and need replacement. This mount design allows you to check and replace the line if needed.
 
The end of the engine tube and main body BT-55 tube will be even with the engine hook overhanging by 1/4".

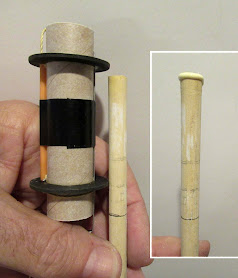
To set a line of glue inside - I measure a glue applying dowel by setting it beside the finished engine mount. Notice the pencil line below, at the end of the engine mount. The pencil line is my depth gauge.

The top end of the dowel is set just below the upper ring. This insures the top ring will hit the line of glue when the mount is slid in place.

A ring of glue is run around the top of the dowel.

The dowel is inserted from the bottom. Try not to touch the wet glue against the inside tube wall until the pencil mark is even with the bottom of the tube. 
Roll the glue line around the inside keeping the pencil reference line even with the end of the tube.

The mount is slid in place until both tubes are even.
A glue fillet is applied around the bottom ring/tube joint.

Several wraps of masking tape is folded around the Kevlar line to prevent a "zipper".
Don't press the tape around the line yet - 

Slide the layers of tape down the line so the middle of the tape is over the edge of the body tube.

Now press the tape securely over the Kevlar line.

Tuesday, October 23, 2018

Semroc Snake Jumper Build, Part 3, Replaceable Kevlar Ties

Some Kevlar is stiff, other Kevlar is soft and can start to unravel.
TIPS: I'll usually tie off the end with an overhand knot to prevent unraveling.
Run a bead of wood glue (never use CA glue on Kevlar or any string) and rub it into the Kevlar. After it dries you can cut off the knot in the Kevlar (wire cutters are easiest for this) and the line won't fray.


Here's how the replaceable Kevlar is tied on.
On the left is the low end of the engine mount. A tight loop is tied around the back end, over the hook on the other side. Feed the Kevlar line through the tube and out the top. Don't glue the Kevlar loop to the centering ring!

On the right is the upper side of the engine mount. A loop is tied in the end of the Kevlar for attachment of the shock cord.

After a few flights you can slip the loop off the back of the engine tube, slide it through the tube and see if it needs replacement.


A forward fillet was applied using a Q-tip taped to a dowel. Put a drop of glue on the Q-tip and spread it around the ring / tube joint. It'll take a few applications of glue drops to get all the way around the outside of the ring edge.

Wednesday, April 25, 2018

Estes Little Joe II (Small) Build, Part 13, Kevlar and Wrap

The engine mount has already been glued into the body tube. I probably should have tied the Kevlar loop, fitted to the BT-5 engine mount tube.

To do it after the fact,
The Kevlar I'm using has started to unravel. Some glue was applied on the last inch and a half. Twist the Kevlar as you rub the glue into the fiber winds. This stiffens the line and allows you to tie it and feed the loose end through the interior tube.

I couldn't tie the tube loop with the mount already glued in so it was tied around a scrap piece of BT-5. Tie it fairly tight but give the loop a little slack so the engine hook can have movement.

The loose end is fed through the tube and the loop fitted around the short extension of the engine mount tube. Long tweezers can help fit the loop.


The corrugated wrap is slightly formed in the palm of my hand with a 1/2" diameter dowel. Concentrate on the ends so they curve and meet at the tube joint.

Make two small tape loops with the adhesive side out. You don't want it too sticky, it could peel up a layer of paper when it's pulled off.
Before setting on the finish, corrugated side, press and peel off your pant leg a few times to reduce the adhesive.
Set the tape loops on the outside surface of the wrap, one on each side.


Set the wrap, printed side down on scrap cardboard for a shot of adhesive. The tape holds the wrap down close to the backing board preventing any spray from getting under and on the finished side.
I use the 3M 77 adhesive spray.
The 3M 45 is too light a tack, the 90 formula is too strong.

Thursday, March 23, 2017

Estes Nike Smoke #7247 Build, Part 7, 24mm Engine Mount

I'm making two Nike Smoke kits, one with the standard 18mm engine mount, the other with a 24mm mount with the Enerjet smoking nose cone.
First up is the 24mm engine mount.

I used the kits 18mm centering rings to make 24mm rings.
A D engine casing was set in the center and traced with a sharp pencil. The new larger centers were carefully cut out.


220 grit sandpaper was wrapped around the expended 24 mm casing and light sanding brought it to the correct fit around a BT-50H engine tube.


The tubes were punched for an engine hook relief (at the bottom)
The upper smaller holes are for a cotton swab plastic tube. The mount will have a replaceable Kevlar line feature. The small tube will guide the Kevlar through from the bottom centering ring tie.

Wednesday, February 15, 2017

Nike Goon Build, Part 5, Engine Mount


On the Goony models the engine mount is set in farther up in the body tube. This puts the center of gravity forward and makes for better stability.
The bottom bend of the engine hook is even with the bottom of the BT-60 tube.


It'd be too hard to tie the Kevlar line around the back end of the engine tube with the mount set forward.
TIP: To get the right sized loop, tie the Kevlar around a BT-20 sized tube. Use a square knot. Leave a 1/2" tail on the end so you have something to grab onto when you want to check the condition of the line.

This loop and knot shouldn't be overly tight around the tube. You should be able to move the engine hook with the Kevlar line over it.


The body tube is short. You'll have to pull the end out the back to tie the attachment loop in the line.


After the loop is tied pull it through the mount and back to the top of the tube.

Nike Goon Build, Part 4, Centering Rings

These rings must have come from an older kit, these were die-cut, not laser cut.
Before punching out the centering rings they were marked for replaceable Kevlar.
Pencil marks were made on opposite sides of the rings.
Test holes were punched to check the diameter fit of the Q-tip straw.


Here's how the rings looked after the punches were made.


This is the lower ring with the larger hole for the engine hook movement.
You can see how rough the inside die-cut is.