Sunday, September 30, 2018

Quest Striker AGM Build, Part 12, Red, White & Blue Band Decals

This is going to be interesting.
I have some blue Trim Monokote, but no red and white. The three bands are cut to 3/8" wide.

TIP: To make a red band decal I sprayed gloss red paint on a white background decal sheet. This will transfer like a regular water slide decal. No clear coat is needed with a spray paint decal. Cut a paint decal with a very sharp knife to avoid any flaking.

The white band is just the white decal sheet into a strip. No gloss clear coat is needed. The white also transfers like a normal water slide, it just feels slimy. A clear coat would get rid of the slimy feel, but really isn't needed in this application.


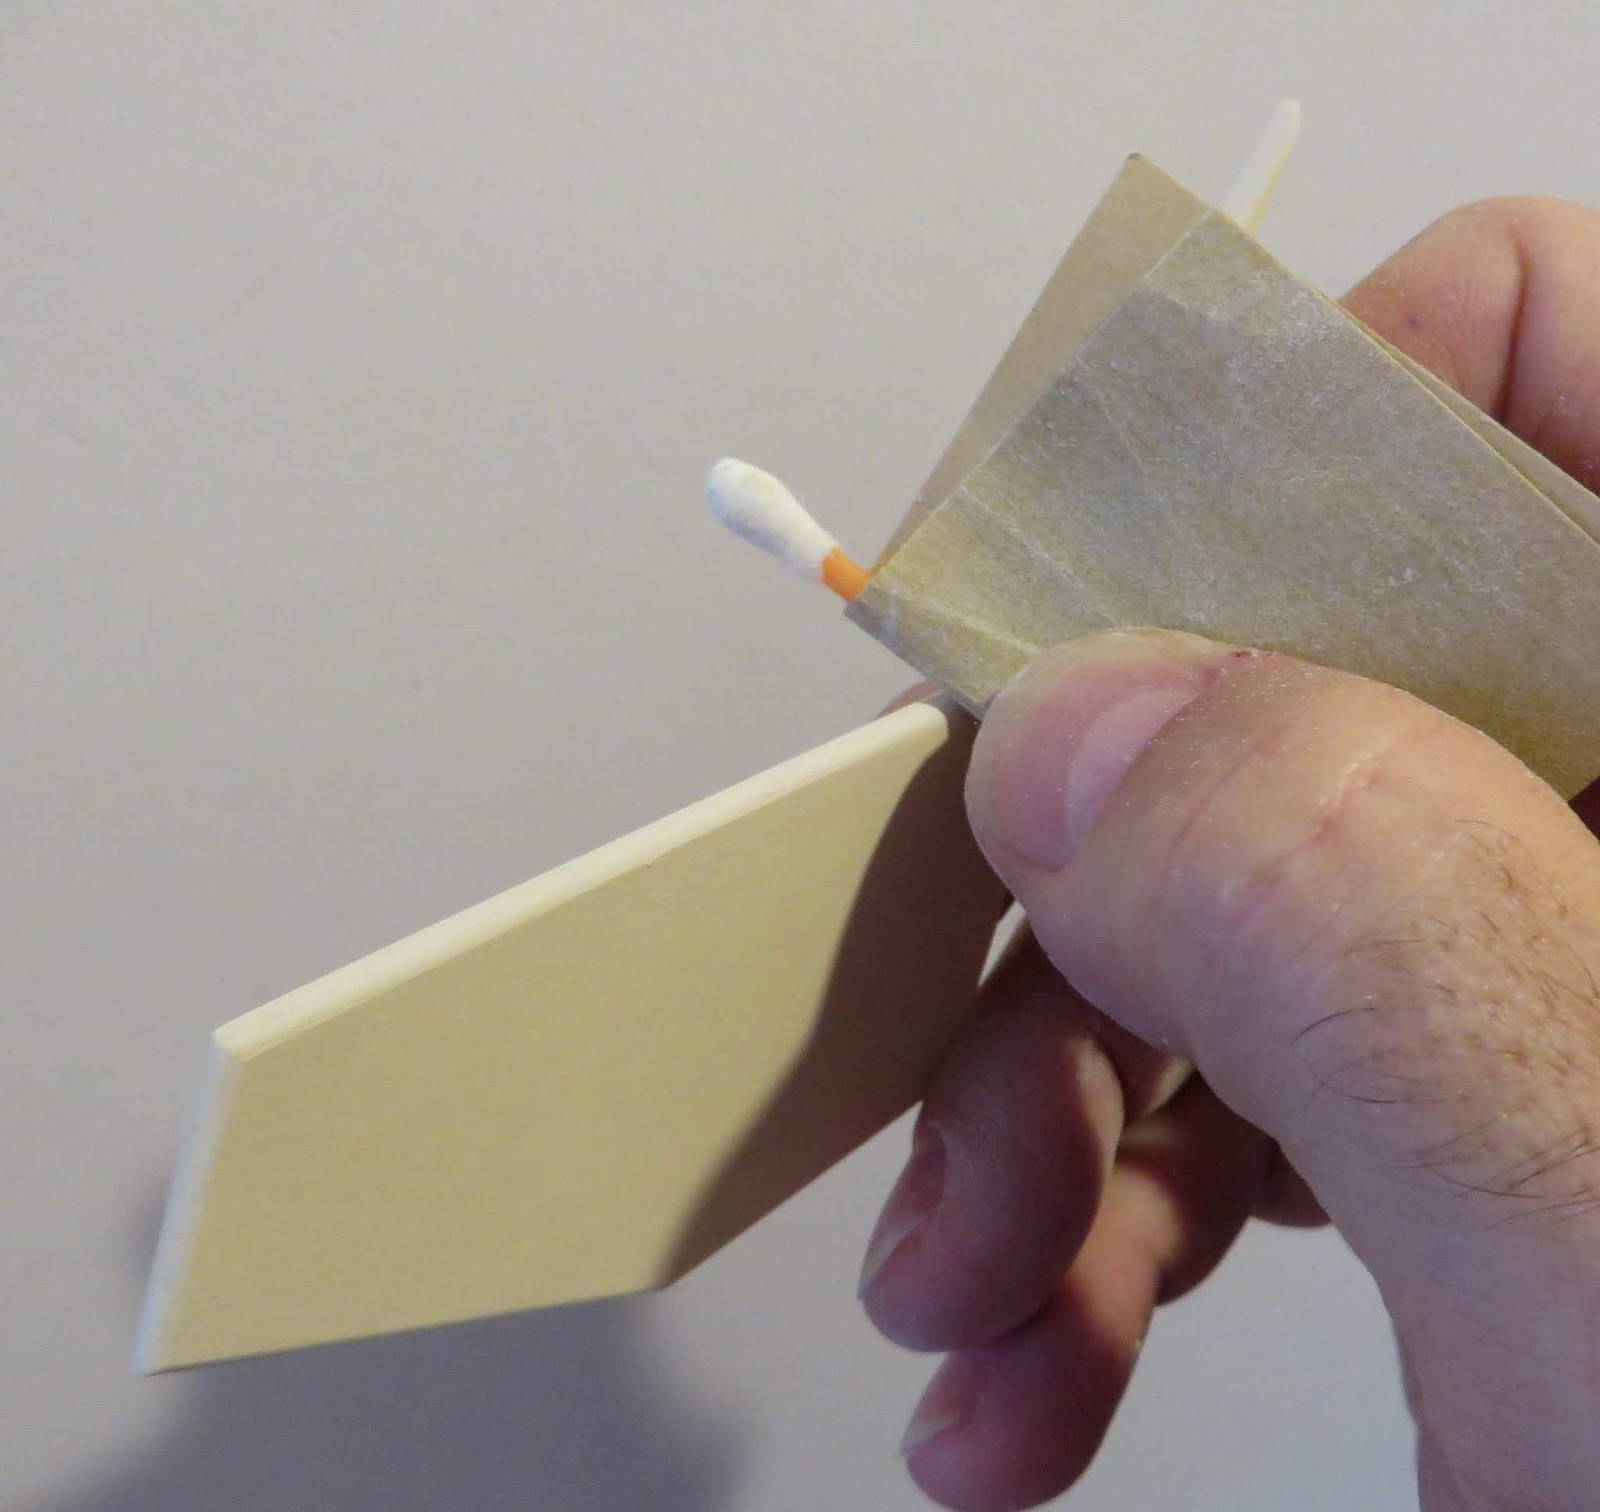
A blue Trim Monokote band goes on first right on top of the paint mask line. To keep it out of view, the end overlap is in line with a fin on the back launch lug side.


I thought I might have to do a double layer of the white decal. Sometimes a single white decal layer is translucent over a darker color. On the light gray it looked okay.


The cut red spray paint decal followed.
Look to the right of the lower fin and you can see the overlaps. All three are in line and won't be seen when the rocket is on the launcher with the lug in back.

Home Print Decal Clear Coat TIPS, Part 2


When you are spraying a lot of decals for different kits, it's easy to lose track of how many coats have been sprayed.

I keep a Sharpie handy. Each small dot designates the sheet got one coat.

Spray the second coat with the sheet in the "landscape" position. Turning the sheet helps with complete coverage.

Again, let the second coat dry for a minimum of five minutes.


Flip the sheet back to the portrait position for the third coat.

Wait a few hours before transferring onto the model to be sure the clear coats are dry.

Saturday, September 29, 2018

Home Print Decal Clear Coat TIPS, Part 1


No - this aint' no ugly puppet show.
When spraying decals you should be wearing a mask and find some sort of cover for your hand. The UV clear gloss acrylic paint is sticky and is hard to remove from your skin. I save and re-use grocery bags.


Three coats of Krylon UV Resistant Clear is about right. The clear coat will be thick enough for easy transfer, still thin enough so the decal isn't raised above the surface.

The first coat is sprayed with the sheet in the "portrait" position.

Acrylic dries pretty quick, you can do the second coat after five minutes.

Keep a cheap brush handy. Before the second and third coat, brush off any dust that could be caught under the next spraying.

Quest Striker AGM Build, Part 11, Nose Cone Fix and Decals


I got a pretty smooth coat of red on the nose cone except for a little dust fuzz.
This is one of those times where the decal could cover up that area if the fuzz is gone. I can sand down the raised thread.

To keep control over the width of the sanded area, I wrapped some old 400 grit around a Q-tip. This re-used sandpaper is probably closer to 800 grit by now.

I sanded in a straight line keeping the sanded strip in a narrow rectangle.


These are the nose cone decals. The clear border outside the black print will cover and shine up any roughened finish.


Sometimes laying a decal over a color break mask makes things more interesting. This is close to how the Astra 2000 was shown in the Enertek catalog.

Friday, September 28, 2018

Quest Striker AGM Build, Part 10, Masking


This is a relatively easy mask.
The body is light gray, the nose cone is red. The lower body is dark gray.

I could have painted the nose cone an overall red but decided to mask off the low taper near the shoulder. It's a little tricky to get the Scotch tape mask in a straight line and takes a few tries to get it in line.


I probably should have did a white undercoat but figured the light gray underneath would be okay.
Here's the nose cone after the tape mask was pulled. I got a very clean mask line.


Right above the lower fins is another easy tube circumference mask.


I used the same Rust 2X Arctic Gray paint I used on the Dragon Ship 7 model. The darker gray looks better on this model.

Above this mask line will be red, white and blue bands like in the Enertek catalog picture.

Thursday, September 27, 2018

Quest Striker AGM Build, Part 9, Paint Drying and Decal Draw


I hate humidity! If the paint would dry I would probably be finished with this one by now.

This lighter gray paint still feels sticky after two days. I don't want to risk spraying it too soon.
I drew up some decals to get the look of the Enertek Astra 2000.

Those blue "rocket" profile fin decals are a guess. It's hard to make out much detail in the online catalog pages.

The "SPACED NEEDLE" decals are for another project.


It's difficult to get the decals to the right size without placing them on the actual fin surface. A fin tracing was done and copied into Corel Draw. I did have to re-size them for a better visual balance.

Wednesday, September 26, 2018

Quest Striker AGM Build, Part 8, Gray Paint and Nose Cone Changes


On the left is the Winter Gray I used on the Dragon Ship 7 build. It turned out to be too dark.

I did find a lighter gray, the Rusto 2X Stone Gray. It's a satin finish, I might hit the model with a gloss clear coat so the decals will stick.


The gray color shown on the face card looks to be a medium gray. I've decided to go with the Enertek Astra 2000 decor, the design that inspired the Quest kit.


The raised hatches and antenna were sanded off to make the nose cone surface flat. This will get away from the Nike Smoke look. After sanding I will have to hit the nose cone with primer filler again.
That recess line that runs around the nose cone is filled with medium CA. Not thin CA, but medium, thicker CA glue.

Squeeze out a drop of CA glue onto some scrap cardboard. dip a toothpick into the drop of glue and let it dry. This prevents any more glue from soaking into the toothpick.
Dip the toothpick into the glue again so a drop is held on the toothpick tip. Run this drop into the recess line making a bead of glue that sits over the top surface of the nose cone.


It will take a few minutes, but let the CA glue bead completely dry.

On the right is that bead of CA sanded to surface. The recess line is completely filled. After another shot of filler/primer and sanding you shouldn't be able to find the line.

Tuesday, September 25, 2018

Quest Striker AGM Build, Part 7, Fin Gluing


The body tubes and fins got a shot of filler/primer and smooth sanding.

The root edge gluing areas were scraped with an old X-Acto blade for best adhesion. The troughs in the tail cone were also scraped to remove the filler/primer.


The question was asked earlier - How do you glue balsa fins onto a plastic tail cone?

On the left - the area that makes contact with the tail cone was marked with pencil. This area will get the Beacon Fari-Tac glue. The glue contains acetone that should give better adhesion where balsa contacts the plastic. The rest of the balsa root edges (above and below the gray pencil marks) will get wood glue. Above the pencil marking, the fin is against the body tube. Below the penciled area, the adhesive backed paper wrap adheres better to the balsa than bare plastic would.


I used my Odd'l Rockets FinTool to line up and hold the fins while the two different glues dried.


The smaller forward fins are glued on in line with the low fins.

A wrap of masking tape was used to line up the bottom corner of the trailing edge.

Monday, September 24, 2018

Quest Striker AGM Build, Part 6, Rounding The Fins Leading Edges

The fins are two piece assemblies. The forward strake hasn't been glued on yet.

The instructions don't mention rounding the fin edges, I didn't on the previous build. This time around I decided to round all the outside fin edges.

On the left is the forward strake and main fin with all edges square. To round all the edges you have to do a little extra work for a smooth round transition on the inside angle on the leading edge.

TIP: Sand the leading edge of the strake round before gluing it onto the larger main fin.


After the leading edge of the strake is rounded, glue it onto the larger main fin.

Now you can round the leading edge of the main fin, feathering the round corner into the already rounded edge of the strake.
A sanding block was used to start the rounded edge, from the main fin working up to the inside corner.


Here's how the round leading edges should blend with the rounded inside corner.


On two of the fins some dried glue made it difficult to sand into the corner. I wrapped some 400 grit around a Q-tip stick so light pressure could be applied for the sandpaper to "cut" into the corner.

Sunday, September 23, 2018

Quest Striker AGM Build, Part 5, Fin Fitting


Every time my old Striker touched down, a fin would crack off the plastic tail cone. What glue will adhere to a balsa and plastic joint?
For the strongest root edge joint, the fit has got to be tight.
On this fin there are three different root edge angles that have to make contact.

The other problem is, there are four evenly spaced "troughs" in the plastic boat tail used for fin positioning. This leaves a hollow area under the middle of the root edge.

Here's how the fin fit when removed from the laser cut sheet. The two bottom edges "floated" above the tail cone.

That stepped ridge at the bottom of the body tube/adapter joint wasn't the same all the way around. I marked the fins 1, 2, 3 and 4. Each fin had to be individually fitted.

On the left is fin #1 after the root edge was trimmed and sanded to fit the complex root edge.

As explained earlier, strips of pressure sensitive paper were stuck around the front and rear shoulders for a better wood glue bond.

How Many Tube Seams?


Estes has the Explorer Aquarius now listed in the "What's New" page on their site: CLICK HERE
There are NINETEEN (count 'em - 19) external tubes on this one. That's 19 tube seams to fill! You don't have to fill the seams, but knowing me . . .
This time around you have the option of the E12 engine. I would think it's a bit draggy for a D.
It's got that interesting "mushroom" shaped nose cone. Sorry, no comment - too easy.

Saturday, September 22, 2018

Interesting Ebay Clone

Here's one I found on Ebay - 


ESTES Clone OOP STAR RIDER Rocket Model Kit Vintage #2010
At first glance it looks like a OOP bagged Estes kit.
Turns out it's a clone. The seller has copied the face card and hang tag.
How can you list it as vintage when it's a clone?


Take a good look at the nose cone -
The canopy and small side wings are hand carved!
That's not an Estes parachute.
Home print decals, clear coated.
Fins are pre-cut but not laser cut.

Interesting . . .

Quest Striker AGM Build, Part 4, Nose Cone Assembly


The fit of the nose cone halves isn't the best, the MPC molds are old.

To help the fit, I sanded the side that doesn't have the raised alignment posts.
I didn't apply plastic cement until after the sides were rubber banded and aligned.

The great thing about liquid plastic cement is you can apply it from the outside, right down the joint seam. The liquid glue doesn't distort or melt the plastic like the old tube cement could.

You might see some slight residue after the glue dries but it is easily sanded off.

I did try some old, dried up Squadron Putty, but even with acetone added it was still pretty crusty. That's the gray you see, left in the sanded joint.

I ended up using a bead of medium CA on any low areas. That was sanded to surface filling the gaps.

Friday, September 21, 2018

Odd'l BT-20H Tubes Featured On Another Blog -

"Why You Should Be Excited About Odd'l Rockets NEW BT-20H Body Tubes" - To read the article, CLICK HERE

Check out the wall thickness, the BT-20H (heavy wall) tube is on the right side. These tubes are available only from jonrocket.com! CLICK HERE

Am I plugging my new product? You bet - heck it's my blog!

Quest Striker AGM Build, Part 3, Engine Mount Assembly Gotcha


Before gluing on the front and rear centering rings, sand the ends flat. This gives you a flat, wider gluing surface.


The lower ring got a notch to allow engine hook movement. The instructions don't mention this.
GOTCHA: Without the notch, the kit supplied engine hook would be bent out each time an engine was inserted or removed.
The assembly order:
1. The low ring was glued onto the tail cone using Beacon Fabri-Tac glue.
2. The engine mount tube (with engine hook and tape wrap) was slipped into the tail cone and through the lower ring.
3. The upper ring is slid over the top of the engine mount tube and glued onto the upper edge of the tail cone using the Fabri-Tac glue.
4. Wood glue fillets are applied to the top and bottom of the centering ring/ tube joints.
5. The Kevlar line was tied on to the upper bend of the engine hook by tying a loop in the line. The upper end of the engine hook was lifted out of the cut slit and the Kevlar lip set underneath. Push the engine hook back into the cut slit.

I didn't use a Replaceable Kevlar Mount on this model. Usually the tail of the line loop is underneath and inside the tube end, out of sight. If I were to use it on this kit, the loose line tail would be visible.

GOTCHA and TIP: With the balsa fin glued to a plastic tail cone you can't get a good bond. The fit of the tail cone in the tube was also loose, the shoulder would have to be built up for a better fit.

I used an old technique from gluing balsa adapters into clear plastic payload tubes. Estes would use sticky paper shroud line tabs on the inside of the clear tubes so white glue would adhere.

I had some Avery self-adhesive paper. Strips were cut the same height of the tail cone shoulder. On the right is the wrap on the upper end for a better fit in the 35mm tube.
On the left, the low end got a wrap of the self adhesive paper for a better glue bond on the low end of the balsa fin root edge.

Thursday, September 20, 2018

Quest Striker AGM Build, Part 2, Engine Mount Assembly and Upgrades

To use the Odd'l BT-20H heavy wall tubing with the 3" long Odd'l Rockets XLEH (EXtended Length Engine Hook) - available soon!
Cut the BT-20H engine mount tube to 3" long.
Cut a notch for the forward bend of the (longer) engine hook, 1/4" from the forward end.

Notice the position of the engine block - It will end up glued underneath the top bend of the hook. See the fourth picture in this post. This prevents wear and tearing of the engine mount tube.

Here's a dry test fit of the kit supplied centering rings. The fit was very close, it took a few easy passes of 220 grit around the center hole for a friction fit on the slightly wider diameter BT-20H tube.
I did the test fit to mark the rings for a notch cut at the engine hook locations.
Looking ahead - 
GOTCHA: Here's the first problem in the instructions:
If you do a tape wrap around the engine hook, you won't be able to slide the tube (with the tape wrap) into the tail cone after the centering rings are glued on the ends.

So - First, glue the smaller low ring in place on the small end of the tail cone adapter. The engine mount tube is slid in and through the lower centering ring. Then glue the top ring over the BT-20H and down onto the tail cone.


The engine block is slid in from the bottom, dry no glue yet.
Use an engine casing to push it up and against the upper bend of the engine hook.
Leave the engine casing in place for now. From the top, apply a glue fillet locking the engine block in place. Remove the engine casing.