Sunday, April 30, 2017

New Rotary Punch? Tools - TIP

I use a rotary punch (leather punch) on almost every rocket build.
Holes are punched in centering rings, these are some hand cut rings so the center holes are a little rough.
Instead of punching holes in parachutes with a pencil I make shroud line holes with the rotary punch.
TIP: When punching small shroud line holes in a parachute, always place thin cardboard underneath the plastic sheet for a cleaner punch.
On the right are holes punched for an altimeter payload. Punched holes are much cleaner than a hole drilled with a knife blade tip.

After a few thousand punches my old rotary punch was getting dull. I bought a new one at Home Depot, The name brand was "GENERAL", it has black handles. I can't recommend this brand.
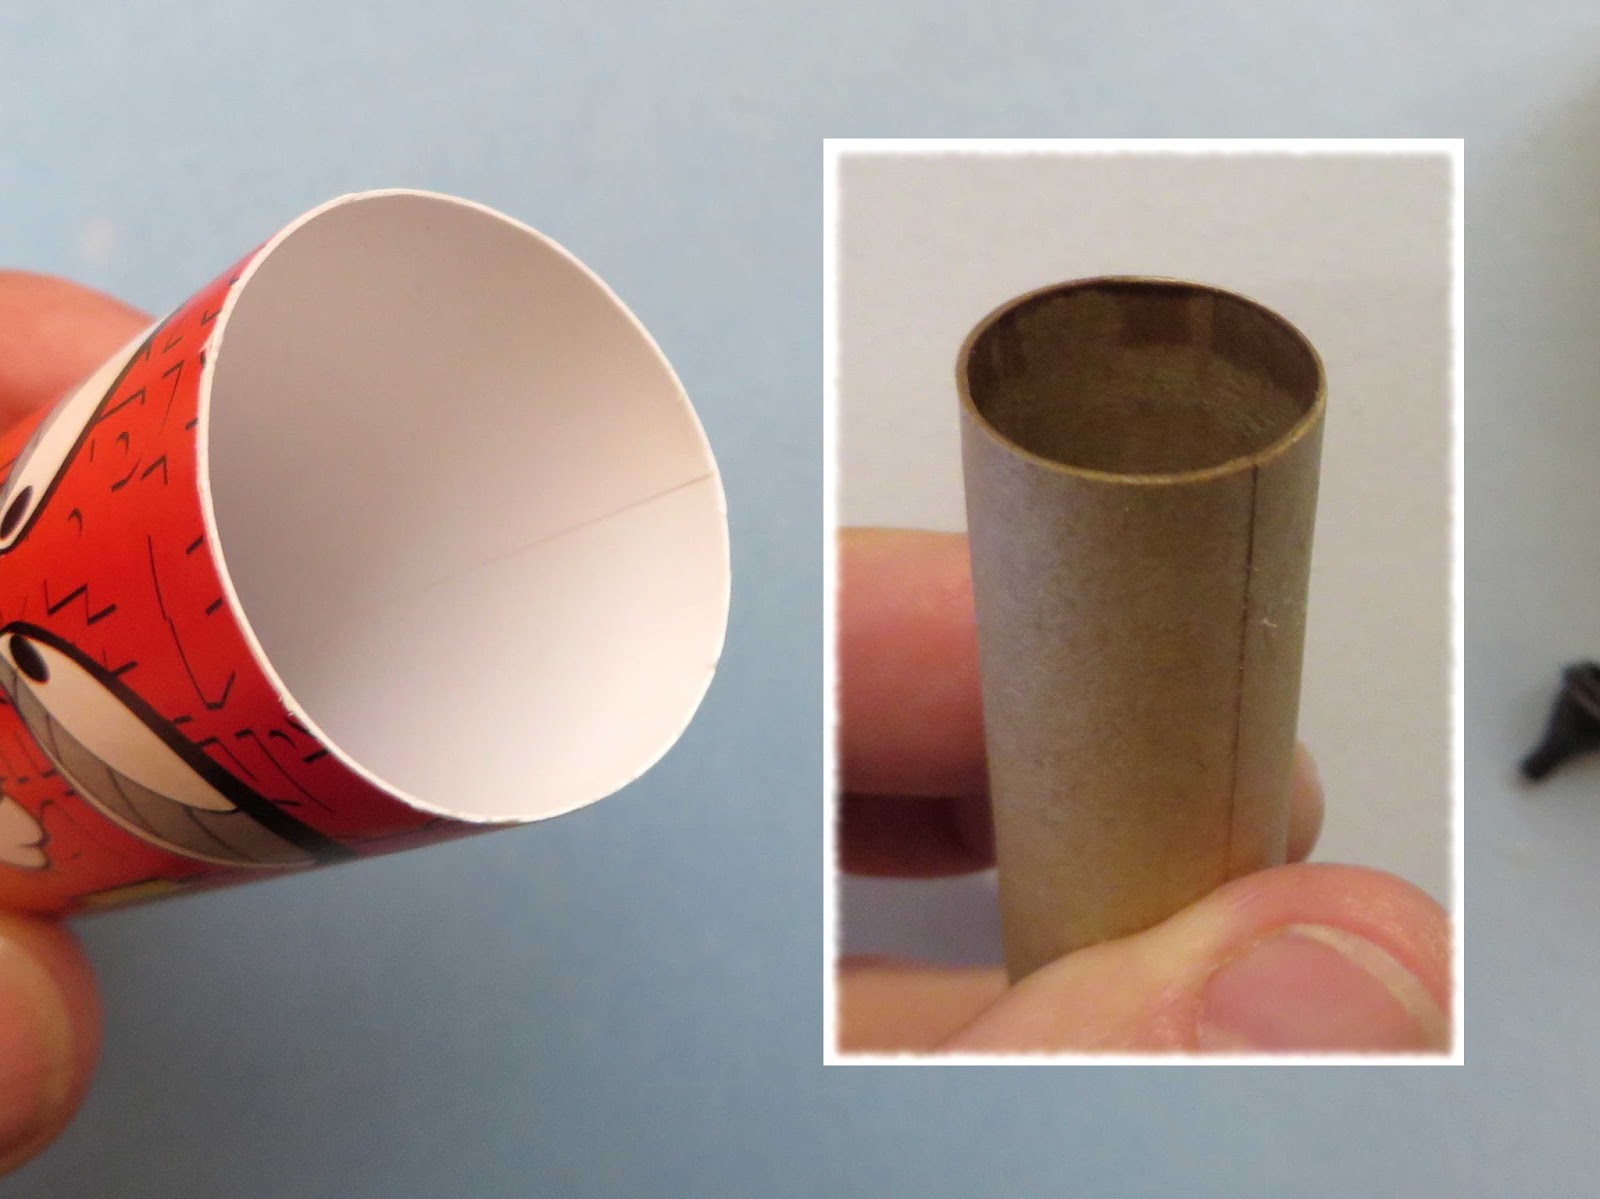
Look close at the punch tubes. The tubes on the right have a slight taper at the cutting edges as if they are sharpened. The General brand punch certainly works but the tube ends aren't sharpened.
The two holes on the left were punched by the Home Depot General brand punch.
The two holes on the right were punched using the tool I bought today at Michael's crafts. This new punch has red handles. You can easily see the difference in the cut.

On a recent purchase at Michael's crafts I signed up for their emails. About twice a month I get an online coupon for 60% one item! With that coupon my new, better punch was only about $4.00.
My local Michael's doesn't have a great selection of rockets, but I'll use the coupons for other supplies.

MPC X2 Invader Build, Part 4, Ends and Edges


The blow molded nose cone did have some seams. I did my best to smooth them out but didn't do any seam filling. Heck, it's only a five dollar rocket. I'm not going that crazy with this one.
I don't know why this picture came out orange.


The attachment hole needed to be cleared for tying on the shock cord.
I used the Duncan Uni-Knot.


The small black nozzles are glued into small holes in the back of the fin can.
The holes were too small and were enlarged with a small diamond file. A small amount of glue was set into the holes and the nozzles pressed and turned into place.

The 18" parachute is too big for the model. I would think packing this big chute in a BT-55 sized tube would be tight, not leaving any room for wadding and the shock cord.
I'll be substituting a 12" chute in its place.
The chute colors aren't a great match for a red and yellow rocket.

Saturday, April 29, 2017

MPC X2 Invader Build, Part 3, Fin Can

An elastic shock cord was tied to the Kevlar. The entire shock cord was rolled up and stuffed into the engine mount tube.

Before gluing the fin can into the tube, line up the pre-printed tube graphics so the Marvin art and rocket name are positioned between two fin slots. In the right side picture I made pencil marks on the fin can for alignment on the back tube seam.


A bead of the Fabri-Tac glue was set down inside the tube and the fin can slid into place.
The pencil mark on the fin can was aligned with the overlap seam on the body tube.


The fins were slid into the fin can slots.
Thin Ca glue was dropped onto the top and bottom joint and allowed to run inside the joint.

One side of the launch lug was roughed up with 400 grit. I was surprised how well the lug adhered with just wood glue.

The two small lugs were aligned with the aluminum angle.


Friday, April 28, 2017

MPC X2 Invader Build, Part 2, Engine Mount


I replaced the engine hook with one of my own.
The kit didn't include an engine block. I added a 5/20 centering ring for an engine block.

The engine hook end was slipped through a slot cut into the tube end.
Just enough Scotch tape was pressed over the hook to hold it into place. Too much tape (or a full wrap) won't allow the tube to slip into the plastic fin can.


A small slot is cut into the engine block and a length of 150 lb. Kevlar tied around the ring.


The instructions show the engine mount tube being even with the flat end of the fin can. I glued my mount with a very slight bit extending out the back. This allows for a fillet to be applied. Fillets were added on the top and the bottom.

I used the Beacon Fabri-Tac glue for all plastic to plastic and tubing to plastic joints.

MPC X2 Invader Build, Part 1, Parts


The parts were actually pretty good.

The tube one the left is flipped upside down, Marvin Martian should be at the bottom.

I was glad to see the NAR Membership Application included.

Those tiny black nozzles would be easy to misplace.

The main body tube feels like its made of convolute wound (not spiral wound) plastic. Enlarge the picture and you can see the interior seam running down the tube length.

The engine mount tube is rough. I had already gave the tube end a wipe of medium CA glue when the picture was taken.


These parts will be replaced, well except for the engine mount tube. I decided to use it.

The engine hook was easily bent, it wasn't spring steel.
The thin paper tri-fold mount won't be used.

Thursday, April 27, 2017

MPC X2 Invader Build, Background


Why another MPC branded model?
I needed some ST-7 tubing and ERockets.biz are the only vendor left that carries it. The MPC kits are on clearance at $5.00.

The box still proclaims: "Flys up to 260 feet!" Every different model design in the MPC lineup says the same thing. My MPC Red Giant (another Sky rocket re-brand) did get to 427' with an Estes C6-5.


Besides that, Warner Brothers characters are a favorite of mine, even thought this model looks nothing like the Duck Dodgers cartoon rocket seen at the right. Sometimes it's a nice change to put together an easy one.


I find these kits interesting to see how things are done in China.
I don't think I'd launch this one with the Quest A6-4. At 2.2 ozs it might be on the ground when the parachute deploys.


This rocket is the same kit at the Sky Long March 3, a semi-scale model of the Chinese launch vehicle, with a very different decor.

This picture is from the Apogee Components website.

Odd'l Rockets Goony G-16 Build, Finished


This was much better than building another F-16 prototype! I like Goonys.
If the regular Odd'l F-16 sells well I might bring this one out as a companion model.
What do you think? Is it worthwhile to produce as a kit?
I had two stable flights with a B6-4 and C6-5 last Saturday.
A quarter ounce of nose weight was added to help place the C/G forward.

Wednesday, April 26, 2017

Odd'l Rockets Goony G-16 Build, Part 10, Nose Cone Divot Touchup - TIP


The canopy is glued in place  using CA glue.
CA glue can get brittle over time. I'd recommend adding a bit around the edges every once in a while to keep it secured.

The canopy decal strips were overhanging the sides after the decals dried. these are trimmed off using a razor blade.
Look at the upper right along the canopy edge. The razor blade cut chipped some white paint showing the black nose cone plastic underneath - ARGHHHH!


For touch-ups I use the same paint I used on the body. Rusto 2X paints can be temperamental but they do blend very well on touch-ups.

A small snack bag is pressed into a mixing cup.
Paint is sprayed into the cup making a small pool in the bag.
NOTE: Metalhead1986 commented that Krylon spray paint will eat right through the plastic mixing cup!


Dip a toothpick into the paint retaining a small drop on the tip.

Set the tip into the chip recess letting the paint fill the divot. Don't use the toothpick as a brush, just place the tip and let the paint run into the chipped area. It might take two tries to fill the hole.


Pick up any excess paint outside the divot with a Q-tip.

It's not perfect but a whole lot easier than masking and spraying again.

Odd'l Rockets Goony G-16 Build, Part 9, Decals TIP

I always read of water slide decals  problems. Some builders dread them and won't even try to apply a decal.
In my Odd'l Rockets kits I include "Extras" or practice decals. Start with those smaller extras first! It's tempting to apply the largest, most colorful decals but save them for last after you get a feel for the decal soak times and how they transfer.

TIP: Always wet the surface of the model with a wet finger. Rub the water back and forth and leave on the surface.
This gives the decal some surface lubrication and lets you position and re-position the decal until it is where you want it.

When re-drawing decals for a Goony you should poke fun at the original design.
Obviously you include the word Goony on the decals. I replaced the stylized eagle with a duck. The duck wasn't part of the first Goony F-16 build, the decal was changed after the model was finished. The center star was changed to a target with cross hairs.
The CAUTION decals made me think of things my Mother would warn me about.


Some of the references are a little inside like the number on the rear of the rudder decal.
The DANGER decals near the canopy were changed to DANGME.

Tuesday, April 25, 2017

Odd'l Rockets Goony G-16 Build, Part 8, White Paint and a Fix TIP


This is an easy one to paint, it's all gloss white.

After one coat I sanded down any rough fillets and glue blobs.


To keep paint out of the front end of the tube a wrap of masking tape went on the inside end.

The nose cone was painted separately because the Rusto 2X seems to take much longer to dry on plastic.
To hold the nose cone, masking tape was set down on one edge of some copy paper. This was wrapped around the nose cone shoulder.


I couldn't get a smooth surface on the bomb support sides, they are hard to reach with sandpaper.

So I cheated!
TIP: A piece of white decal paper was cut to size and set over the rough support surface.
This isn't something that works all the time, this is in an area nobody would probably notice. But it did cover and smooth out the rough side some.


Here's how it came out. Much better, not perfect but better.
I followed up with some Future clear acrylic applied with a Q-tip.

Odd'l Rockets Goony G-16 Build, Part 7, Canopy Continued


After flexing the scored line back and forth it should crack on the cut. If it doesn't easily crack, go back and lightly score the line again. Don't pull or tear the sides off, score and crack!


The edges could be a bit rough, especially around the front and rear.
Notice the pen lines are still there, they will be removed in the next step.
Wrap some 220 grit around the BT-60 tube.
Sand the bottom of the canopy back and forth over the sandpaper.

Keep sanding until the pen lines are gone, it should take about 10 minutes.
The problem for many builders is they don't work vacuform parts long enough. The Estes Saturn V fairings won't fit unless you sand them down a while. I've seen some Saturn V builds where the fairings weren't fully trimmed and didn't seat well.

You are getting close when small plastic "strings" hang off the sides. Look close at the lower right side. The sanded edge is barely hanging off the edge recess line.


This is the finished canopy from the underside. Note how clean the edges are.

Monday, April 24, 2017

Odd'l Rockets Goony G-16 Build, Part 6, Canopy


Here's how the canopy looks from the Odd'l F-16 kit.
You have to trim and sand the bottom to best fit the curvature of the nose cone. It's not as hard as it sounds.


Along the bottom of the canopy is a edge recess.
To see the line you will cut, a ballpoint pen line is drawn down the recess.
Right above the pen is a squiggly line on the cardboard. The plastic is slippery and you may have to "start" the ink a few times while tracing around the clear plastic.


Don't cut all the way through the plastic. SCORE the plastic with a sharp knife. The plastic will crack down the scored line by flexing on either side of the cut line. Don't flex the scored line yet.
Score a line all the way around the canopy. Relax and TAKE YOUR TIME!


On the corners cut a line from the scored edge to the outside of the clear piece. Here you do cut all the way through the plastic.
This makes it easier to flex and crack the scored lines in four segments all the way around the four sides.

Two New Saturn V Kits - Achhhh!


Why two kits?
I wanted to have them on hand just in case somebody wants one built. I have built a few for customers in the past.

The package lists the kit as a Skill Level 4. This should be a Skill Level 5 kit. Getting the vacuform wraps and fin fairings right should qualify it for a 5. The painting masks are very time consuming.


The last Saturn V kit I built had an additional small white background decal sheet. This sheet has the fin markings with the white ink.
The small UNITED STATES and flag decals still aren't curved to fit the conical command module.
CORRECTION: I did look closer at the decals and two of the command module decals are curved.

I don't know why the yellow backing sheet is in the box. Everything was loose and the backing sheet was nowhere near the decals.
These decals say they were printed in China but there is no Chinese print on the yellow backing paper.

Here's the newer molded fins - no more vacuform fins in this kit!
I've read where some kits included both the older vacuform and molded fins. My kits had just the new molded versions.

A D engine yellow spacer tube is included at 2 3/4" long. The instructions show the longer 3 3/4" long E engine spacer.

I won't be building these any time soon, unless someone wants to buy a finished model. My previous blog build still applies to 90% of the latest kit version.