Showing posts with label PML Lunar Express. Show all posts

Tuesday, April 18, 2017

PML Lunar Express Build, Finished


This was different! The piston ejection system was a change and I could certainly use the experience doing epoxy fillets.
It was interesting making the vinyl graphics work on a four finned model. The original Futurama rocket had three fins.
I was most impressed by the quality of the kit components. Public Missiles did a great job on this one!

Monday, April 17, 2017

PML Lunar Express Build, Part 22, Tying It Together


The parachute shroud lines were much thicker than what I am used to!

Small loops are tied at the centers of each line. These are passed through the nylon strap.

An overhand knot is made over the shroud lines locking them 1/3 the way down from the nose cone.


The end of the nylon strap is tied off at the piston ring.
This finishes off the build!

PML Lunar Express Build, Part 21, Landing Pod Gluing


Epoxy was pushed into the landing pod fin slot with a toothpick.


The pod was pressed into the fin edge. Notice the epoxy oozing out from the slot. Epoxy runs so you definitely want to watch for drips.


The excess epoxy was spread out with a Q-tip. Again, watch for drips until it starts to set up.


TIP: To prevent wobbling on the finished model, only glue three fin pods in place. Let the three pods dry thoroughly.

Use the fourth pod to square everything up. You'll be able to slide the pod up and down the fin edge slightly until the rocket doesn't wobble on a flat surface.
I set the model on the floor while making final adjustments.

Sunday, April 16, 2017

PML Lunar Express Build, Part 20, More Vinyl Trim


The Planet Express logo went on both sides of the smaller rudder fin.
I'm holding one of the landing pods in place to judge the visual centering of the rudder vinyl.


A red strip was added to all four landing pods to tie them into the red trim on the main body.

I have talked to two different people who have built and flown their own Lunar Express rockets. Both said a landing pod seemed to pop off on every landing. Epoxy was used to glue them to the outside edge of each fin. I didn't do heavy fillets, that might lead to a larger repair and paint touch-ups where the fillet would be. I tried to keep the glue area close and inside the pod slot.


Stickershock had included some extra art. I checked with the client and he said to leave them off.

Saturday, April 15, 2017

PML Lunar Express Build, Part 19, Canopy Vinyl

Stickershock had done some custom Futurama vinyl for the build.

Red Trim Monkote strips were applied down the body and onto the nose cone.
I centered the canopy position between the two red stripes by marking a piece of paper. The paper was folded in the middle giving me the center mark.


The bottom layer of the vinyl is peeled off leaving the printed vinyl on the top layer.
The upper layer is translucent letting you position the printed vinyl.
Notice the pencil line down the center of the canopy. This was lined up with the center pencil line already drawn on the nose cone.

When you are sure the vinyl is in the right spot, press and burnish the vinyl in place. The upper layer is then peeled off leaving the printed art in place.


There was some light green trim on the borders. This was lightly trimmed off cutting only the vinyl and not into the paint.

PML Lunar Express Build, Part 18, Mask and Reveal


Regular masking tape was used to completely fill the tail cone area mask.
Before shooting the darker green the fillet area masks were burnished down using a Q-tip.
A plastic grocery bag was used to cover up the upper body.


Here's the fin fillet color separation after all the tape was lifted. It came out clean with the mask line down the center of the epoxy fillet.


The fin slots in the landing pods were pressed into some scrap balsa from a previous build.
This gave me something to hold onto and allow painting from all sides.


Friday, April 14, 2017

PML Lunar Express Build, Part 17, Masking The Dark Green - TIP


All four fins are to be painted dark green.

Here's the first root edge tape. Masking this leading edge is more difficult with the curvature of the tail done joint.


The epoxy fillets leave a rounded leading edge joint.
One the left is the first three pieces of marked Scotch tape set down. More pieces are added to give a rounded end.


Regular masking tape will go down next filling in the larger areas between the fins.
TIP: To help avoid any paint lifting some of the tape adhesion is lessened by pressing the tape against the pant leg of my jeans. The tape is stuck down and lifted three or four times. This leaves fiber threads on the adhesive side. It still sticks but not anywhere near as much as the tape right off the roll.

PML Lunar Express Build, Part 16, Paint!


I went to three different stores to find the Futurama colors.
In the past I didn't have great luck with Valdspar but they had the closest light green color. Valdspar seems to take forever to dry!
Rusto 2X had the best dark green.


The model is sprayed a light green overall.
Here's how it looked after the first light coat.


Light sanding with 400 grit followed each light coat.
A final heavier coat went on last.
This semi-gloss Valdspar paint did dry evenly and fairly quickly.

Thursday, April 13, 2017

PML Lunar Express Build, Part 15, Fillets and Primer


Here's how the epoxy fillets looked after forming and sanding.


Two coats of Primer/Filler was shot and sanded between coats.
Primer coats really show what needs to be cleaned up before color coats are added.


I mentioned before how well the fillets flowed around the two large launch lugs. These fillets didn't need much sanding at all.

PML Lunar Express Build, Part 14, Nose Cone Tip Blend


I mentioned before how clean the kit parts are.

The resin nose cone tip required very little work to eliminate the joint. A little medium CA glue was ran around the seam then got some fine sanding until smooth.


There was a slight molding line down one side at the top. More CA took care of the filling.
After filling the nose cone got a good shot of Duplicolor Primer/Filler. After sanding you can see what was left in the slight recesses.

Wednesday, April 12, 2017

PML Lunar Express Build, Part 13, Rings and Pistons


The top of the ejection piston has a routed slot for the strap passage.
This was one of only pieces in the kit that needed some cleaning up. A small rat tail diamond file rounded out the slot ends.


Here's the finished piston slid into the short, main 4" diameter tube.


The interior tube is centered in the tail cone with the narrow ply ring.
This was glued into position with epoxy.

PML Lunar Express Build, Part 12, Landing Pads Fin Details

Landing "Pods" are attached to each of the four fins. These really give the rocket a 1950's era sci-fi look.

The pods are very well cast from resin. They are smooth and show no flaws at all.
They are two part, the upper and lower flat gluing surfaces were sanded flat with 220 grit on a block.


Here's the low end, the pod is turned upside down. This is a dry fit.
There is a small dimple on the bottom which I won't be filling.
The instructions recommend using medium thickness CA glue.
A fair amount was set on the flat of the longer end and the bottom pressed into place. Any CA glue that ends up on the outside is easily sanded off.

When the seams were sanded smooth there was virtually no line at all! I wish all pre-formed parts went together as easy and clean.

Tuesday, April 11, 2017

PML Lunar Express Build, Part 11, Launch Lugs


There are two 1/4" diameter brass launch lugs on the model. They are set on the bottom, side by side. Both lug ends are pre-cut at a 45 degree angle.
Straight pencil lines were made using my aluminum angle on the short central body tube piece.


I may have mentioned earlier, on lug was about 1/16" longer than the other. You can see the longer lug closest in the picture.
Both will need to be the same length. A metal file and 10 minutes work shortened the longer lug.


The tube was roughened up with 220 grit before the lugs were glued on.
I don't know why but the epoxy lug fillets went on much smoother and required very little sanding. The fin fillets needed more attention.

PML Lunar Express Build, Part 10, Epoxy Fillet Smoothing

I've been using 30 minute epoxy. I like the extra working time before it starts to set up. The masking tape "dams" are removed when the glue starts to set up and doesn't run anymore. Don't wait too long to remove the tape or it will be glued to the model!
Wear disposable gloves when using epoxy. Don't take the chance and find out afterwards that you have an allergic reaction to the glue!

With the tape removed my gloved finger is dipped into the alcohol and ran down the fillet to remove any ridges that remained at the tape edge.

After the epoxy fillet has dried some 220 grit was wrapped around the appropriate sized dowel and the fillet smoothed. It shouldn't take a lot of sanding if the fillets went on smooth. Epoxy is fluid and self leveling.

Monday, April 10, 2017

PML Lunar Express Build, Part 9, Epoxy Fillets

Always wear gloves when mixing and using epoxy!!!
If you aren't allergic to epoxy you could become allergic over time. I don't use it that often but I still wear gloves. Using Epoxy is like doing fillets with running honey. You can be as careful as you want but it gets everywhere!

Like I mentioned, my experience with epoxy fillets is limited. Please don't comment and tell me: "That's not the way I do it!" This is simply my experience from other's posts on the Rocketry Forum. 


Mix up small equal parts of part A and B.
You'll only be able to do two facing fillets at one time so you won't have to mix up very much initially.
Some builders add Micro Balloons to their epoxy mix. The small silica beads thicken the mix and make the fillets easier to sand after it dries.

I applied the fillet by picking some up some epoxy on a dowel and dragging it down the root edge joint.

To smooth out the fillet you can use the same diameter dowel you used to mark the fins with pencil. In this case I used a rounded popsicle stick that matched the dowel diameter.
Dip the stick into the purest alcohol you can find. This is 90% pure. Shake off the excess alcohol.

Run the rounded stick end down the fillet. This will push some of the epoxy out of the fillet and onto the masking tape on either side of the fillet area.
Run your dowel or rounded stick down the fillet for a few inches and wipe off the excess. If you tried to do the entire length of the fillet in one pass there will be too much excess epoxy at the end.
Epoxy runs and is self leveling. A big drop at the edge of the tape could run down and back into the fillet.

PML Lunar Express Build, Part 8, Getting Epoxy Fillet Ready

My experience with epoxy fillets is pretty small. Here's a technique for masking the fillets I learned from the Rocketry Forum.
For me, fillet width or thickness should reflect the size of the rocket. Big rockets get bigger width fillets, small rockets get smaller.

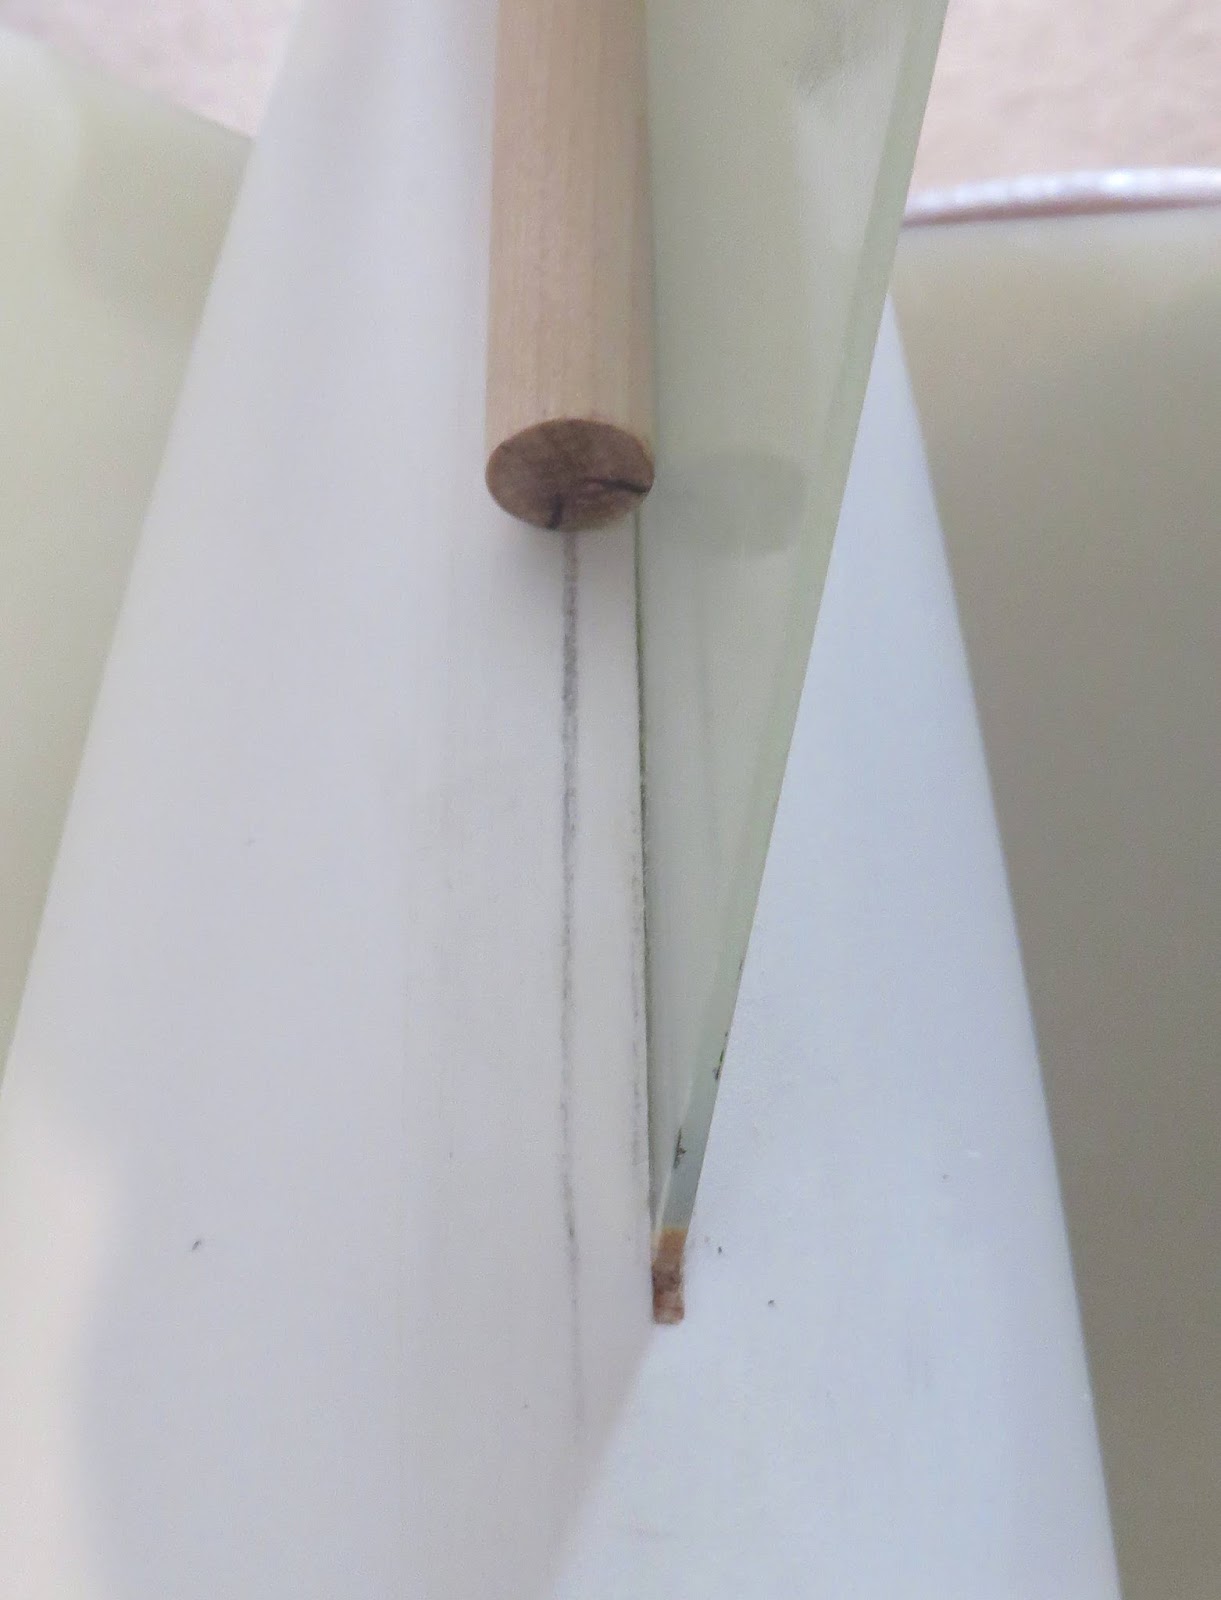
To mask a consistent width epoxy fillet, find a clean dowel. With a soft pencil, mark up the sides of the dowel end at the 6 and 9 o'clock positions.


Rub the dowel back and forth down the root edges of the fins transferring the soft pencil from the dowel to the rocket.
This will eave a consistent spaced line on the rocket body (in this case the tail cone) and the side of the fin.
The transferred pencil line is the masking line for the epoxy fillets.
You will want to use masking tape the keep the runny epoxy central and in the fillet areas.

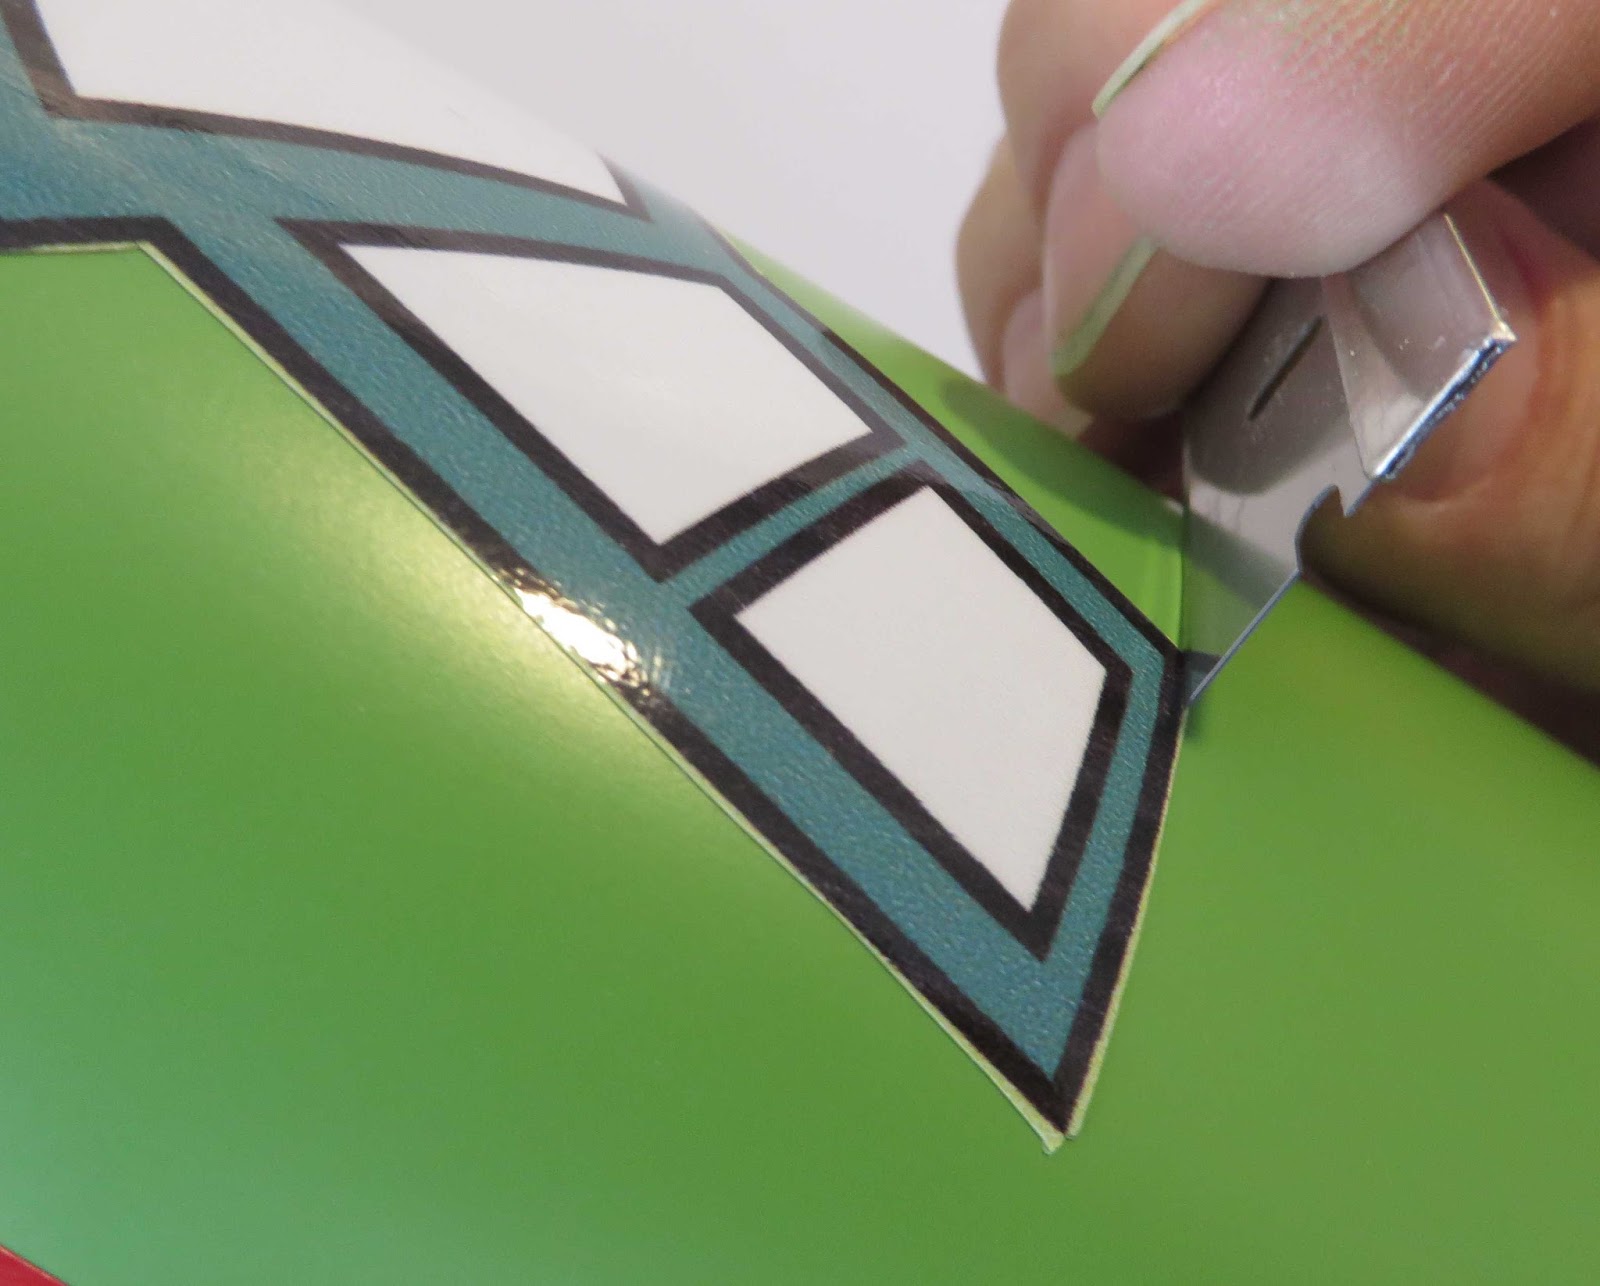
This model was harder to fillet mask because of the tail cone curvature. The fin mask has mall cuts to allow the tape to run in a curve.


Here's the complete mask for one fin.
You will also need to mask the leading and trailing edge tips ends where the fin meets the body.

Sunday, April 9, 2017

PML Lunar Express Build, Part 7, Fin Slot Fill


The two smaller, opposing fin slots were cut just a bit long. This will need some sort of fill.
Epoxy would drip and run into the slot and might take three or four runny applications to fill it.

I ended up pushing toothpicks into the slot.
Stacked side by side it'll be strong fill. The width of the toothpick sides were just about the right width.


After the toothpicks were friction fitted and tight, some medium CA glue was applied to the sides to lock them in.


The front edge was cut to match the leading edge angle with a single edge razor blade.

After that, the toothpicks were trimmed close with an X-acto knife.


The fill was sanded to match the leading edge and flat with the tail cone contour.

Later, epoxy fillets will smooth and seal the joint.