Showing posts with label Kit Production. Show all posts

Friday, March 14, 2025

A Day At Odd'l Rockets

Now that my back is on the mend, I can pull up some "filler" posts:


Kit prepping:
The Odd'l Rockets F-18 is currently the more popular of the three fighter jet kits.
I vacu-form the canopies, two at a time. Any more than that and the plastic gets too hot!

Parachute kits:
The Odd'l kits that need a chute get one of my "pick your size" parachutes at 12", 15" or 18" diameter.

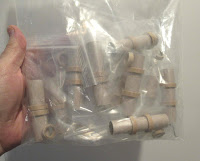
In the zip bag you'll find:
#10 cotton embroidery thread for shroud lines (very strong)
and plastic (not paper) reinforcing rings

All Odd'l Rockets kits include the heavy wall BT-20H tubing. (Except for the lighter weight Cylcone)

Standard 20/50 rings won't fit the slightly wider diameter heavy wall tube. This requires some simple hand peeling of the inside ring wall for a perfect fit.

Tuesday, December 13, 2022

Starting Your Own Model Rocket Company? Part 2

STANDARDIZE Where you can! 
Go with Estes tubes and nose cones (standard "BT" diameters) that are easier to source. 
My earliest kits used some Centuri diameter tubes. Many of those are not being produced now. At present I can't get Centuri ST-18 tubes for the Pigasus and Little Green Man kits.
Another example: Don't design every kit with different length launch lugs. On smaller models use 1/8" x 1 1/2" launch lugs. Larger models go with 3/16" x 2" launch lugs.
Standardize your engine mount designs. Where you can, use one design in different kits. 

Be ready - That custom order of 3,000 Raise Springs you just received aren't right! Oh boy - You get to call the vendor and politely say they are unacceptable and you aren't paying for them.
Odd'l Rockets Ceramic Blast Deflectors are no longer being produced. Half of the final order were poorly molded and couldn't be sold.
These type of things happen to every kitchen table kit vendor.

COPYRIGHTS
Copyright your kit instructions. If you don't, somebody will scan them, print it and make money off your designs when you are gone! As an entertainer, my original material was stolen few times. Thieves are always surprised (and can get pretty angry) when shown Copyright ownership.  
Odd'l Rockets like the Estes Birdie and Cyclone kits are produced by written permission. If you clone an OOP kit, get written permission before production and always give full credit to the original designers and producers. 

BOTTOM LINE
Bagging the first 100 kits can be fun. After that it becomes a job!
Don't expect to make a huge profit. I couldn't pay all the bills from rocket kit sales alone. 
Don't expect the product distribution of an Estes or Quest/Aerotech. You can dream big, but it takes a lot to jump into a major distributor network.  
You get into kit production because you really like the hobby. 
After 13 years of kit production, it remains a fun sideline.

Monday, December 12, 2022

Starting Your Own Model Rocket Company? Part 1

These next two posts are not meant to discourage. Many have a dream to produce and sell a model rocket kit. Here are some points to think about.

Occasionally I get an email from someone who has a design that: 
"We should produce! Everybody at our club launches say they like it.
It could be a great Odd'l Rockets kit, it would surely sell and we could split the profits!" 

I'm tempted to email back:
"Does this fit my product line? What is different or "Odd" about your design? 
I can appreciate the time it took to design and fly your model.
You might want to consider producing the kit yourself."

Split the profits? That's a lot of work from my end -
Designing and test launching is just a part of kit production. There is also  a time investment drawing up instructions, part orders, cutting tubes, bagging kits, boxing and mailing. 

Before you bag a kit there are CONSIDERATIONS: 
$$ A Business License
$$ Register with the State
$$ Get a LLC (Limited Liability Company)
$$ Talk with a CPA about Tax considerations

Before BUYING KIT SUPPLIES:
Specialty parts suppliers can disappear. Custom, proprietary parts are harder to find.
After Carl (Semroc) passed away, many inexpensive Semroc and Centuri based parts were gone. 
If Balsa Machining Service were to stop selling tubes, nose cones and laser cut balsa, Odd'l Rockets will probably be gone too!
Start with the Estes BT standard and available tube diameters. 
More tomorrow - 

Tuesday, May 17, 2022

A Typical Day at Odd'l Rockets, Part 2


Continuation of May 11, 2022 at Odd'l Headquarters- 
I boxed up a pretty good sized order for ERockets.
Well, a good sized order for me anyway.

I weighed and measured the box. Randy was emailed and a label was sent. This was dropped off at a nearby UPS Store.


Back home again - 
Four Quest Sport models (Two show, two flying versions) got their parachutes tied in and stickers were applied. 


Starting on the next Quest builds - four new Icarus kits.
The only drag on this build is each rocket has two parachutes - eight chutes in total. Quest chutes have to be cut out and assembled.

I don't mind making parachutes - but eight in one sitting? Oh well, dive in!


Earlier in the afternoon I shot the Mars Snooper II build with a final white undercoat. Things look good, it's now ready for the gloss red. Well, after the white paint sets up for 48 hours.


Eight additional Break-Away kits were bagged up in addition to the ones that went out in a vendor order. I always make extras trying to cover upcoming orders.

It's 1:00 a.m. - Post the next day's blog entry.
Time for bed!

Monday, May 16, 2022

A Typical Day at Odd'l Rockets, Part 1


Rocketry is now a full time job! 
Here's all my Rocketry activity from May 11, 2022.
After answering rocketry emails and Facebook, I start on kit production and model building about 1:00 p.m.

Humidity is lowest at about 1:30 p.m.
The landing legs for the Mars Snooper II got a shot of gloss white.


I've got to bag up some Break-Away kits for a vendor order.
Couplers are cut by hand. A taper is sanded into the ends for an easier slip into the tube sections.
Today, over 100 couplers were cut and sanded.
Reinforcement pieces are marked and cut from coupler segments. 
I probably cut 150 pieces. Five are needed for each kit.

I learned early on - make extras. If you have an order for eight kits, make enough pieces for 20 kits. You won't have to deal with as much prep when that next order comes in.


The couplers get a single punch for the Kevlar line ties.


I bagged about 20 Break-Away kit engine mounts.
I use my Odd'l Rockets heavy walled BT-20 tubes in my engine mounts. Every 20/50 ring needs an interior peel to fit the slightly wider diameter tube.
More of one typical day tomorrow . . .

Saturday, February 5, 2022

Busy, Busy, Busy at Odd'l Rockets!


I've been busy printing decals, cutting tubes, printing instructions, bending springs and vacu-forming jet canopies.

The past two weeks has included production of:
14 Heavy Duty Engine Mounts (HDEMs)
12 Adeptors
6 Break-Away kits
9 Birdie kits
14 Sputnik kits
8 Cyclone kits
19 Single Raise Springs
7 Raise Spring 10 packs
10 F-16 kits
13 F-104 kits
36 F-18 kits

This may not seem like a lot compared to a big vendor, but it's just me!
It took over 10 years, but here I am with sometimes more work than I can handle.

Wednesday, October 6, 2021

Builds In Progress!

Sometimes it feels a little overwhelming! 
I'm not complaining . . . 
I used to build two of the same kit at the same time. One for me, a second build to sell on Ebay. The build was then featured on the blog.
I now do quite a bit of building for vendors.

Finished builds sent out over this Summer:
3 Estes Super Mars Snoopers (Just finished on the blog)
2 Estes Vesta Intruders (Vesta Intruder Build coming very soon on the blog)

Finished builds sent out in September:
3 Estes Alphas, 2 Estes Wizards, 2 Estes Magicians
1 Aerotech Initiator Starter Set (Finished Initiator, assembled Launcher & Controller)
2 Estes Green Eggs (Will be a short blog feature)
4 Odd'l Rockets kit orders

In progress are
1 Estes Mercury Little Joe I (already built on the blog)
1 Estes Mars Longship (already built on the blog)
3 Quest Quad Runners (Will be a full blog build)

Complete (just sent out)
1 Quest (Now branded Enerjet) Lil' Grunt (Will be a full blog build)
1 Quest (Now branded Enerjet) Mean Green (Will be a short blog feature)

In the build queue:
1 Estes Leo Space Plane (already built on the blog)
1 Estes Sasha (already built on the blog)
1 Estes Skylab Saturn V (Might be a full blog build, at least the new Skylab n/c mask)
1 Estes Alpha
1 Estes Space Corps Corvette Class (already built on the blog)

How do I keep track?
I only work on as many as I can comfortably build and finish. 
I have developed some "systems" over the years.
Five builds are now in glue. Two were just mailed. 
I might work on four or five builds at a time. All small parts are kept in small zip bags.
Pictures, pictures and more pictures are taken for the blog posts. 
Digital cameras have changed everything!
I also want to get the builds back to the vendors in a reasonable time frame.
I am single (that helps) and don't have to answer for the rocket builds on 
the kitchen table or kit boxes strewn around.
It goes without saying that I'm not able to do individual custom builds. 

Odd'l Rockets?
My Odd'l kit designs aren't simple 3F/NC designs. Some kits require some proprietary parts. Every month I get four vendor orders. Each day one kit (maybe a run of 15 each) is bagged up until all orders are fulfilled. 

When I was in my late teens my dream was to work for a model rocket company.
Be careful what you wish for! I do enjoy my job.
Forty years of Banjos, Musical Saws and Bagpipes, now full-time Model Rocketry.

Sunday, August 20, 2017

Odd'l Rockets F-104 Fuel Tank Correction

When I posted the first prototype build of the Odd'l Rockets F-104 Starfighter, I heard about it!
Most comments were positive but a few let me know the wing fuel tanks were too small.
To be honest, I didn't have many dowels and grabbed what was handy. I bought larger dowels.

Above is the first prototype. It has quite a few stable test flights.

I cut off the fuel tanks and carved two larger ones. On the left is the size comparison.

The inset shows where the paint was scraped off to glue onto the wing.
Is this better? - hope so!
Compared to the OOP Centuri kit, this version is much closer to the truth.
Now . . . more test flights.

Saturday, August 19, 2017

F-104 Intake Pattern Development, Part 2


The round intake tube segment was ironed flat. My iron was set on cotton with a little bit of steam.
Here's what I ended up with. The 1" long reference lengths were added so a picture can be copied to Corel Draw and traced at full size.

With the body tube segment ironed flat I was surprised at how thin body tube walls are. Spiral rolling Kraft paper into a tube substantially increases the strength.


Some test patterns were printed up and a few more intakes cut out. The fit was perfect!


Three more edits later I have a good template for the new kit!

Friday, August 18, 2017

F-104 Intake Pattern Development, Part 1


The upcoming F-104 Starfighter kit from Odd'l Rockets had some interesting kit design challenges. One is the intakes on each side of the body.
The old Centuri kit folded card stock rectangles. They didn't look like the round intakes on the real jet.


I wish I could say the intake shape was developed using some complex geometry. I took the easy way out - I guessed.

Some BT-20 tube was cut into half wedge shapes. This picture shows how many tries it took to get the best fit.


Final shaping is done by sanding the rough cut edges with 220 grit wrapped around the BT-50H body tube.


Okay, here's a good fit!
To make a paper cutting pattern I could just wrap a paper around this intake and trace, but I wanted something more accurate.
More in next post - 

Monday, May 5, 2014

Any Trick To Bagging Kits?

Anybody who ever thought of starting your own rocket company would be fun, has never had to bag up kits! 

Taking a cue from the Semroc kits, the engine mount
and recovery system parts are in separate zip bags.
Putting the engine mount pieces in a separate bag makes it easier to do a visual inventory. If a piece is missing you have to send out another part to the buyer. There goes your profit!
Kits are now bagged so most all pieces can be seen through the clear bag. For a while I was putting the cut balsa sheets inside the folded instructions to protect them. Now they are set outside and are visible.
The engine hook faces away from the softer balsa so it can't scratch up the wood.
The clay weight is in another bag so it won't stain the balsa or any paper stock.

Doug Pratt once said: "Do you know how to make a small fortune selling model rockets?
Start with a large fortune."
There is some truth to that. Unless you are doing kit runs of 10,000 each in China and have major distributors you probably won't make a fortune. But if you sell a good product you could make enough money to support your own hobby habit!

Wednesday, October 10, 2012

Kit Bagging The Odd'l Rockets Sputnik Part 5

The kit antenna legs were 1/8" X 12" dowels.
I've since changed to bamboo skewers.

This was for two reasons. Bulk dowels were inconsistant. Some broke on landing and many were warped.

The bamboo skewers are very strong! They are also sharpened on one end which makes it easier to insert into the pre-drilled holes in the styrofoam ball.
Bamboo also adheres well using white and yellow wood glues.


Those tapered ends are very sharp.
I sell a lot of Sputnik kits to school groups. I don't want a young builder to hurt himself with the sharpened bamboo.

The sharp tips are taken down by sanding four at a time on some 100 grit sandpaper.


Here's a hundred or so of the skewers with the tips sanded down to a blunt end.

I'll go through the bunch and throw away any rough and warped antenna.
Any discolored sticks are also thrown out.


This is only a small part of kit production.

Instructions have to be drawn up - the hardest and most expensive part of the kit. I save money on that, I draw up my own.
But there's more - Print the instructions, print and cut out the header cards and buy the correct size kit bags.
Add in shipping boxes and packaging supplies. And, I'd better renew my business license, too.
That check I just got in the mail goes right back into another parts order from Semroc and BMS for more laser cut fins.

Looking at all that is involved, I don't complain about kit prices anymore.
Oh, I didn't mention, you sell your kits to distributors at a wholesale price. There goes the bulk of the profit!

Compared to the large vendors, Odd'l Rockets is a small operation. I read somewhere that each Estes kit is produced 10,000 units at a time. When you deal in large numbers, bulk parts are cheaper and your profit is higher - if the kit sells.

If you want to go into kit production, you'd better love this hobby. After you've bagged a few hundred kits, the "glow" fades away! I still enjoy doing most all rocketry related activities.

Doug Pratt said it best years ago: "Do you know how to make a small fortune in Model Rocketry?
Start with a large fortune."

Tuesday, October 9, 2012

Kit Bagging The Odd'l Rockets Sputnik Part 4


Thirty BT-5 engine mount tubes were cut to size.

Sure, you could buy them pre-cut, but you'll save 10 cents per kit by buying longer tubes and cutting them to size.


A "Stop Disk" is glued in at the top of the engine mount tube to prevent the ejection charge from frying the inside of the ball.

These are actually a double layer plywood glued together with a "high tech" clamp.

Make 30 of these.


Here's the small parts bag for the Sputnik kit.
Thirty of these were made up.

Next up, 25 sets of four dowel legs will have to be prepared.

Monday, October 8, 2012

Kit Bagging The Odd'l Rockets Sputnik Part 3

After drilling the antenna holes, the tip of the Sharpie is rotated near the edge.
This marks the holes so the builder can easily find them.

When building the Sputnik, the dowel legs must be gently rotated and wiggled into the drilled holes. By doing this slowly, the dowels will find their way into the holes at the correct pre-drilled angle.

Drilling for the 3" long launch lug is next.
This is the hardest part of the preparation and can ruin the work done up until now if the drilling isn't straight down the engine mount tube.

A BT-5 tube with a dowel glued in is used for support. The 3/16" dowel used for the lug hole drill must be guided down the length of this support tube. It had to be reinforced with the interior dowel.

TRIVIA: A 1/8" diameter launch lug actually has a 3/16" outside diameter.


The 1/2" support tube (with hardwood dowel interior) is slid into the 1/2" drilled hole.

The last Sharpie mark is the lug hole, running inside the ball along the side of the engine mount tube. It is 3" long and goes all the way through the ball.

As the sharpened 3/16" dowel is pressed through the ball, it is checked for straightness traveling along the inserted support tube in the ball.

Keep pressing and drilling until the sharpened end goes all the way through the top of the ball.
Keep your hand away from the top of the ball or your palm could be skewered!

Sunday, October 7, 2012

Kit Bagging The Odd'l Rockets Sputnik Part 2

Without the right tools, getting a consistant angle on all four of the antenna legs is difficult. If you've ever tried to drill the legs on a Sputnik you know what I mean.
The cut out center hole of a template is set directly over the drilled engine mount hole.
A Sharpie pen makes marks while the template is held in place.

(Looks like I'm due to make another card stock template for the antenna marking.)

This is a drilling tool I made and used since the first Sputnik kit was made three years ago.

A 1/2" hole was drilled into the wood block and a long 13mm engine casing glued into place. You can see the casing slid into the engine mount hole already drilled into the ball. The Leg Jig tool actually slides down flush with the surface of the ball.
The angled black line shows the travel of the leg drilling dowel. A 1/8" hole was drilled through the middle of the jig.

A 1/8" diameter dowel was sharpened and marked 1" from the point.
With the jig casing in the 1/2" hole the dowel is slid into the angled hole. The dowel tip is lined up with the Sharpie dot marks made in the last step.

The dowel is pressed into the ball up to the 1" deep mark on the dowel.

From the side view you can see the dowel mark almost at the surface of the ball.

This is repeated four times on each ball.
The jig is rotated to the next hole mark and the dowel pressed in up to the 1" mark.

Repeat on 29 more balls.

Saturday, October 6, 2012

Kit Bagging The Odd'l Rockets Sputnik Part 1

Sure, most modelers have an original design or a clone kit they'd like to bag up and sell.
Putting your first model on sale is exciting - bagging up the first dozen kits is fun. Then, reality sets in!
Bagging kits using custom parts can be a chore.

I wanted to show what goes into the preparation of a few parts in the Odd'l Rocket Sputnik kit.
Once, I overheard a customer say:: "How can you charge this much for a Styrofoam ball and four dowels?"
So, you think it's easy?

Many of the Odd'l Rockets kits parts are just that - odd. Some parts require hands on drilling cutting and fitting.

On the right is a well worn Sputnik, ready for flight with an A10-3t engine installed.
Take a good look at the engine mount tube, 3" long thru-the-body- launch lug and dowel legs. All the Styrofoam balls are pre-drilled so the engine mount tube, lug and dowels can be easily slid in place.

The Styrofoam ball must get a drilled hole, 1/2" diameter and 1 1/2" in for the BT-5 engine mount tube.

The end of a 1/2" diameter brass tube was sharpened.
Down the tube, a wrap of tape is set at 1 1/2" from the top. This is my simple depth gauge where I stop the "drill".

After looking over the Styrofoam balls, one out of five is thrown away. Many have dents and creases in them and can't be used.

The brass tube is pressed in about 1/4". It is spun like a ball on a stick to make sure it is visually centered in the ball.
If the tube is straight, the drill continues up to the masking tape wrap.
The the tube is sharply turned the opposite direction to break off the foam cored piece at the top of the tube.

The tube is slid out the back, hopefully with the drilled core inside of it. With a 3/8" dowel, the foam "worm" is pushed out of the brass tube so the next ball can be drilled.
If the drilling wasn't straight or clean, the ball is thrown away!

Repeat this process in 30 more balls to complete this part of the kit run.