Showing posts with label Knots. Show all posts

Friday, May 2, 2025

New Way Letter - Go Build, Part 10, The Parachute


Gee, where have I seen this parachute design before?

I'd place the reinforcement disks towards the outside corner of the chute.
The printed placement disk outlines are pretty big.


A toothpick is supplied to punch holes in the plastic.

I like a cleaner assembly so I punch a round hole using the rotary punch.

Set some scrap cardstock under the chute plastic for a clean, round punch. 


The shroud line spool is pretty smart.

Hold the side (over the punched hole) with your thumb and index finger. 
As you pull the red shroud line with your right hand, the spool wobbles back and forth releasing the line. 
No tangles!

I actually enjoy assembling parachutes - 
Especially after I started using ling tweezers to tie the knots.

I use a simple square knot - not a "Granny".
Square knots will not come undone. If you don't know how to tie a square knot: CLICK HERE

Wednesday, May 8, 2024

New Estes Mini Alpha Instructions - Shock Cord Mount


The new Estes Mini Alpha kit instructions have been posted online: CLICK HERE

Most instructions tend to say tie a "double knot".
This implies tying two overhand knots which gives you a "granny" knot. They are prone to slip and open up. Unless you were a Boy Scout, a first time builder probably doesn't know the difference between the two knots. 

At the arrow point in the illustration, look how short the free end of the shock cord line is! If you've tied a "granny" or "false knot" that short end could easily pull through. Tie so the free end is longer, maybe 3/8" to 1/2".

You can use fancier knots, but a "square knot" is easy and shouldn't come undone when tightened.
In the third picture below, note how both ends come out side by side. Both lines come out under the turned line on one side and over on the other side.

Instruction once said to use a drop of glue to "set" knots.
If you tie and tighten a knot correctly it shouldn't need the glue.

TIP: NEVER, no, no NEVER apply super glues (CA glue) to a knot!
CA dries hard and makes the shroud line or shock cord brittle. 
If you want, you could apply a small bit of white or wood glue to a knot. Again, if you tied a good knot correctly, it won't need the glue.

I tie parachute shroud lines using square knots. In the past, some shroud lines found in Quest kits would come undone by themselves! Those Quest lines did require a small drop of white glue to help hold them closed.

Wednesday, June 14, 2023

NewWay Angled Invader, Part 6, Parachute Assembly & CA On The Tube Edges

The New Way kits don't use the regular Avery style adhesive disks to reinforce the parachute tie points.

These are Tyvek, a reinforced paper you can't tear.
Stick one circle under the chute material, centering it under the pre-punched hole.
Soft fold over the other end and center the second circle on the lower circle. Press in place.
There is no adhesive on the inside middle of the fold. The fold stays open and allows a shroud line to be tied on.
  

Directions are supplied for tying on the shroud lines.
I went with my standard Square Knots for attaching the lines. 
This knot seems pretty complicated for a shroud line attachment.


Here you can see the sanded CWF filler in the inside seam of the outside tubes.

The tubes are strong and thick. I still used a wipe of medium CA to harden the edges and keep the fuzzies down after sanding.

Friday, January 24, 2020

New Shock Cord Knot?

On Y.O.R.F., Bernomatic found a good knot for attaching a shock cord to a nose cone screw eye or plastic eye on a nose cone shoulder.

Imagine a screw eye in place of the fish hook.
To learn how to tie it: CLICK HERE

"Winner of Dupont‘s “Best New Knot” from 498 entries. Dependable and easy to tie in monofilament or fluorocarbon line. Created by Gary L. Martin of Lafayette, Indiana this terminal tackle knot was selected by a panel of outdoor writers as the best new, easy to tie, all-purpose fishing knot in Dupont Corp’s Great Knot Search. He named it the World’s Fair Knot because he first demonstrated it at the 1982 Knoxville World’s Fair. 

Saturday, January 19, 2019

OR Spaced Needle Build, Part 6, Engine Block and Kevlar Tie

TIP: I don't recommend the Elmer's Glue anymore. The "New Stronger Formula" glues are thinner consistency and parts that are slid into the glue can freeze in the wrong position. Use Titebond II or Aileen's Tacky Glue.

The BT-20H is narrow, you won't be able to apply glue for the engine block using a fingertip.
The engine will extend 1/4" beyond the back end of the model.
A round end dowel was pencil marked about 2 1/2" from the top. Notice how the top of the dowel is below the top of the engine. This insures the glue bead will be a bit below the final engine block position.


A bead of glue is applied to the sides of the dowel end.
Stick in the dowel and roll the glued tip around the inside of the body tube.


Slide in the engine block and press in place with an engine casing.
Slide up until you reach the 1/4" pencil line at the rear of the casing.


An elastic shock cord is tied to the end of the Kevlar line.
This knot spreads out the strain of the Kevlar and Elastic tie.

To see how to tie it: CLICK HERE

Saturday, March 31, 2018

What Knot Is It?

In an earlier post I showed the knot tying diagrams from the New Way Firecat 4 kit.
I was a Boy Scout and tied my share of knots but that was years ago. I do remember the simple ones.

Some comments were trying to identify the shroud line attachment knot shown.


Scott Johnson wrote:
"That knot looks like a hitch. Kind of like a taut-line hitch. We use the taut-line hitch for tent lines."
I did a search online and found a step by step for the Tautline Knot, shown above.


I think Tim Burger has the right knot, the BUNT LINE HITCH. At first glance, both knots look the same.
It looks like the New Way rocket designers used this GIF (above) to draw their knot tying directions.
I don't care for this "hitch" style knot for shroud lines. When the long end is pulled the knot cinches and tightens. While the Tyvek is very strong I wouldn't want the line to cinch and bunch it up.

Thursday, March 29, 2018

New Way Firecat 4 Build, Part 15, Shock Cord Ties

To be sure the Kevlar didn't extend beyond the body tube lip -
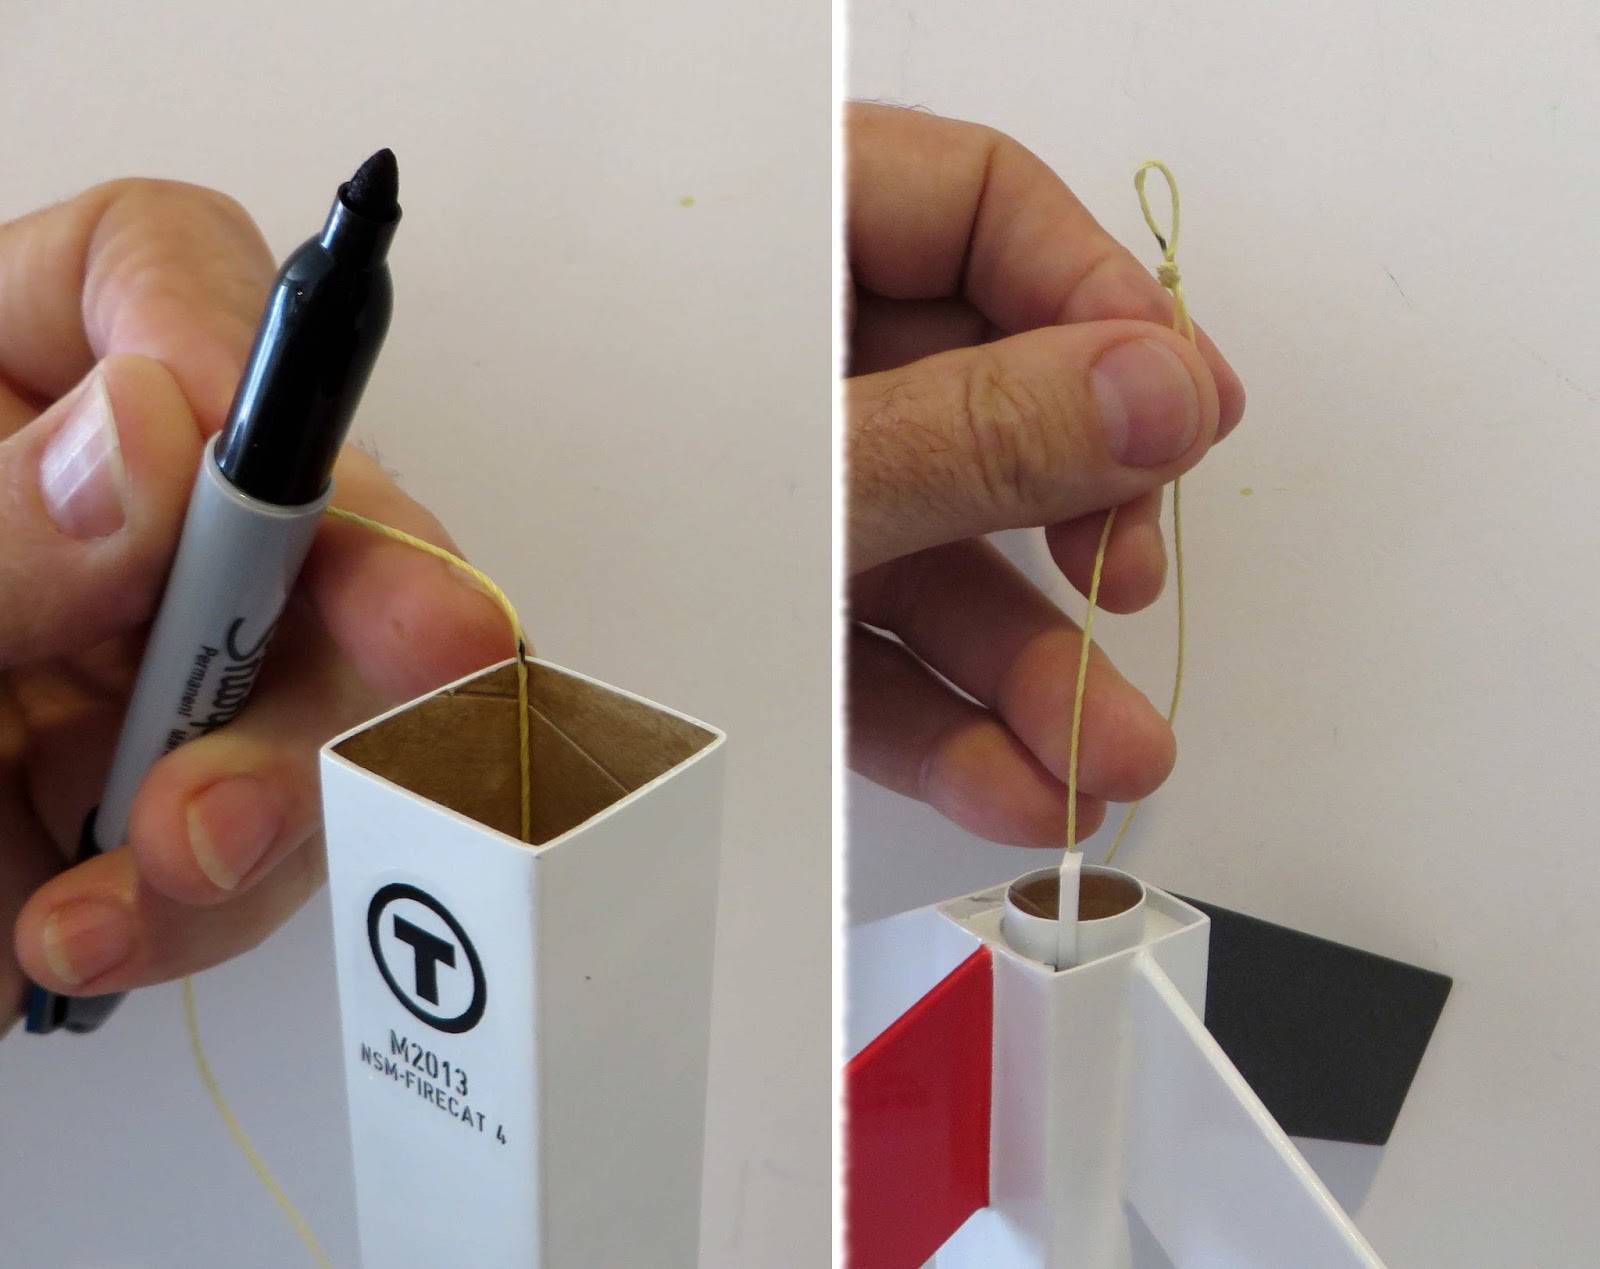
It was pulled tight against the top of the body tube and the Kevlar marked with a Sharpie.

This was fed out the rear, through the engine mount.
A loop knot was tied with the Sharpie mark below the loop.


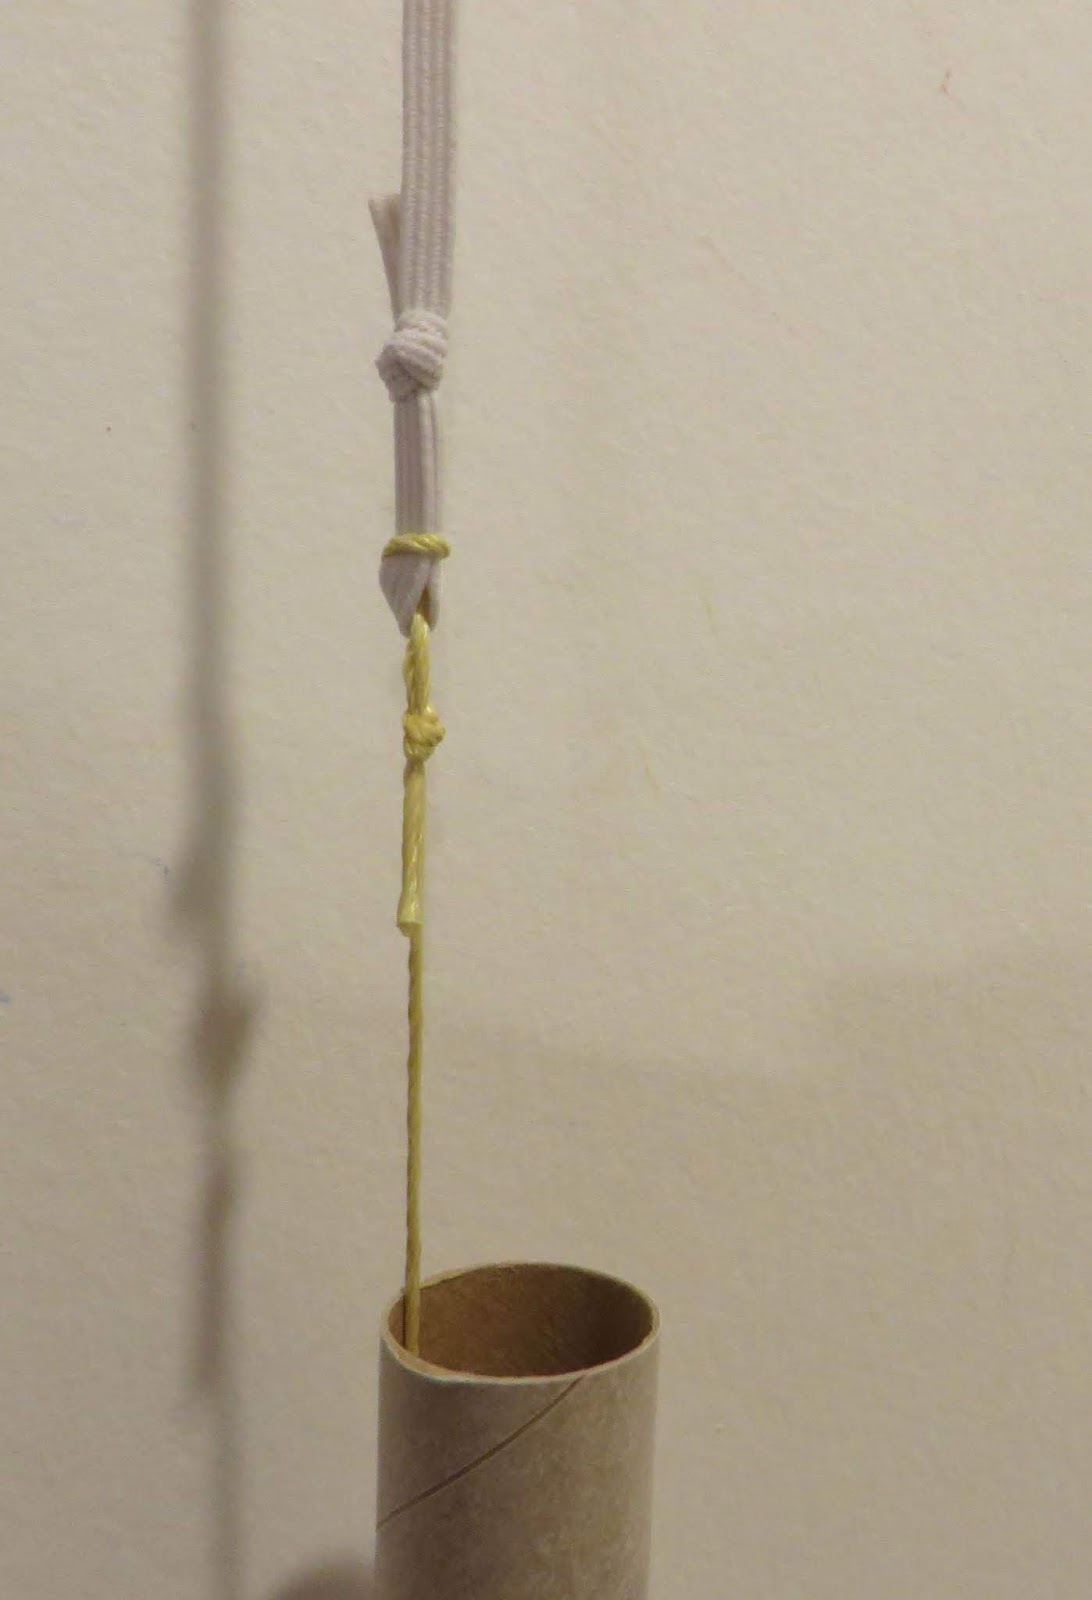
The round elastic was attached with interlocking loops.

The line was fed through the engine mount, body tube and back out the top.
On the right you can see the loop knot is below the top of the body tube edge. No chance for a zipper!


An overhand loop knot is tied a few inches down from the nose cone. The snap swivel and parachute is clipped onto the loop.


Monday, March 19, 2018

New Way Firecat 4 Build, Part 9, Shroud Line Tying TIP


On the back of the small "Recovery Kit" envelope face card there is instructions for a shroud line knot.
I tried the knot but it didn't work for me. This knot will slide up and cinch up around the middle of the Tyvek attachment strip.
I went back to my usual Square Knot tie.


TIP: Shroud line ties normally face each other at the parachute attachment points.
You can have the long end loops face each other on the flat side of the chute.


For the left side of the parachute "flat" side -
Start as shown on the upper picture, tie a square knot for a shroud line end that will face to the right.


For the other right side -
Start as shown on the upper picture for a shroud line that will end up facing to the left.


I tie shroud lines this way to make the tangle free final attachments easier.

Friday, December 29, 2017

Kevlar Fraying and Knot Setting

From the NAR Facebook Page:

Bill Lindsay Jr asked:
What are the disadvantages of twisted Kevlar thread, compared to braided? I know the big thing is fraying. Can you heat it up enough to keep it from fraying?

Wallace McDuffey responded:
I use Dritz Fray Check for cloth. It works great on Kevlar and reinforcing knots. It is flexable enough that it wont make it brittle when stressed.
http://www.joann.com/prym-dritz-fray-check-sealant/1052851.html

This Fray Check should work very well. I also use white glues on frayed lines.
TIP: Never use Super Glues (CA) to stop a line from fraying. The thin glue will run up the line making it hard and brittle.

Thursday, May 25, 2017

New Kevlar Supplier, Part 3


This softer Emma Kites Kevlar can fray at the end.
Tie an overhand knot close to the end.


Here's the weird thing about the Emma Kites Kevlar.
Normally a square knot stays tightly together after being pulled closed. After tightening, the knot starts to loosen and open up!

It's easy enough to fix.
A small drop of white or yellow wood glue adds the right amount of grab and keeps it closed. Apply a small dot of glue and pull the knot tight.

Here's the knot after the glue dried. It is closed and tight.

TIP: NEVER use super glues on knots, whether it is a Kevlar shock cord or shroud line knot. Super Glues run down the line and away from the knot. When the CA glue dries it makes the cord and knot stiff, brittle and breakable.

Friday, June 24, 2016

A Better Shock Cord Knot? Tips, Part 2


Tie an over hand loop knot in both the Kevlar and elastic cords. The loops should be about 3/4" long. (Left side picture)

Pass the Elastic loop over the Kevlar loop. The elastic loop can pass over the Kevlar knot. (Right side picture)


Pass the loose end of the elastic through the Kevlar loop. (Left side picture)
Pull the end of the elastic almost completely through the Kevlar loop.
Pass the elastic knot and loose end up and through the Kevlar loop.
Pass the Kevlar knot and loose end down and through the elastic loop. (Right side picture)


On the left are the loops after the knots and ends are passed through, before cinching up the knot.

On the right is the finished and tightened knot.
The new knot is cleaner, stronger with less stress on the elastic.

You may not get it right the first time. All new knots take practice.

Thursday, June 23, 2016

A Better Shock Cord Knot? Tips, Part 1


Here's how Quest shows to tie the Kevlar to an elastic shock cord. We've all tied shock cords on this way.

I was concerned that the tight knot might weaken the tightly cinched elastic.


For years I've tied the elastic on like this. There is no knotted elastic where the Kevlar makes contact. The tension at ejection will be spread out more.

An overhand loop knot was tied in the lower Kevlar line.
The only way I could attach the elastic was to tie a square knot. The end of the elastic ended up out and away, not side by side like on the Kevlar below it.


I know I'm probably not the first person to tie the Kevlar and elastic shock cord like this. In the next post I'll show how to tie the knot.
This cinch knot spreads out the tension even more and has a neater look with both lines side by side.

This is one of those things that I should have figured out years ago. Sometimes a simple solution can slip right past you.

Saturday, June 4, 2016

Knots?

An email from Thomas Rea:

Hi Thomas,
I use different knots for different purposes. I use these two most often.
The first picture shows a simple loop knot connection. 
I think it spreads out the tension especially when using wider elastic.


The Quest method (at left) is easy and also works. It's better for thinner elastic.


I want to try the "Nail" knot, shown on this website: CLICK HERE
That knot really spreads out the stretch tension and also cinches down when pulled tight.

I got the Duncan Uni-Knot from the same website. I use that for most screw eye / nose cone base ties of the shock cord.

Here's a link to all the new (old) knots posts on the blog:
Plenty here about other knots for other locations on the rocket. 

NOTE: When using these knots you have to cut much longer shock cords to allow for the wraps of Kevlar and elastic. The elastic supplied in kits is never long enough and will end up even shorter when using wrapped, cinch-down knots.

Thursday, May 28, 2015

Better Kevlar / Shock Cord Knot?

Quest kit instructions show a very simple overhand knot to join the Kevlar and Elastic ends of the shock cord.

It works fine but I never cared for this knot. I always look for something cleaner.
I knew there was a better way to join the two lines.


Here's how I was joining together the lines.
It works, I've never had a break or separation.

Yes, I know the Kevlar should not go over the tube edge. This is just for the picture.


This might be my new knot choice.
It's called an Albright Knot.
This picture and instructions are at the Animated Knots website: CLICK HERE

I like this knot because it is smaller and cleaner.
Like the Duncan Loop Knot (used to tie the shock cord to the nose cone screw eye or lug) the ends are parallel to the line going into the knot.
Very secure, both cords aren't going anywhere!
I only used four wraps of the elastic, not ten like shown above.

All knots take practice. You probably won't get it right the first time. Everybody uses different knots to tie the recovery system together.
This is what works for me right now. Find what works best for you.

EDIT: In the comments below, Eerofluge made the following suggestion:
"The Albright Knot is often used to join thicker leader material to fishing line, which is a good application for joining a thick shock cord to thinner Kevlar cord. However, usually the thicker line forms the single loop (gold cord in example picture) and the wraps are made by the thinner cord (blue cord in the picture)."

Thanks Eero, I'll have to try it both ways and see how the knot lies.

Thursday, December 4, 2014

Public Missiles Shock Cord Knot


From the Public Missiles Tiny Pterodactyl instructions:
https://publicmissiles.com/pml/images/TinyPteroinstructionbooklet.pdf

Here's another knot to think about.
I still prefer the Duncan UniKnot for tying the shock cord to the nose cone eyelet or screw eye.
With the Duncan Knot, the tail ends of the shock cord end up facing down, side by side. The loose tail doesn't stick out.
This cinch style knot (shown above) has the loose end of the cord facing out and might get caught up between the nose cone shoulder and body tube.

Sunday, November 30, 2014

Kevlar Loop Knot


When you put a tight loop to make a knot in three strand Kevlar it tends to unravel. (On left)

Before tying the overhand knot, over twist to tighten the line to overcompensate where the line wants to separate. It only takes an extra half twist the same direction as the three lines are turned.


Here's how the overhand knot should end up after tying.
There is no unraveling  at the top of the loop.

A little white glue is applied to the knot to prevent unraveling.
Some on the forums say not to use glue on knots. I don't use glue down the length of the Kevlar or shroud lines, just on the knot.

TIP: Never use CA or Super Glues on knots!
Super glues will run up or down the line making it stiff and brittle.
Use a small drop of white glue or Titebond.

Friday, September 19, 2014

Weak Shroud Lines

While building an Estes Patriot I tested the shroud lines on the pre-made 12" parachute. This newer chute was made in China, dated 6/20/2013.
I pulled on the line and it broke - very easily.

I've ran across this before. I wouldn't risk this parachute on a flight so the weak lines will be replaced.
I'll use Coats and Clark Button and Carpet thread for the new lines.
For a 12" chute, three 25" lines were cut.
On the pre-made chutes, check the tied knots at the parachute corners. I've ran across square knots and granny knots.
If the knot slips, it's probably a granny and can come loose on a hard ejection.
If a knot slips, tie an additional overhand knot over the top. That will stop it from coming loose.

Many kit instructions and a few online videos say to simply tie two overhand knots when tying on a shroud line.
Two identical overhand knots will result in a slipping granny knot.
To make a square knot, tie an overhand knot, but reverse the second overhand knot on top. Better yet, check out the Animated Knots website: CLICK HERE


When the lines were removed, I cleaned up the torn holes in the reinforcement rings.
Card stock was set underneath the chute material for a clean punch.

Sunday, July 20, 2014

ASP Corporal Build, Part 2, New Kevlar Knot

First up you are instructed to tie a loop knot in the upper end of the Kevlar. This loop will tie to the elastic shock cord.
Usually I tie an overhand knot to make an attachment loop.
This might be my new upper attachment knot.

The instructions say to tie an overhand knot 6" or 7" from the end. I thought this was a bit long so I tied the overhand knot at 4" from the end.


The end is brought back through the loop in the knot and the knot tightened.
Then a half hitch is tied and pulled tight against the overhand knot.


The instructions state the loop can end up between 1" and 2".
I went for a 1" loop. A 2" loop seemed too long.

Sunday, June 15, 2014

Old, New Screw Eye Knot?

Jim (K'Tesh) asked on TRF,
"Sorry to string you along... Anybody know what the name of the knot Mike Fisher (Binder Design) recommends for connecting his shock cords to the eye bolts?"


My response:
I also thought it might be the Improved Clinch.
Binder has the end go through one of the three center winds instead of the larger loop on the outside.

Finishing up through the center makes the tails end up parallel.
The Duncan Uni is another cinch knot that leaves the tails both facing down.


If you haven't yet, Give Mike's knot (shown above) or the Duncan Uni knot (Click HERE) a try when tying the shock cord to the screw eye. 
With both ends facing down and away from the screw eye there is less chance of the loose tail end getting caught between the nose cone shoulder and body tube.

Thursday, January 17, 2013

Knots? Part 3


On the left is the Duncan (Uni) Knot tied with 135 lb, Kevlar.
Refer to the knot HERE

Looking at the animated tying instructions, you loop the line four times after making the "S".
This Kevlar tie has the four looped turns.

On the right is 1/8" elastic tied around a plastic nose cone eyelet.
The elastic is thicker than the Kevlar so I only did 3 loops before pulling it tight.
I prefer to keep the loose tail end about 1/2" long, not cut short as shown in the animation.

Both lines feel very tight and aren't going anywhere!