Showing posts with label ASP Ram B. Show all posts

Saturday, March 5, 2022

ASP Ram B Build, Finished


This is visually, a busy rocket!
Red, White, Green Black, Gray and Silver!


At the top and bottom of the largest black vinyl pieces are horizontal 1/8" wide strips.

The red band goes on last.


Here's the upper section with the smaller fins and the spiral band.


And, the nose section.
Call it done!

Friday, March 4, 2022

ASP Ram B Build, Part 14, Fin Leading Edge Trim


The leading edge trim is cut using one of the templates.

Lay the strip down the middle of the leading edge by sighting down from the rear. Get both sides as even as you can.


Initially, the black trim strips look very good.


But, after an hour -
The vinyl strips started to lift and couldn't be used.

I could mask and spray the black leading edges but it's a lot of work!
I'll pull the fin vinyl and call it done. This model is very colorful and doesn't really need the fin trim -  Unless you are a real scale guy.

Thursday, March 3, 2022

ASP Ram B Build, Part 13, Thin Vinyl Spiral Trim


Getting a smooth flow on these vertical lines is tricky.
A 1/8" wide strip is pre-cut for you.

Set the lower, shorter piece first.
Start at the low root edge. This piece finishes at the top of the adjacent fin root edge. 
The ends are carefully trimmed down the root edge.

The next longer piece starts on the other side of the fin and continues in a spiral.
Hopefully it ends directly over the starting point. Mine was close!

Oops! If I had followed the color and masking directions - 
There wouldn't have been a launch lug in my way!

I had to trim the vinyl to sit around the lug.
I always cut the tall slot too wide. The slot could have been narrower to tuck into the launch lug fillets.

Wednesday, March 2, 2022

ASP Ram B Build, Part 12, Large Vinyl Trim


This is the vinyl trim template sheet.
Cut them out using a knife and straightedge.

You are given enough black vinyl that if a mistake is made you can cut out a replacement. 

Notice the Lower Back Section template.
Here's how the lower vinyl section piece fit between the fins. 
Even though I used thinner 3/32" balsa, there would be some gaps near the tops of the root edges if the 1/8" thick balsa were used. 

If I were to do it again I would cut the the recesses wider to touch the root edges. Trying to match the rounded leading edge would be tough. 


Check the fit of the template before cutting out the Upper Black pieces. You might have to make adjustments to the width.


Matched corners on one side - 


Might not meet on the other.
I couldn't use this piece and had to cut another one slightly wider.

Tuesday, March 1, 2022

ASP Ram B Build, Part 11, NC Touch-up, Clay Weight & Parachute


On the left is the nose cone mask, a little rough.

I've mentioned before how good the Ace Hardware Premium Enamel is. It also takes brush touch-ups very well.
I sprayed some light gray into a cup and touched up some small areas that got scraped off when removing some of the silver.

The picture on the right shows the smooth touchup.

The balsa adapter is glued into the upper BT-20 tube. The clay nose weight is pressed into the tube and against the top of the adapter.

You are given more clay than will fit with the nose cone slid in place. Remove enough to slide the entire nose cone shoulder in.


The large screw eye was set in the adapter base and the shock cord tied on using a Duncan Uni Knot.

A overhand loop was tied in the shock cord about three inches from the screw eye. 

The eight sided Mylar parachute was clipped onto the loop in the shock cord.

Monday, February 28, 2022

ASP Ram B Build, Part 10, Green, Black Fins & NC Masks

The top picture shows the mask for the Green fins. The green was shot and the tape pulled.

Two days later allowing the paint to dry, another mask and the Black fins were sprayed.

The inset picture shows the upper fins.
The remaining fin on the opposite side of the black fins remain white.


The tip of the nose cone is to be painted silver - 1/4" down from the top.

I cut a curved arc from marked Scotch tape.
The lower picture shows the top half of the arc lifted from the cut piece. This is the arc that will be used in the nose cone tip mask.


On the left is the mask, only the tip of the nose cone is open.

After the tape was pulled - 
Not my best result, the tape curve was a little wide. A bit of Silver got under the tape. It required some light scraping which took off some of the Gray. I'll be touching this up with a brush and calling it done.

Sunday, February 27, 2022

ASP Ram B Build, Part 9, First Red Masks

The paint mask drawing is a bit confusing, as are most roll pattern masks. There is a lot of masking on this model. 
Eight fins, each set of two is a different color.
Two red, two white, two green and two black.

On the right is the start of the red fin masks.
Notice the rear of the upper fin. Instead of the trailing edge being squared off, I slightly round off the corners.

Blackened Scotch tape outlines the fin. Masking tape fills all the open areas.
I seal the Scotch tape edge using a a Q-tip. Be careful, some of the black from the Sharpie ink has transferred onto the Q-tip. Be careful to rotate the cotton end so you don't wipe black ink on the white fin. 


Here's the red fins after the tape was lifted. These two red fins are in line with each other.
I did have to "push" back some small high points with my knife blade to round out the red paint on the round leading edge.


I went ahead and did one of the nose cone masks.
Using Scotch tape masks around a body tube gives very sharp color separations.

Saturday, February 26, 2022

ASP Ram B Build, Part 8, Fin Gluing & White Undercoats

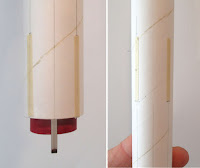
I used a wrap of tape to help line up the fins. 
On the left, the tape wrap helped set the leading edge at the same height on all four fins.

On the right side inset picture - 
A tape wrap helped line up the trailing edge of the upper fins.

OOPS! The engine mount tube should be even with the bottom of the BT-50 tube. Out of habit, I glued it in with 1/4" of the engine mount exposed.


Before spraying the white - 
I pulled out the adapter shoulders and nose cone just a little bit. This allows white paint to get on the shoulders and guarantees full paint coverage when the pieces are slid together after the paint dries.

After the white paint was shot, I noticed some fuzzies on the inside edge of the BT-50 body.
Sometimes I'll wipe some CA glue around the tube edge before gluing in the engine mount. I didn't his time.

If you do seal the inside tube ends before gluing in the mount - keep the CA glue away from the final position of the lower centering ring.


I squeezed out a drop of CA, dipped a toothpick and spread the glue around the inside tube edge.
After the glue dried, the fuzzy threads were carefully sanded with some 400 grit. 

Much better!

Thursday, February 24, 2022

ASP Ram B Build, Part 7, Filler/Primer & Planning The Masks

Here's Friday's post a day early - the internet at the campground is not running.

On the left is the CWF filled balsa and tube seams sanded to surface.
On the right is after spraying with filler/primer.
Notice how rough the tube is. Some tubes fuzz up when sanding the filler on the seams. This fuzzy surface will disappear after light sanding.

The gray filler/primer shown here is right after spraying, still wet and shiny. Depending on what brand of filler/primer you use - wait a few hours or overnight before sanding.


Two fins - the upper one shot with Duplicolor filler/primer.
There isn't any visible grain, the first fill of CWF did it's job. They don't always turn out this smooth after the single pass of CWF.

The lower fin has the filler/primer sanded leaving very little in the remaining grain pores. This was some quality balsa.


Looking ahead - 
Here's a page from Peter Alway's Rockets of the World.
The upper transition swells out like the plastic adapter on the Estes Nike Apache.
This is going to be an interesting mask!

Wednesday, February 23, 2022

ASP Ram B Build, Part 6, Engine Mount & Fin Root Edge Mask


I'm sending out Thursdays post a day early - I'm camping and their Internet doesn't work! Tomorrow I go to the Cape - Haven't been there in probably 15 years.


I checked the length of of the Kevlar line against the BT-50 and tied the loop below the top end of the body tube. I could have made it a little longer.
OOPS! I glued in the engine mount without checking the instructions. I thought I had read it to go 1/4" over the end of the body tube. I read the instructions later and saw the red tube should have been even with the end of the body tube. Fingers crossed, it should be stable. 
The four lower fins overhang the end of the body tube by 1/4". That's probably the measurement I saw when gluing in the engine mount.

The lower tick mark on the lower fin is at 1/4" to overhang the end of the tube.

The marks on the body are slightly inside the gluing area for the fins.


3/32" wide strips of masking tape are set on the fin lines to keep the filler primer off the tube for a stronger glue bond.

ASP Ram B Build, Part 5, Shaping The Nose Cone

The kit supplied nose cone is conical. To fit the scale profile, it has to be rounded off.
You aren't given a final length of the nose cone, so start small and check the look. If needed, sand more.

There's some CWF filler on the lower end of the cone. I was trying to sharpen up the shoulder edge then thought: 
"I'd better round off the top before filling the rest of the nose cone!"


The top was sanded off.
The sides were knocked down by turning against my sanding block.
Then smoothing with 400 grit rounding it off.


I ended up taking more off the top and re-rounding it.


This reminds me of the nose cone from the old Estes 260 Space Booster. It was made from a TA-550 balsa adapter. A creative way to make a nose cone from another part.

Tuesday, February 22, 2022

ASP Ram B Build, Part 4, Cutting Out The Fins


The supplied balsa sheet is 1/8" thick. Checking Alway's Rockets Of The World, the fins on the real rocket were very thin. I decided to compromise and go with a thinner, 3/32" balsa.
The instructions say to trace around the templates with a ball point pen. I wouldn't recommend using ink to trace the patterns, it's not a great habit to get into. Ink will bleed through the final colors of paint. 
TIPS: Never mark fin lines on a body tube with ink!

I used some of the scrap balsa left over from other kits. Some Estes kits leave you with a lot of balsa sides. 
Here I've traced around the template with a "safe" pencil. 


In this kit, the leading edges are rounded.
On the actual rocket, the leading edges are a knife edge.

Both the trailing edges and root edges are the same length. I mark the root edges with pencil to keep everything consistent.

Monday, February 21, 2022

ASP Ram B Build, Part 3, Engine Mount


Before using any glue - 

Always test fit the centering rings. 
On this build they were a little tight and required light inside peel to slide over the red engine tube.


The kit included an addendum for the engine mount. An engine hook was added after the initial kit run.

The addendum instructions have the bottom  centering ring position set lower. With the ring too close to the bottom it doesn't allow the engine hook to flex.
I raised the low ring so a 3/4" space was clear at the bottom.

The top ring was glued just over the top of the upper bend of the engine hook. A pencil line was drawn to show the top of the hook position.

The instructions sometimes have you knot the Kevlar under the upper ring.
There's very little room for a double knot between the diameters of a 20 and 50 tube.

I sometimes do a wrap of the Kevlar line, this keeps the tie closer to the engine tube. This is tightened and pressed into the wet glue fillet against the ring joint.

Notice the red tube is darker than the rest of the tube.
The red tubes are sometimes a little rougher than a standard brown engine mount tube. Some medium CA glue was "brushed" on using a Q-tip. That hardens the tube and allows for smooth sanding.

At the bottom right you can barely see a line of sanded CWF filling the seam on the red tube. The CA glue and sanding followed the filler.

Sunday, February 20, 2022

ASP Ram B Build, Part 2, More Parts

Parts of interest:
Roll of black self adhesive vinyl to cut body roll patterns from. This saves you from any tricky masking.
Red and Black vinyl strips for trim and "barber pole" stripe on the upper tube.
BIG screw eye, larger than usually seen on a model this size.
Clay - see below 
Pattern sheet - The upper templates are for cutting out the larger black vinyl trim pieces.
1/8" thick balsa for the eight fins. It seems thick. 


With the upper fins, nose weight is needed for stability.

The clay weighs in at just under 1/2 ounce at .45 ounce.

Saturday, February 19, 2022

ASP Ram B Build, Part 1, Parts


I picked up this A.S.P. (Aerospace Specialty Products) kit at JonRocket last week. It had an interesting roll pattern with some different colors not normally combined on a scale model. The colors are White, Red, Green, Silver, Gray and Black. 
I don't see this kit on the ASP website, it may be OOP.


All the parts - 
A small 1/8" thick balsa sheet - You cut out the fins "old school" which is fine by me!
Yellow, cardstock pattern sheet for the black body quarters
Black vinyl trim, one strip and a small roll
Red vinyl trim
Standard 20/50 engine mount with the ASP red engine mount tube
Pointed, conical nose cone, a section of BT-20 and a balsa 20/50 adapter
A large screw eye
Clay weight  to move the C/G forward
12" chrome Mylar 8 sided parachute