Showing posts with label E Mini Mars Lander. Show all posts

Sunday, October 21, 2018

Estes Mini Mars Lander Build #0881, Finished


This was a fun one, even with the flaky decals.
I'm curious how it will recover with the streamer.

Friday, October 19, 2018

Estes Mini Mars Lander Build #0881, Part 15, Old Decals


The remaining decals got a shot of clear acrylic. This will make a film over the decals and hopefully hold them together.

On the left is the decal that broke apart with no way to repair it. I took the easy way out.

I cut the damaged area off the decal that goes on the opposite side. This makes it look like it was intentional, well sort of.


Here's another place where the decal broke up. Like before, the broken line was scraped off.


An orange Sharpie filled in the broken area in the "A".
This was a gamble, black usually works on black print, colors rarely match up. I lucked out on this one.


I used the back of my X-Acto knife to scrape the paint off the engine hook. Use the back of the blade, it'll flake the paint off without dulling the sharp side.

Thursday, October 18, 2018

Estes Mini Mars Lander Build #0881, Part 14, Old Decals


These decals are 30 years old. They could either transfer easily or break up because they are brittle.
Normally I'd test the soak and transfer time on an image that wouldn't be used on the kit. There were no extras to test on.

I figured I'd try the small three dot decals that go on the legs. If these black ink decals didn't work I could always print up some new black dots. These went on the model with no problems.


The nose cone wrap decals are wide, I didn't want to take a chance of them not going on easily. They were cut in half. The edges will be butted together and lines matched.


Things were okay until the body tube decals were used.
This one broke up and couldn't be repaired.
I'll show a work around in the next post.

Wednesday, October 17, 2018

Estes Mini Mars Lander Build #0881, Part 13, Leg/Fin Details


The leg braces are die-cut from thinner card stock.
There are some hold-down ticks that have to be cut through. Light sanding with 400 grit removed them.

These could have been glued on earlier but would have needed some involved masking to paint orange.
Paint the orange off the model, save time and get clean color separations.

On the left, the leg braces are stuck down on tape to be sprayed orange.
On the right the braces are flipped over (orange side underneath) and sprayed with Scotch 77 spray adhesive.

The leg braces were pressed in place, the 77 adhesive is plenty strong for this application.

The height of the legs weren't as tall as the face card picture shows. The bottom diagonal edge should have overlapped over and covered the dowel. That's okay, setting the low end on the dowel joint looks like it was meant to be this way.


The only brush paint was the silver on the foot pads.

Tuesday, October 16, 2018

Estes Mini Mars Lander Build #0881, Part 12, Streamer & Undercoat Prep


The streamer is tied onto the shock cord, 2 1/2" from the top edge of the body tube.


This is some 400 grit sanding, taking down the rough spots and small side ridges left from the Titebond Molding and Trim Glue (or No Run - No Drip, whatever they call it this week) fillets.


The rocket got another shot of gloss white. There was still a bit of sanding. I sanded too far and some wood showed through on the dowels. I didn't want to shoot white gloss again, that's more weight.

TIP: I did some paint rolling with Q-Tip "brushes".
A small baggie is pressed into a mixing cup. Spray gloss white into the bag until a puddle of paint is in the bottom. Dip the Q-Tip into the paint.


Wipe off some paint on a paper towel. There will be more paint on the Q-Tip than you'll need.
ROLL, don't brush the Q-Tip over the area.

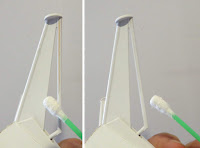
On the left you can see the wood peeking through the paint on the dowel legs. On the right the touch-up paint has been applied.
The Rustoleum rolled on like this blends pretty well. You can use this on dowels and rounded leading edges of fins - not on large flat areas.

Monday, October 15, 2018

Estes Mini Mars Lander Build #0881, Part 11, Nose Weight & Bulkhead


The kit supplied lead weight weighed .15 oz.
A standard Estes clay pat weighs almost .25 oz.

For better adhesion I'll use enough clay to weigh the equivalent .15 oz., maybe a bit more.


Like the centering ring on the engine mount, you'll have to widen the slits for the shock cord tie.

Two small drops of glue were set on either side of the shock cord.

The raised mold lines inside the nose cone didn't help the fit of the round shock cord tie disk.

On the left is the fit before trimming.
After trimming down the disk sides the fit is much better, shown on the right.


I used my favorite card stock to plastic glue, Beacon Fabri-Tac.

On the left, the clear Fabri-Tac a glue bead is set on the edge of the shock cord disk to make an internal fillet.

Saturday, October 13, 2018

Estes Mini Mars Lander Build #0881, Part 10, Leg Housing Sides Fix


When I got to the last pair of fin housing sides I noticed they didn't match up!

The last side was shorter than the side already glued on. This would lead to problems with the cover pieces that follow.


I slipped a razor blade into the glue joint to remove the housing side.

The long and shorter side were stacked and the longer one cut to size.
These thin strips cover the open tops of the leg housings. You can tell now why the housing side lengths had to be even.

If I had to do this over, I would have cut new wider covers that would have gone from edge to edge. The kit supplied strips fit inside the thickness of the side piece.


The foot pads are glued on the end of the legs.

Double check to be sure they are set flat and 90 degrees to the leg.

Friday, October 12, 2018

Estes Mini Mars Lander Build #0881, Part 9, Leg Housing Side Fix


In the last post I mentioned how the leg housing sides weren't "Mirrored".

You can see the raised area near the side housing root edge. This is a crushed area from the die-cutting. I haven't glued the housing sides on yet.


Just to keep track, I marked the inside of the housing sides with an "X". These are easy to get mixed up.


After a rub with the back end of a Sharpie to press in the raised areas, I did a light coat of medium CA applied with a Q-tip. Keep the CA glue away from the root edge and glue areas.

This was lightly sanded with 400 grit.


Now it's starting to look like a Mars Lander.

Both sides of the housing are glued on and are straight.

Estes Mini Mars Lander Build #0881, Part 8, Primer and Leg Gluing


The engine mount is glued in, the nose cone slid in place for a shot of Duplicolor Filler/Primer.


After sanding, the filler/primer was sanded down to the tube surface on the fin lines.

The pencil lines were re-drawn. Notice the lines are extended around the back end and on the lower centering ring.


All four leg assemblies are glued in place.
On the left side, the leg housing sides tend to bow out.
Before gluing, lightly bend the housing side so it will end up in a straight line. Gluing the sides on is covered in the next post.

These leg housings weren't cut with right and left side pieces. Each pair should have been cut as a mirror image. You are not able to glue the rough side to the center where it won't be seen.

Thursday, October 11, 2018

Estes Mini Mars Lander Build #0881, Part 7, Nose Cone Prep


The nose cone fits into a very short section of BT-60. There won't be much room for the wadding and streamer.
There is a recessed line in the shoulder to set the cut. I used a razor saw to cut off the back end.


Here's the back end after the cut.

The rough edges were sanded smooth.


TIP: The raised molding seam was scraped using the backside of my X-Acto blade. The backside of the blade works almost like a cabinet scraper and won't dull up the sharp side of the blade!


Scraping off the seam took down the raised ridge. There were still some recesses.

A bead of medium CA was set down. Allow plenty of time for it to dry before sanding with 220 grit, then 400 grit.

Wednesday, October 10, 2018

Estes Mini Mars Lander Build #0881, Part 6, Gluing Up The Struts


After the first strut dries you can match up the edges by sanding on a block. I'll usually cut the dowels a hair long so everything can be trimmed to size afterwards.


The short dowel is a bit tricky, don't use much glue at first. You can always add more after the piece is in the right position.


The long top piece is added last. Repeat four times!


In the upper picture you can see the center card stock piece is longer than the dowel ends.


The card stock extension was trimmed and the ends sanded.

I'm going to wait to glue the leg braces on. The rocket is painted yellow overall, the leg brace pieces will be painted orange and set in place with spray adhesive - no masking!

Estes Mini Mars Lander Build #0881, Part 5, Cutting The Leg Struts


The dowels are a bit rough. Smooth them out with 400 grit.

The dowels were taped down and got a hit of filler/primer.
Sanding followed leaving very little filler on the dowels.


The instruction drawings are supposed to be full size, but they were off by about 1/16" in the length. I figured I'd trim them down after the dowels are glued in place.


The dowel angles were cut by laying the dowels on the full-size drawings.
A new razor blade made the cuts easy, these dowels aren't that thick.

Line up the blade with the cut lines on the instructions.


The dowel diameter is thicker than the card stock. Be sure the dowels are centered on the card edge.

Tuesday, October 9, 2018

Estes Mini Mars Lander Build #0881, Part 4, Fin Center Prep


The die-cut card stock edges needed some cleaning up. I used a block with 220 grit sandpaper.

Above shows the rough edges, the smoothed piece is below.

The die cutting process leaves a crushed lip at the bottom of the cut.
I used a Sharpie barrel to burnish down the raised sides.

Above is the before, below is the after.


Here's what I mean, you are simply pressing and smoothing down the edges before gluing together the fin. You could never get rid of this edge after the fin/legs are assembled.


I did a quick wipe of medium CA glue over the rougher back side of the fin piece. fine 400 grit sanding smoothed out the surface.

Keep the CA glue away from the edges that will get wood glue for the dowels.