Showing posts with label OR Red Max. Show all posts

Monday, May 29, 2017

Carded Red Max Build, Finished


Here's the cliche picture you'd take to show how small it really is -
Only 5 3/16" tall and weighs .33 oz. Much of the weight is the clay in the nose cone.


The nose end picture shows a mistake! Can you see what it is?
I had to go back, fix the art, print and build again. Everybody that requested the Red max PDF got the corrected art.


Here's my Red Max family,
The standard BT-60 based Red Max, the BT-50 Mini Max and the BT-5 Micro Red Max.

Sunday, May 28, 2017

Carded Red Max Build, Part 8, Glued Assembly


The black fin position lines were lightly scraped for better glue adhesion.

At the paper seam joint on the launch lug, the seam was sanded.


The fin lines were also scraped and the fins glued on.

On a printed, carded rocket it's important to use white glue on the outside surfaces. Wood glue would dry yellow and discolor the print and model. White glue dries clear and is invisible on the finished model.

There is no room for a streamer, this model used a simple nose blow recovery.

The nose cone was 2/3 full of clay weight.
The Kevlar line was tied to the nose cone base with a secure square knot.

Carded Red Max Build, Part 7, Ends & Edges


A small notch was cut into an engine block and some 65 lb. Kevlar tied on with a square knot.


A 13mm engine casing was marked at 1/8". Normally an engine could extend 1/4" out the back, but on some models that could set the engine lower than the tips of the fins.


A great thing about a pre-printed carded rocket, the only thing to paint is the nose cone!
The shoulder was masked off and spray painted gloss black.

Saturday, May 27, 2017

Carded Red Max Build, Part 6, Tube Wrap


The final BT-5 length is 2 13/16" long. You might find it easier to use a piece of tube about 5" long and trim it to the size of the wrap after it is glued on.

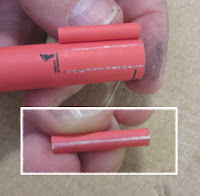
Without using any glue check the fit of the tube wrap. The inset picture shows the black border line being trimmed off before gluing.

Draw a pencil line straight down the tube to line up the wrap edge.

Apply glue stick completely over the back of the wrap being sure to cover the edges well.
Start the wrap down the pencil line lining up the the top edge with the top of the body tube.

Here's the launch lug cover piece -
By the time you get all the way around you may have to add some more glue under the overlap seam. Burnish down the seam closing it up.

Friday, May 26, 2017

Carded Red Max Build, Part 5, Fin Skin Gluing


The upper picture shows the three layers viewed from the root edge.

Use your burnisher to round off the cut side edges. This won't be a full round like the folded leading edge. The burnishing just takes the squared edges down a bit.
Don't burnish over the root edge, leave that square and sharp!


Run a small bead of white glue down the outside and trailing edges of the fins. Let dry and sand lightly with 400 grit.

Repeat the glue bead again, let dry and lightly sand.
This seals the open edges and rounds them over a bit.

Thursday, May 25, 2017

Carded Red Max Build, Part 4, Fin Skin Gluing


Don't use liquid white glue to attach the skins! Use a glue stick.
TIP: Glue sticks don't over saturate the paper or card stock. They also allow re-positioning before the glue dries.

I use the colored (purple) glue stick so I can see if I have good coverage. Be sure to apply enough down the center fold and along the edges.

Set the skins over the rounded straight leading edge of the cardboard. Press the leading edge fold down on the interior cardboard edge first before smoothing down the sides.

Burnish the skins down onto the cardboard interior piece.
It's not necessary to set these under a weight or in a book to dry.

Be sure your knife blade is new and sharp so the backside skin won't tear when cutting.

After the fins dry, cut through all the layers down the fine line on the "Root Edge" side.
The inset picture shows the other side of the fin. The back side is printed oversize to be sure the red ink covers edge to edge.

Wednesday, May 24, 2017

Carded Red Max Build, Part 3, Fin Skin Folding


To emboss the leading edge fold line sometimes I use the back side of a single edge razor blade. The sharp side is taped over with layers of masking tape.
Any rough burrs are sanded off before embossing.

You might find it easier to use the tip of a dull butter knife to emboss the leading edge fold lines.


Emboss the leading edge fold before cutting out the fins.
Lightly score the center lines using a straight edge.
Cut out the fins outside of the red image area. The white edges will be cut off after the overlay skin is glued to the center core.

Notice the ink coverage one side is larger. This ensures full ink coverage on the backside of the fin when it is cut out.


Pre-fold the leading before gluing over the center core. As always, I'm using the back end of a Sharpie barrel as a burnisher.

Tuesday, May 23, 2017

Carded Red Max Build, Part 2, Fin Core Prep


My early art layout page had a LOT of extras. The body tube wraps are printed on 20 lb. paper, the fin overlays are printed on 110 lb. stock.
Lightly spray the print side with clear acrylic. The model will get a final coat of clear after it is assembled.


The center core of the fins is cereal box cardboard.
Here I'm cutting of the edge to have a straight leading edge of the fins.


After the straight edge is cut, run some 400 grit over the edge and round off the top. It doesn't take much, just knock off the corners.


With some 220 grit sandpaper rough up the glossy printed side of the cardboard for better adhesion.

Monday, May 22, 2017

Carded Red Max Build, Part 1, Parts

I've seen a few pictures of "Rocket Families" on the forums. The Red Max is a favorite with the Estes Mini Max (BT-50 based), standard Red Max (BT-60 based) and Mega Red Max.
Well, how about a smaller BT-5 version for 13mm engines? This one is tiny at just 5 1/4" tall! It performs like a BT-5 Mosquito.

At one time I had a little carded Red Max model. It was a BT-5 diameter with a Micro Max engine mount. I lost it somewhere along the way and wanted to make another one.
After a few searches I couldn't find it. I thought it might be at Wayne Hill's Rocketry Blog - CLICK HERE 
There are many carded rockets there including my designs.

The carded Red Max I had before had three piece laminated fins. The redraw I did has two piece "butterflied" fins where the center fold becomes a rounded leading edge. The center core is cereal box cardboard.

The decal art was taken from the online instructions at Jim Z's, cleaned up a bit and reduced.

Don't use the illustration at the right to make the rocket.
Patreon supporters can email me at: oddlrockets@bellsouth.net and I'll send the full size PDF.

Two prints are made, one on 20 lb. paper a second on 110 lb. cardstock. This print gives you enough to make two rockets or have some extra parts.

PARTS: You'll also need some BT-5, a plastic Quark style nose cone, 1/8" diameter launch lug, 65 lb. Kevlar and a 13mm engine block.
TOOLS: A sharp knife, a dull butter knife for scoring the fin leading edges, clear acrylic spray, white glue and a glue stick.