Showing posts with label E Vanguard Eagle. Show all posts

Saturday, February 9, 2019

Estes Vanguard Eagle, Kit # 2193, Finished


This kit was a big disappointment. Too much plastic on the fin can, poorly fitting adapter sticker and very difficult masking on the rounded rear engine tops.
The small capsule nozzles are almost too small to be noticed. I had a hard of a time holding onto them. They were left off the model.

The model weighs in at 3.3 oz. without engine. Too heavy! I'm glad Estes is not producing stuff like this anymore!

Friday, February 8, 2019

Estes Vanguard Eagle, Kit # 2193, Part 14, Adapter Sticker Fix


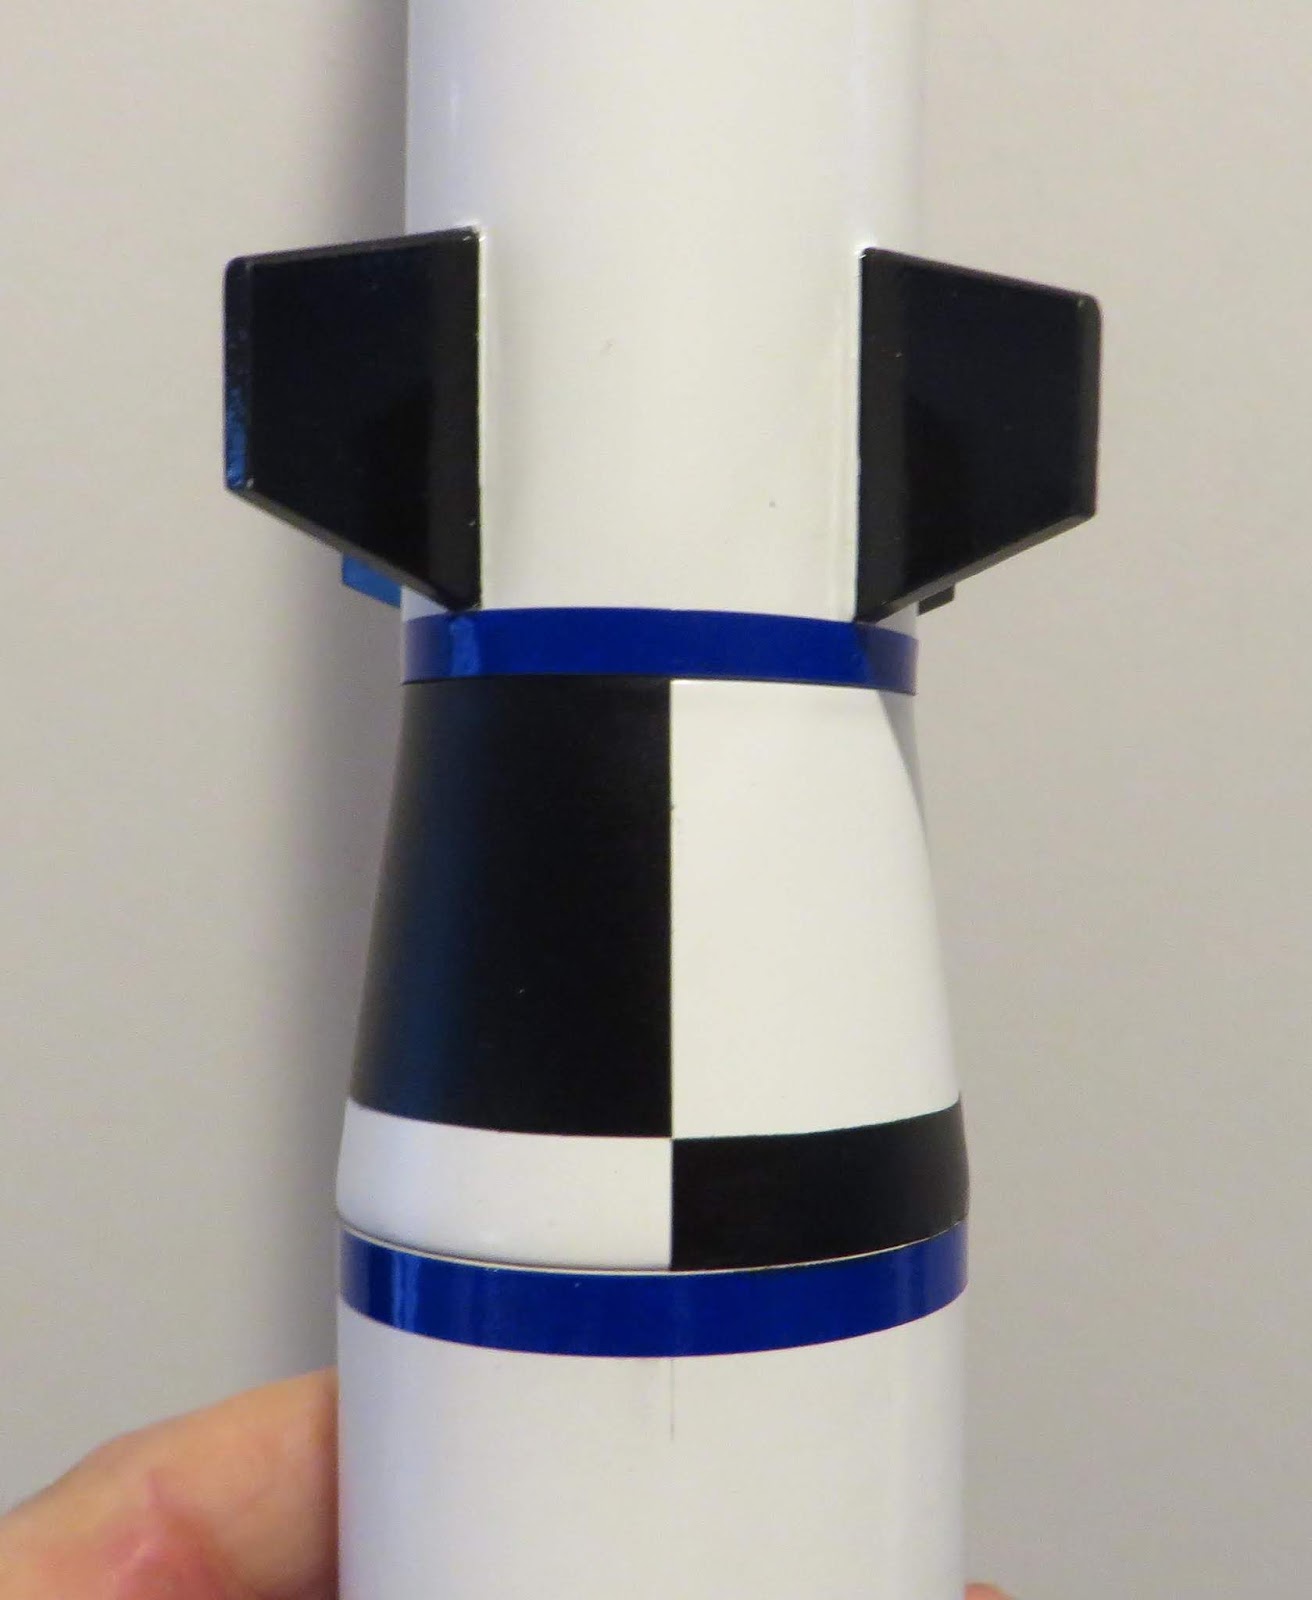
On the left is the adapter area from the face card picture. It looks like some black was added to fill the empty areas at the top and bottom.
On the right is how the wrap sticker fit the adapter on my build. I wasn't happy with the look.


I took a chance and peeled it off the adapter.
It was stuck down onto some paper for a cutting template.

This was taped onto some Contact Paper Blackboard Cover Material.
The vertical lines remained the same, the top and bottom were extended. This vinyl Contact paper stretches more than the clear sticker ever could. It should have a better fit from top to bottom.


With the backing still on, the curves were cleaned up by sanding the edge with 220 grit.


Any long edges were trimmed off at the shoulders.


The black shoulder edges got some color extension into the edges with a Sharpie.

Estes Vanguard Eagle, Kit # 2193, Part 13, More Miscellaneous


This model has a lot of different features. Some work, others don't.

Here's the removable engine nozzle plate. There's a open slot that fits around the low bend of the engine hook.

I rarely use the tri-fold shock cord mount. On this rocket there was no easy way to use a Kevlar line. The upper tube is a BT-55, a large diameter so it can't block the ejection of the chute.

The parachute is just 12" diameter. Some reviews say it's too small and nozzles break off on landing. I'll probably replace it with a 15" chute.
Here's another marginal part. Marginal as in too small to bother with.

This square on my cutting board is 1" wide. Under the right side of the tweezers is a nose cone nozzle.

I was holding the nozzle down with the tweezers to paint it. The nozzle popped like a tiddly wink and flew across the room! After five minutes of searching I found it. I used less pressure to hold it down and got one nozzle painted.
The second nozzle flew across the room! I couldn't find that one. Enough already! If two nozzles were lost I knew I wouldn't have any more luck with the third and fourth. I'm leaving them off the model.

Thursday, February 7, 2019

Estes Vanguard Eagle, Kit # 2193, Part 12, Capsule Details


The base of the capsule is painted black. This is a stupid hard mask to get right. A first time builder would be frustrated trying to get a mask in the tight area beneath the raised dimples.

I cut a very narrow strip of Scotch tape to go under the dimples. A wider piece of tape was set down above that.


Here's the paint line after the tape was lifted. Not good.
It took too much time scraping and pushing the black paint back to get it close.


The capsule decals were applied. There is a lot going on here.
It reminds me of the Quest X-15 with all the decals on the nose cone.

The rounded areas above the cylinders are supposed to be painted silver like the engines tops on the fin can. I'm not bothering with it. It's too small an area to mask effectively.

More dimples at the top are painted silver.

I cut the top off a toothpick and sanded it smooth.
The tip was dipped in silver paint and the excess wiped off.

Touch the wet toothpick on the dimple and turn. You should get a round bead of paint. These upper dimples are actually oval shaped.

Wednesday, February 6, 2019

Estes Vanguard Eagle, Kit # 2193, Part 11, Drawing Up Decals


The stickers were scanned. Before scanning, always draw some 1" span references. This gives you something to size your drawings to.

In your drawing software, draw a 1" box. Enlarge or reduce your dropped in scan to match up the 1" reference.
I couldn't find all the logos online. The scanned colors weren't a great match but I'm not going to be picky.

The scanned logos were used as is. The color register was a little off on the US flags. Those are found online. I dropped in the new, cleaner flags.


The recessed lines on the capsule are shown as black on the face card.

These turned out well, simply run a fine point Sharpie around the notch.

Tuesday, February 5, 2019

Estes Vanguard Eagle, Kit # 2193, Part 10, Masking the Silver Engine Tops

The round top of the fin can engines is painted silver. This will be a tough mask.


Here's my patio door glass again.
I used my old cheap compass to scribe a half circle on some marked Scotch tape. There are some layer of masking tape below the Scotch tape to hold the center pivot pin on the compass.

Enlarge the picture and you can see the arc on the tape.

The tape was lifted off and repositioned on the glass at an angle for easier cutting.

For easier placement the tape arc was cut in two.

Each half was placed around the round end.
More small pieces of Scotch tape were added to round out the mask.

On the left is the complete mask.
On the right is the complete mask after the tape was removed.
This mask was a pain to get right.

Monday, February 4, 2019

Estes Vanguard Eagle, Kit # 2193, Part 9, Stickers! I Hate Stickers!


I did use some of the stickers. I thought using the blue bands would be easier than another mask.
These blue stripes are translucent but look okay over the white paint.
On the low end of the fin can there are four blue strip pieces. These are stair stepped to fit around the round engines.

Look to the root edges of the fins. The fine point line down the root edge overlaps just a little onto the main body. I could have got a cleaner root edge mask using just the Scotch tape. It was worth a try!
The roll pattern adapter sticker didn't totally cover the length of the adapter. There is white showing through on the top and bottom.

The fit wasn't perfect, there was some raised areas along the top. I tried slicing through the bubble and that closed it up. After it sat for an hour the cut area rose again! A fix will be made later . . .

Saturday, February 2, 2019

Estes Vanguard Eagle, Kit # 2193, Part 8, Fin Masking

Here's a rare look through my patio door.

Scotch tape was set on the glass. To see the tape on the model, a wide point Sharpie line was drawn through the middle of the tape. The tape was cut down the middle of the line giving me two sharp, clean edges.
Don't press hard on the glass, you don't want to scratch it.
On the left is the mask for the lower fins on the plastic fin can. The Scotch tape was set on the fine line drawn earlier. Once again, this pen line idea was an experiment and didn't get good results. Masking tape was set down outside of that.

On the right are the upper fins on the BT-55 tube.
The leading edge of the upper fins were rounded. Look at the above right picture and you can see small pieces of Scotch tape placed around the leading edge.

On the left you can see small "corners" around the leading edge where the tape pieces were placed.
On the right the raised areas were pushed back with the flat side of my knife. I usually do this when the paint is still a bit sticky.

Friday, February 1, 2019

Estes Vanguard Eagle, Kit # 2193, Part 7, Miscellaneous Stuff


I tried to slide in a finishing wand dowel into the engine mount. That tight fit of the BT-20 tube in the plastic centering rings made for a very tight fit. I had to sand down the end of the engine casing to get it inside.


After spraying the eight larger nozzles some touch up was needed. Instead of brushing I used a Sharpie to darken up any areas not covered with black paint.


The upper small fins were glued onto the BT-55 tube.
Fillets of Titebond M&TG followed.


The fins on the lower plastic fin can are painted black. I thought it would be tough to get a good mask with the raised half rounds so close.
To get a good line I ran a fine point Sharpie down the root edge. I wouldn't recommend doing this, I was trying something new. More upcoming . . .

Thursday, January 31, 2019

Estes Vanguard Eagle, Kit # 2193, Part 6, Primer and Paint

With the launch lug glued on it got fillets of Titebond M&TG.

The BT-60 lower tube, adapter and upper BT-55 tube were friction fitted with masking tape, no glue yet.
In this picture the Duplicolor Filler/Primer was shot and is still wet. I spray one coat, fairly thick.


The molding seam on the adapter was sanded. The picture shows a bit of the filler/primer left in the seam.


The bases of the nozzles were sanded flat to remove the molding hold tabs.

The gluing position tabs on the bottom will remain white, they were slipped into cut slots in the cardboard.

The Elmer's Carpenter's Wood Filler didn't stay in the wood grain. You can see the grain pores after the filler/primer was shot.

I'll rub in some CWf with a fingertip and sand smooth. I don't think I'll need another shot of filler/primer, maybe some light sanding between color coats.

Wednesday, January 30, 2019

Estes Vanguard Eagle, Kit # 2193, Part 5, Ends and Edges


The small forward fins are laser cut into some stiff 3/32" balsa.

The instructions say to sand the edges square but I decided to round the leading edges.


I don't know what caused it, but the ends of the body tubes are turning brown. I thought at first the brown edges were from laser cutting but there was no charring.


The clay is cut in half. One half goes in each nose cone side.

The halves are glued together and rubber band wraps hold it tight as the glue dries.


On the lower left are the larger nozzles that glue to the fin can. There are eight larger nozzles in total.

At first I thought the tiny nose cone nozzles were some plastic flashing. I almost threw two of them away! They are so small it will require tweezers to position and glue in place. All the nozzles were in a small bag, separated and not on trees.

Tuesday, January 29, 2019

Estes Vanguard Eagle, Kit # 2193, Part 4, Fin Can


The plastic fin can is made up of four side pieces.
The four fins are in halves, split right down the middle. (See the next picture.)
When all four sides are glued up it makes a very strong fin can.

Look close to the sides of the centering ring to see the ridges in the fin can piece. The centering rings glue into the ridges.


I applied Beacon Fabri-Tac glue inside the ridges and pressed the centering rings in.

When gluing the second, third and fourth sides on, wrapped rubber bands applied pressure to hold everything tight.

Notice the open halves of the fin.


The fin halves were gently opened and some liquid plastic cement brushed in.
Liquid cement dries fast so clothes pin clamps were quickly put on.


Three of the four sides were butted tight together. When the fourth side was pressed in, there was a slight gap. This will be filled before painting.

Monday, January 28, 2019

Estes Vanguard Eagle, Kit # 2193, Part 3, Engine Mount


The holes in the centering rings were very tight against the BT-20 engine mount tube.
I had to go back and shave down the inside to enlarge the holes slightly.


Even after scraping the fit was tight.

Look right below the engine hook and you can see where the BT-20 tube bows into the engine hook recess.

The rings were glued on with Beacon Fabri-Tac glue, perfect for plastic to tube bonds.


Here's the finished mount.

Note the engine hook extends 1/2" out the back. Normally an engine hook overhangs 1/4" beyond the rear centering ring.

Sunday, January 27, 2019

Estes Vanguard Eagle, Kit # 2193, Part 2, Engine Mount


With a short BT-20 tube it doesn't make much sense to push and engine block into a bead of glue from the bottom. Then the engine hook is set into the cut slit. The instructions at the right show how they recommend it being done.


TIP: Slide the engine block in (dry) from the top and against the upper bend of the engine hook. Apply a bead of glue around the top joint of the engine block. You can use an engine casing to help keep the block set straight. After the glue sets up the casing is removed.


Take a look at the centering rings - plastic!

Below the centering rings is the display nozzle plate and nozzles.