Showing posts with label Oops. Show all posts

Wednesday, August 20, 2025

Centuri Skylab Build, #KB-4, Part 16, Oops! Gluing On The Wrap


The 3D wrap was a bit large and slid loose on the 2" tube. I decided to cut out a sliver for a tighter fit.

3D plastic is brittle! When I tried to score the cut line the piece cracked.
The second break was down the cut score line. I set that piece aside. I'm not really concerned as the launch lug will cover any seam.

The wrap was glued on using Fabri-Tac glue. Fabri-Tac contains acetone and works well with plastic to Kraft tube joints.


The Fabri-Tac gives you a little working time, it's fairly slow to dry.

Tape was used to hold the wrap tight as the glue set up.


That broken off piece was glued and slid into place.

There was a gap towards the top. No big deal, the launch lug will cover it.

Saturday, May 31, 2025

BMS School Rocket, Build, Part 3, Engine Mount


From the instructions:
This shows a dry fit, the centering rings aren't glued over the laser cut lines yet.
The Kevlar shock cord is tied through a cut hole and around the engine block.
I prefer tying a small loop knot and setting that under the top bend of the engine hook. This is an idea from Semroc. 
More later - 

OOPS! Originally I raised the lower centering ring above the laser cut positioning line to give more flex of the engine hook. I had to lower the ring, it would be in the way of the TTW fin tab.

I set the rings in a light ring of glue, applied to the tube. The ring is slid into the glue ring.


Side by side, 
Here's how the engine mount centering rings set when glued onto the laser cut lines.

You have some good space around the rings and fin tabs.


Saturday, September 7, 2024

Enerjet by Aerotech, Astrobee D Build, Part 29, Oops!

I wanted to show the "Launch" version with the shiny aluminum wrap. 
The screws sticker strip was carefully removed.
    
It happens to all of us! I screwed up.
I don't think I've ever had a perfect finish. I know where the flaws are.

On the left you can see some rough finish with some white undercoat peeking through.

I held the upper body with a paper towel as I sprayed a dull coat acrylic onto the glossy gray. Some of that clear dull coat landed on the paper towel I was holding onto. It soaked into the paper towel and into the paint already on the tube.

After the clear coat dried, some light sanding followed with 800 grit.

I resprayed with what was left of the Tamiya International White. Let dry, lightly sand to help fill.
One more spray coat covered the mistake.

Monday, May 15, 2023

MPC Lambda Payloader Build, Part 12, Fin Stripe Decal


Sometimes you swing - and miss! So you compromise.

I hoped to place the fins stripes on both sides of the fins with the tops meeting up, rolling over the leading edge.

The first stripe was set down, parallel to the root edge.


Flipped to the other side - 
The ends were rolled over, ending up at an angle on the other side of the fin.


The second stripe was set, overlapping the first side decal over the top and bottom.

A new single edge razor blade cut a straight line through both thicknesses of overlapping decals. GO LIGHT with the cut. You are only cutting through the thin decals, not into the balsa.

You may have to hold down the overhang ends tight as shown on the right.  

Before the decal sets up and is still a bit wet - 
Lift up the decal ends and remove the overlaps.
Wet the lifted end and press them back down.

Sometimes this works, it depends on the fin shape and the angle of the leading edge. 
In this case it didn't work! There wasn't a good flow over the round leading edge.


I cut the top ends back a bit, just at the start of the rounded edge.

The two-sided decal stripes were also placed on the opposite fin. The kit box only showed one fin with the stripe. I decaled two fins for a better visual balance.

Saturday, April 22, 2023

Wolverine Phoenix AIM-54A, Fix!, Part 1, What Happened?

Here's one I assembled in 2012, the Wolverine Phoenix.
It's a clone of the big Estes Phoenix kit, #1380. 

There was a glitch in the pre-production kit I received. 
The model is made up of two BT-80 body tubes, the lower tube should be 14" long, the upper tube, 7.6" long. Both tube lengths are joined by a coupler. 
In my "kit" the lower body tube was sent at its original length of 18". I assumed the tubes were the correct length and assembly followed.

Having never built a Phoenix rocket before, it didn't think anything was amiss until I went to apply the decals. The open mid section ended up  about 4" too long!

While building, I also drew up the kit instructions for Uncle Mike's Rocket Shack/Wolverine Rocketry.

Here's a link to the first build from finish to start: CLICK HERE


This project is to cut out the extra four inches as cleanly as I can.
The scrap tube will have to be peeled off the coupler. Cleaned up then rejoined (hopefully) at the right length. I might lose the upper launch lug. I can home print and replace the small black decals in the middle.

This has bugged me for years! The model has never been flown.

Thursday, December 8, 2022

Estes Blue Origin New Shepard Build, Part 9, Parachute & Engine Retainer


Here's the finished nose cone with the upper tunnel ends filled and painted.
I was happy with the results.

Note the position of the tunnel top position to the right.
Oops! The tunnel top should be closer to the left, at the edge of the black paint feather edge. 
This was my mistake. It didn't really effect the look or position of the feather decals (by much) that go down the body.


The engine retainer is screwed in place. 

Note there is no white paint on the screw threads. The threads were masked before spraying the white.
I tugged the shroud lines and they easily broke. These were replaced using #10 Embroidery Thread.
The parachute was tied as a "no-tangle" chute. To see how a "No-Tangle" chute is tied, read the Apogee P.O.F. article: CLICK HERE

A snap swivel was added.
The chute was not tied to the nose cone, but attached a few inches down from the nose cone. This helps prevent the nose cone from swinging in and out of the shroud lines, tangling the chute.

Sunday, August 21, 2022

New Way, Der Squared Max Build, Part 3, Engine Mount Gluing & Jigs

The engine mount was glued in.
Glue for the forward ring was applied using a coat hanger wire with a taped Q-tip on the end.

Glue was applied to the Q-tip and transferred inside the body tube. The motor mount is slid in place and a fillet applied to the back centering ring.

Mentioned earlier - I forgot to add the shrink wrap tubing over the Kevlar. 


These are some well fitting Fin Jigs.

The smaller, forward jig was pressed together against my block.

Press the larger rear jig together and slide apart. The laser cut leaves an ash mark that shows where the glue line should go.


Another template is for the launch lug placement.

Fold and press over the corner of the tube. The alignment lines should be drawn next to the single centered fin slot.

Thursday, August 18, 2022

Cleaning Up! Missing Posts?

Stuff happens!
I wondered why a few readers asked where I got the balsa nose cone for the EAC Firecat build. I thought all that was covered in the first "Parts" post. Doing some backtracking, I found that post was still in Draft form, never published! To see it: CLICK HERE
I also skipped Step 22 of the most recent Super Orbital Transport build. It's in the correct order now! To see it: CLICK HERE
The NewWay Boxie Birdie was missing build step Part 4. Here's that correction: CLICK HERE

That's enough cleaning up for tonight. No other posts today - instead, there are now three never seen (missing) build steps.
I did make up a new name banner for the top of the blog -
That NewWay SquaRed Max build is coming up!

Wednesday, August 3, 2022

Estes Super Orbital Transport Build, Kit #7314, Part 8, Wing Tips & Engine Housings


The wingtips are glued on, here shown upside down.

After the glue dries, CWF filler is brushed over the tab/notch seams.
I chose to sand off the tabs and leave the notches filled on the wings. While it's easier to align the engine housing sides using the cut slots, it takes much more work to fill the tabs that usually end up beneath the surface of the open slots. 
Oops! I did run into a problem  - of my own making. I probably sanded off too much!
Sanding down the tabs may have slightly lowered the height of the engine housings. The BT-20 jet tubes wouldn't comfortably fit under the housing assemblies.
I wrapped 400 grit around an engine casing and sanded a very shallow dip in the top surface.


In the picture above - those little dots help me keep track as I assembled three kits. The marked pieces all came off the same balsa sheet. 

The finished look is good. Those subtle dips under the top piece aren't noticeable.

Note the right and left rounded corners of the engine housing.

Monday, July 25, 2022

Quest Harpoon Decals Fix

I don't use clear coats - either overall sprayed or Future. I've never been able to get great results. 
There are some times when I apply Future clear acrylic to seal and strengthen old, dry, brittle decals.

Future can be used to hold down the seams where two ends of a decal meet. I dip a Q-tip, wipe off the excess on a paper towel then brush  down the joint.

I used a new, single edge razor blade to cut off the overhang on the outside edge of the decal. Use a "sawing" motion to remove the long decal without cutting into the balsa. That overhang chipped!

Some Future was wiped onto the decal root area and the broken up edge to prevent any more of the blue breaking off.


Here's a broken edge before the touch up. 

Darkest colors are the easiest to match up. Some Royal Blue paint was sprayed into a small cup and the decal breaks painted.


I was careful but still had some paint overlap the outside face.

After the paint dried, some very light scraping removed 90% of the blue. I didn't want to go too deep and cut into the white. 

Not perfect, but much better.

Wednesday, July 20, 2022

Goofing Up A Build - MRN, June, 1964

Steve Riegel posted on the NAR Facebook page:

"When I was a kid in the 80s, I recall reading a parody article (maybe older than the 80s?) from the POV of a newb who made every classic blunder a he rushed through building his first kit. There was a specific line about using scissors to cut out the balsa fins since it left a nice, splintery edge for gluing.
If anyone has a copy of that article, I would love to get one for the classes I teach. Thanks."

Edit: Found it, Model Rocket News, June 1964. Copy available on JimZ's site.

I remember this article from a "Best Of the MRN" collection you could buy from Estes.
How many of you used too much glue thinking: "My rocket will be stronger than everybody's!"
Always remember: "That's their way of selling more stuff."
Read on . . . it's a good laugh!


Monday, July 18, 2022

Estes Blackhawk #2053 Build, Part 17, A Fix & Decals?


Directly opposite the knife tip you could see a corner of a fin split.

Set some glue on the knife blade and work it into the split cardstock.


Pinch the split together with tweezers until the glue sets.

You can use the tweezers to reform and get rid of any crease lines. 

The parachute assembly is standard. 
A longer elastic shock cord was substituted for the short rubber cord.

The tri-fold shock cord mount was glued 1 1/2" below the top of the tube, 1/2" farther down than the instructions recommended.


I was worried about the age of the decals so I gave them a coat of decal film. 
The decal film goes on with visible brush strokes but is smooth after it dries.


This time around, the decal film didn't help at all.
The first decal easily broke up! Why bother with the rest of them, this wasn't a good sign.

So for now, I've got a black rocket.

Wednesday, June 1, 2022

Estes Blue Origin New Shepard #7315 Build, Stability Issue?

From Matt Ryan on the Estes Model Rocket Facebook page:
"Just got my Blue Origin New Shepard in the mail yesterday, then got this email:
Thank you for purchasing the #7315 Estes Blue Origin New Shepard Builder's Kit. Our team has recently become aware of a stability issue with this model and is working to resolve it as quickly as possible. For your safety and the safety of those around you, please do not build or fly the kit. We strive for 100% customer satisfaction and are asking you to return the item to us for a full refund as well as free shipping to return the item.
Please contact the customer service team at (719) 372-6565 or email us at service@estesrockets.com before June 31st to receive your return shipping label and full refund.
We apologize for the inconvenience and will keep you on a list to be the first to know when the kit is ready to launch again. Please accept this 30% off promo code for your next purchase on our website.
I opened the box but haven't built it yet - anyone know what the "stability issue" is and why it couldn't just be fixed with some well placed ballast?"
_____________________________________________________________

Thursday, April 14, 2022

Estes EAC Firecat #0821, Part 12 - What, Follow The Instructions? GOTCHA!

A Blog Comment from Naoto Kimura:
Naoto KimuraApril 11, 2022 at 4:06 PM
"A potential "gotcha" with regards to the launch lug -- the launch lug needs to be offset from the side of the main body tube to make sure the launch rod clears the nosecone (something that the instructions does not state explicitly)." 


From the Estes instructions: Here's their drawing showing placement of the Launch Lug.
The lug is glued into the root edge of the standoff, closest to the BT-50 tube.


Out of habit and I usually follow the instructions - 
I glued the Launch Lug into the root edge joint.
(Maybe I should have had the Nose Cone in place when the Launch Lug was glued on!)

It probably won't clear diameter the bulbous Nose Cone.

Thanks Naoto! I usually catch these things - Not this time!

Sunday, April 10, 2022

Estes EAC Firecat #0821, Build, Part 8, Launch Lug & Decals

GOTCHA: Scroll ahead to Build Step 12 before gluing the Launch Lug in the wrong place! The Lug placement needs to be positioned so the launch rod can clear the outside diameter of the nose cone!

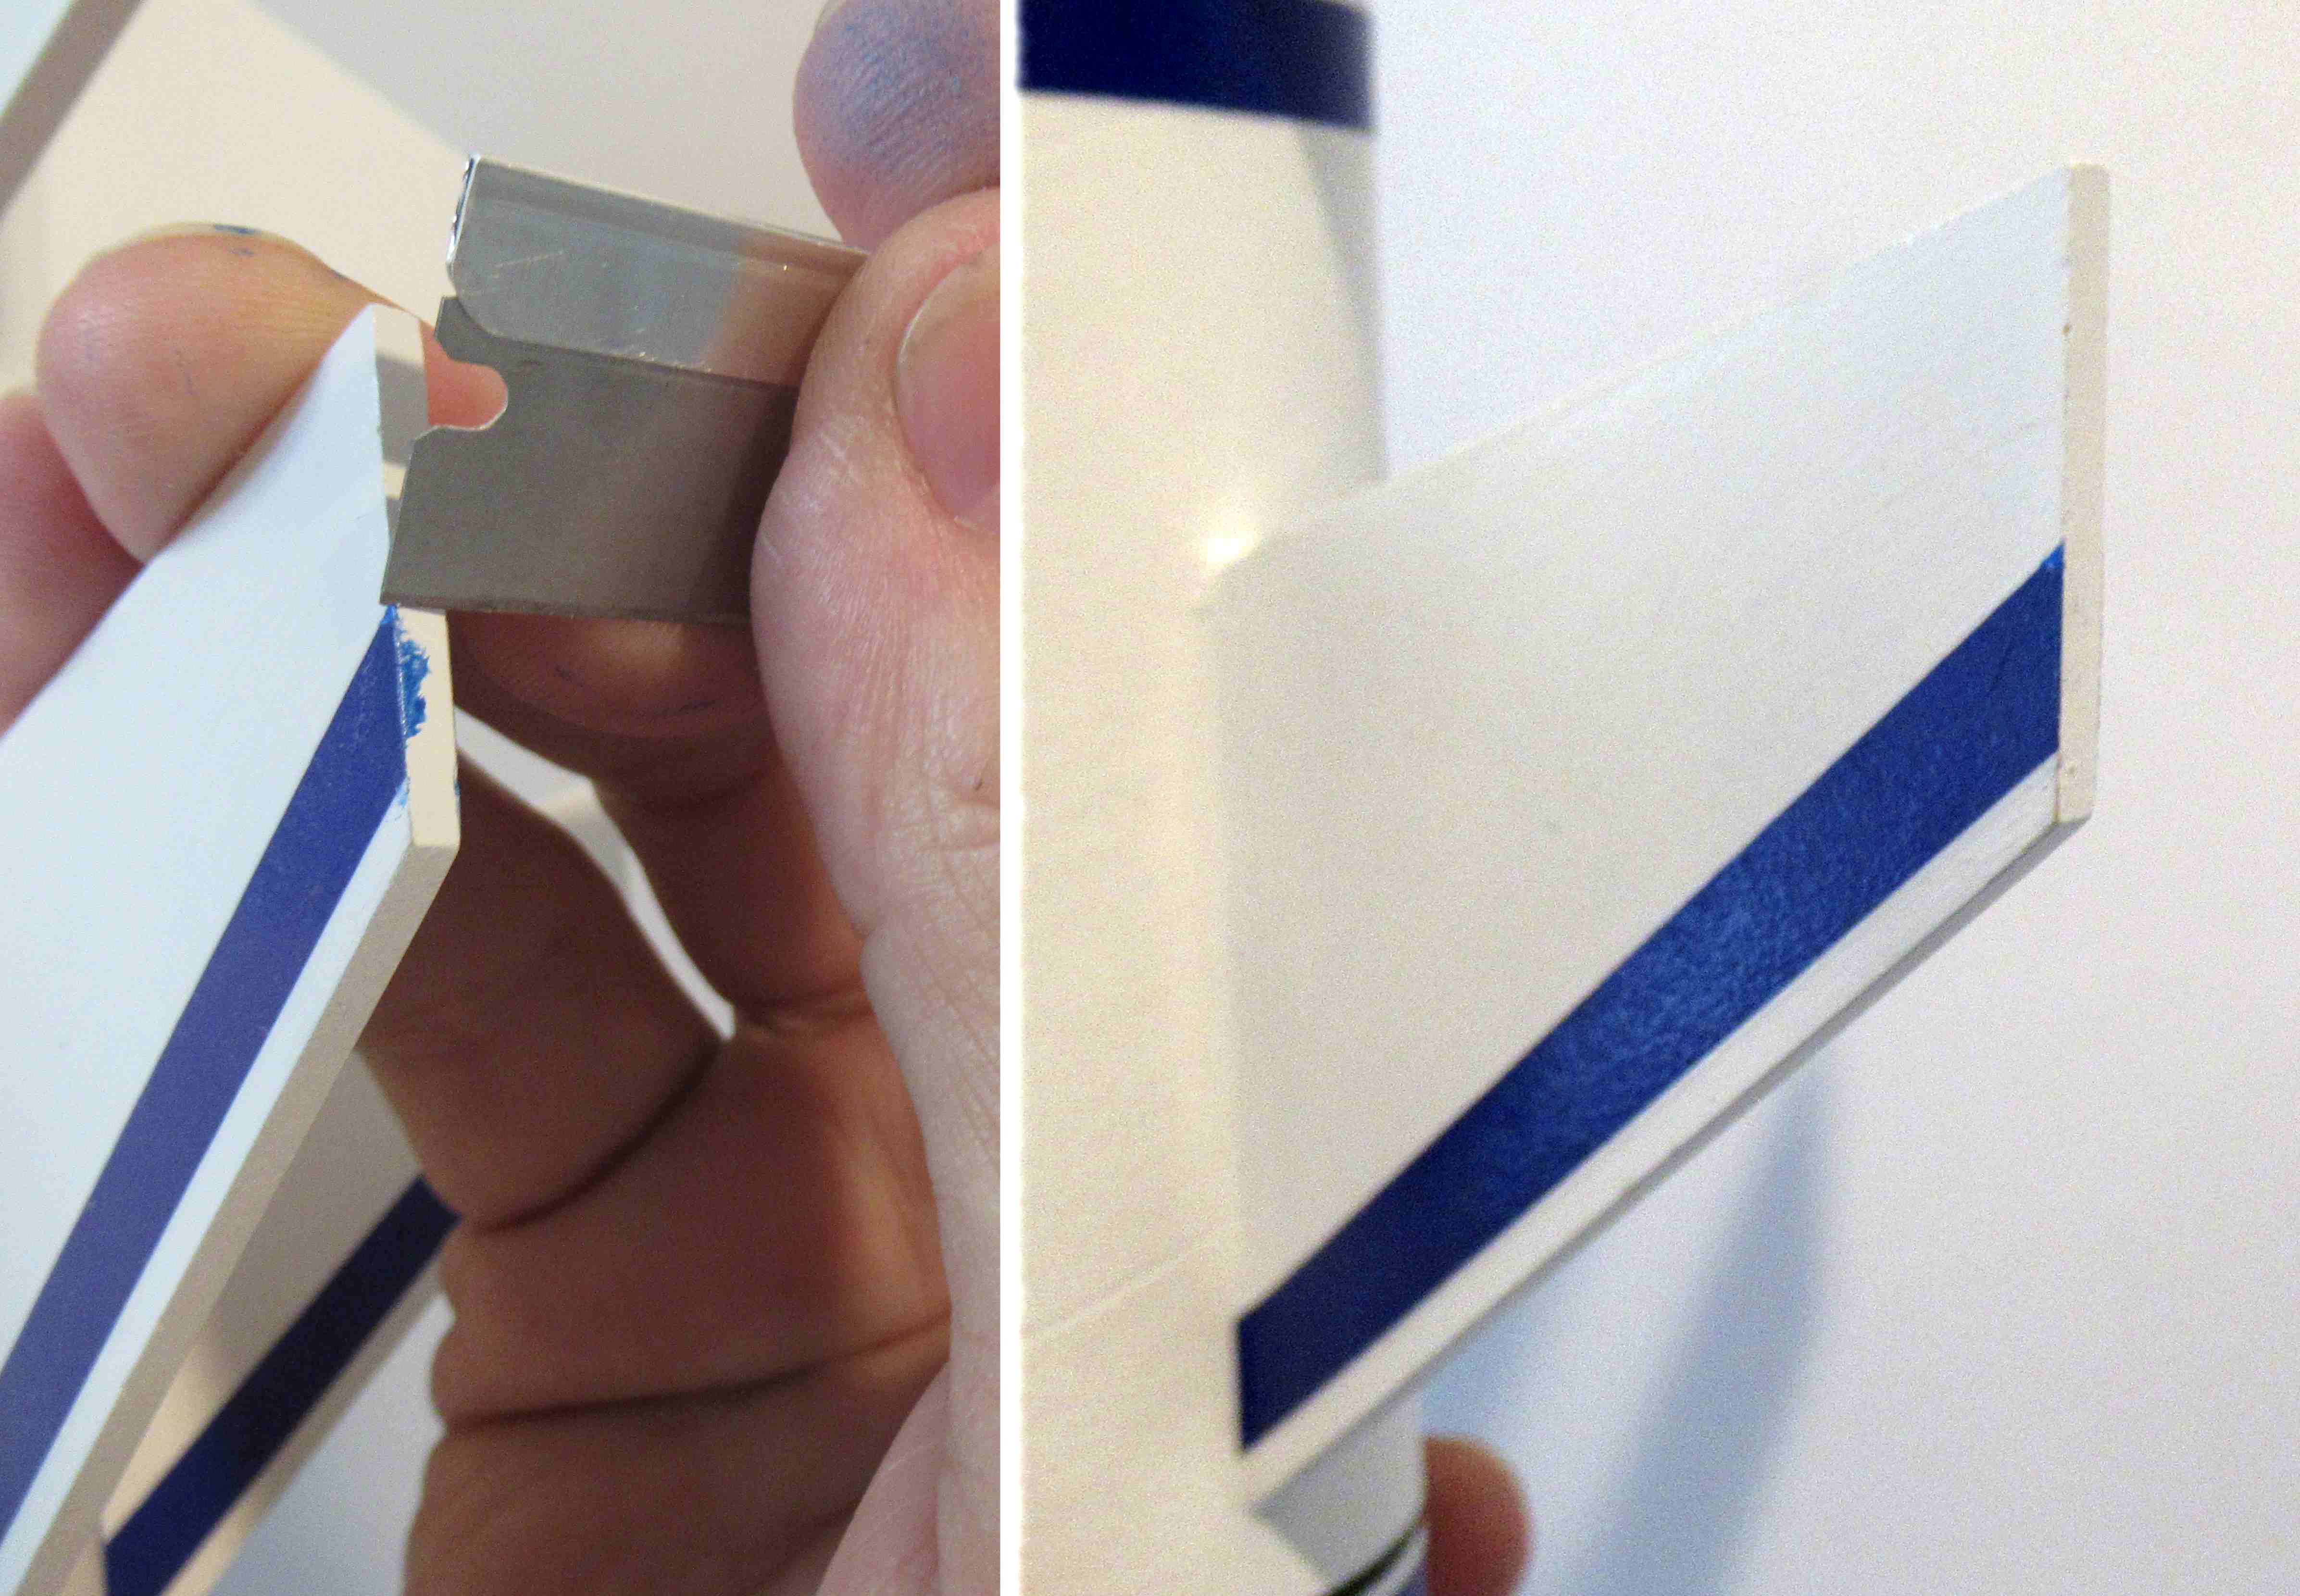
Did you ever forget to glue on a launch lug? Me neither! (Yeah, right.) I didn't notice the launch lug was missing until after the first white undercoats.
I had to carefully scrape off some paint before gluing on the 1.25" long launch lug.

TIP: I don't usually apply glue fillets on launch lugs that are tucked into tight corners like this. The glue is very hard to evenly apply and smooth the fillet.


I have drawn up a PDF of the parts list, decals and fin templates. On the right is the first version. The new drawing (see below) is available to Patreon supporters.
If you are a Patreon member, email me at: oddrockets@bellsouth.net and ask for the Firecat decal PDF.


EDIT: After painting the model and applying my decals, I made some changes in the decal sheet, shown on the right.

The original Firecat kit used the Estes Bandit decal sheet. The Firecat instructions say "The name Bandit . . . will not be used."
There's a problem.
To place the decals like the face card and instruction drawing requires things be cut up. Cutting up home print decals exposes the ink edges which can bleed when soaked.

That BT-48 wrap was meant to roll around the Bandit's BT-55 tube. Some test wraps gave me a width of about 10 of the interior vertical rectangles.

Other trim pieces were cut from that remaining wrap decal.
In my re-draw I separated those pieces for easier cutting and transfer.

At the bottom of the sheet are two rectangles, one is an extra.
Print the decal, cut off the bottom third of the sheet. The upper two thirds is clear coated as normal for home print decals. The bottom third is sprayed gloss white.
More on the decal application comes later in the build.

The fin templates and parts list are still included, but on a separate sheet of the PDF set.

Friday, March 4, 2022

ASP Ram B Build, Part 14, Fin Leading Edge Trim


The leading edge trim is cut using one of the templates.

Lay the strip down the middle of the leading edge by sighting down from the rear. Get both sides as even as you can.


Initially, the black trim strips look very good.


But, after an hour -
The vinyl strips started to lift and couldn't be used.

I could mask and spray the black leading edges but it's a lot of work!
I'll pull the fin vinyl and call it done. This model is very colorful and doesn't really need the fin trim -  Unless you are a real scale guy.

Thursday, March 3, 2022

ASP Ram B Build, Part 13, Thin Vinyl Spiral Trim


Getting a smooth flow on these vertical lines is tricky.
A 1/8" wide strip is pre-cut for you.

Set the lower, shorter piece first.
Start at the low root edge. This piece finishes at the top of the adjacent fin root edge. 
The ends are carefully trimmed down the root edge.

The next longer piece starts on the other side of the fin and continues in a spiral.
Hopefully it ends directly over the starting point. Mine was close!

Oops! If I had followed the color and masking directions - 
There wouldn't have been a launch lug in my way!

I had to trim the vinyl to sit around the lug.
I always cut the tall slot too wide. The slot could have been narrower to tuck into the launch lug fillets.