Showing posts with label Parts. Show all posts

Friday, September 5, 2025

Estes LTV Scout, Build, Part 1, Parts


Votes in the "Pick My Next Build" were tied!
I drew a name out of a hat. The winner was the LTV Scout.


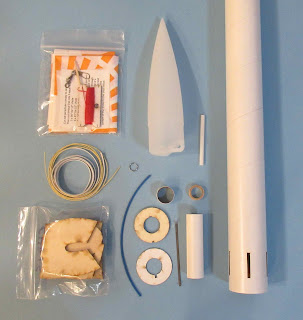
Here's the parts - 
The 1st stage tube (far right) is an Estes BT0-60.
The three tubes to the left are SBT-127CG, above that a SBT-123BR and finally a SBT-129BJ. Those three tubes are not standard diameters.
The long engine mount tube is a BT-20D.

The small red tube of contact cement and nose weight clay should  not be in the picture. They must have slipped in from the Enterprise kit.
The shock cord will be replaced. The parachute is 18" diameter.
The white adapters and nose cone are blow molded.

I hope the decal sheet is okay for transfer - it looks to be  in good shape.

The fins and lower ring are injection molded plastic.

Instructions. 

Marking guides and tri-fold mount are printed on the back of the face card. 


This is the part that has me concerned -

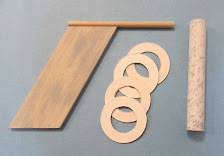
The conduits are cut from some sort of wood I can't identify. They are rough, meant to be separated with a knife and ruler.

These will take quite a bit of work to clean up and form.


Wednesday, July 23, 2025

While the Mini Bomarc Paint Dries -

I used the only brown I had on the Mini Bomarc nose cone - Rusto Custom Spray Enamel. One of those new cans with that crappy "5 in 1 custom spray nozzle". The paint is still tacky after two days!
While I'm watching paint dry, a new project is in the works:
    

I got the Centuri Skylab 3D parts back from a commercial printer I found on Etsy.
These are resin printed, much smoother than the older 3D printers.
Almost all the original kit plastic parts were vacu-formed. 
At $80.00 (including shipping), it was more expensive than I would have liked. I don't have a 3D printer.

In the lower right is a "docking collar". Two are needed for the build, I was only sent one!
I've messaged the printer and a second collar is being sent out.

The Centuri Skylab Thingverse page: CLICK HERE
Thanks to Scott Dee for drawing up the 3D parts and  to Kevin Hedspeth for inspiration and answering all my questions about his build experience.

You aren't told on the Thingverse page - but - 
The two pod nose cones and nozzles fit a BT-20, not the original Centuri ST-7 tubes.
The engine mount tube is also a BT-20. A Centuri ST-7 won't slide through the large nozzle.
I don't have any ST-10 Centuri tubes, I found some Estes BT-52 tubes from an old Thor Agena B build.
Hang onto those spare parts! The nose cone shoulder slides smoothly in the BT-52 tube. 

Sunday, July 6, 2025

Estes Mini Bomarc Clone, Kit #TK-5, Part 2, Fins & Decals


The balsa scan was copied, dropped into Corel Draw and traced. There was some resizing to lock into the ruler reference underneath.

The kit used 1/16" balsa. The sheet is 3" x 9".


The decals were redrawn.

These will require some white decal material under the Canadian circle logo and flags.

Saturday, July 5, 2025

Estes Mini Bomarc Clone, Kit #TK-5, Part 1, Parts

 
All the parts for the clone build are shown above.
The BT-20 main body tube is a BT-20B at 8.65" long.
The two BT-5 nacelle tubes, BT-5J are 3" long.
The BT-5 engine mount tube is 2" long. 

Tube lengths were found at:
Aeromoe.com/estes_body_tube_list.pdf 

A Odd'l Rockets parachute will be sized to 10" diameter.

The nose cone is a BNC-20AZ from Balsa Machining Service.
I'll have to figure out how to add .25 oz. of nose weight.


The two Nacelle nose cones are BNC-5BA also from BMS.
Two LL-2AM launch lugs will be cut to .37" long.

I'm adding 1/16" diameter hear shrink to the Kevlar line tied to the engine mount.

The fin patterns were copied from Jim Z's and sized to a 3" x 9" piece of 1/16" thick balsa in Corel Draw.

Thursday, June 12, 2025

Estes AMRAAM AIM-120 Downscale, Build, Part 2, Semi-Scale "Cheat"


After a few searches, I found a clean copy of the Peter Alway drawing.

To view it: CLICK HERE
Note there is a boat tail on the real missile.


I did run the numbers to get the tube lengths. See the first "background" post. 

But, to get the fin patterns - 

I dropped the Alway drawings into Corel Draw and enlarged it until the body was 1" diameter. The BT-50H tubes I'll be using are .990" in diameter.
With the drawing enlarged I simply traced the fins.
Because the rocket body is tall, I had to draw the fins on two different pages.

Wednesday, June 11, 2025

Estes AMRAAM AIM-120 Downscale, Build, Part 1, Parts


I decided to go with one long tube, 16.40" long
Heat shrink tubing is now added to most all my new builds. Slide over the Kevlar line down to the engine mount and hit with a hear gun.
Odd'l Rockets 12" parachute
Forward fins can make a rocket unstable - .50 oz. of clay weight will be pressed into the nose cone.
The 1/8" diameter launch lug will be cut in half.
Apogee plastic nose cone is PNC-24D at 2.75" long. It's a close match to the AMRAAM scale length and shape.
3/32" thick balsa for the fins.
The water slide decals have been redrawn, the original kit had stickers.
I thought about a boat tail but decided against it. The boat tail wouldn't allow for an engine hook and would require friction fitting. The original Estes kit didn't have a boat tail.

Thursday, May 29, 2025

BMS School Rocket, Build, Part 1, Parts


Parts are clean and ready for assembly without too much prep.

To the right is the nose cone with a hardwood dowel insert.
With the dowel glued in the pre-drilled hole, the screw eye will not easily pull out. 


The main airframe tube (shown above) has laser cut fin slots.

On the left is the 3/16" diameter launch lug. The 3/16" lug was used to make it easier for a younger flyer to slide the rocket down a 1/8" launch rod. 

The engine mount tube has light laser cut lines for the centering ring positions. The square cutout is for the Kevlar tie.

Friday, May 9, 2025

Quest Intruder Kit Bash, Part 1, Parts


Above - 
All the parts that were still in the bag.
Seems I had thrown away the Quest engine hook. The Quest hooks aren't spring steel so I switched it our for a BMS engine hook with no finger tab.

The 3/32" thick balsa sheet is die-cut.
The yellow engine mount tube seems thin walled and is starting to peel.

The nose cone is an older MPC style with a very short shoulder.


The shiny strip on the right is all I could salvage from the stick on decals that peeled off the backing sheet. I'll have to re-draw and print some home made decals.

For whatever reason, I assembled the parachute.
This is an older, "crispy" Quest chute with the shroud lines tied to the Quest "gripper tabs". The tabs are very thick and make it difficult to pack the chute.

Wednesday, April 23, 2025

New Way Letter - Go Build, Part 1, Parts


Rick from New Way sent me a prototype for a upcoming kit.
The LETTER - GO is a robust BT-60 design, but with a custom fin design.

The fins spell out your name from left to right going around the tube!
The fins are laser cut plywood and thru the wall.
The kit should be available after this summer's NARAM. The kit doesn't include the shorter fin attachment tube and letter fins. You send back the coupon with your name request and your custom letter fins are returned to you. Your name could have three, up to six letters. The number of fin slots will be custom cut to fit the length of your name.

This could be a great personalized Christmas or Birthday gift for a rocket flying family member.


Here's the specs. 
It's almost the size of a Big Bertha. It might be upgraded to a 24mm mount As the fin root edges don't reach the motor mount tube. 


All the parts:

A multi-sized (12, 18 and 24") parachute.
Kevlar (with a blue shrink wrap tube for ejection charge durability)

The engine mount as a cardstock lower centering ring and a plywood upper ring. This gives extra strength for the Kevlar line looped beneath the upper plywood ring. 


Parts of interest:

Water slide name decal with vinyl trim strips
Small metal chute ring for chute attachment
Engine hook retainer ring
That blue shrink wrap tube that goes over the Kevlar line
Two of the letter fins spelling out my name
The New Way sanding and Q-tip build bag.

Sunday, March 30, 2025

Estes Advanced Target Drone, Kit #1913, Build, Part 1, Parts


This will be a spare parts build.
Clockwise from left to right:
BT-50H (Heavy wall tube) 11" long
Apogee PNC-24C (a bit shorter than the original kit nose cone)
Odd'l Rockets 12" chute 
Some leftover Air Force decals I might be able to use
1/4 oz. Clay nose cone weight
3/32" Balsa sheet
1/8" dia. Launch Lug 2 3/8" long
20/50 Engine Mount
Round elastic shock cord
135 lb. Kevlar
More about the cardstock in an upcoming post.

Sunday, March 16, 2025

Aerotech Mega Initiator #89541, Part 1, Parts


 All the parts, going left to right:
The 54mm Motor Mount Tube
38mm motor mount tube
29mm Adapter tube

Quick Link and hardware
Red elastic shock cord
36" parachute
Four packs centering rings, adapter rings and bulkhead


The main airframe tubes:
28" x 4" diameter body tube with three fin slots cut

12" payload tube
4" diameter black nose cone.


Three fins laser cut from 1/4" thick plywood.

Saturday, March 1, 2025

Estes Star Seeker BT-50 Upscale (Tri-Pack) Kit #0866, Part 2, Engine Mount

Parts of interest:
The four fins and correct dowel diameter for the BT-50 size upscale.
Four cardstock centering rings made in an earlier blogpost.
Four 1/4" diameter launch lugs.

The tube seams and balsa grain have already been filled.
The centering rings I cut seemed a little thin.
Four were initially cut, I decided to double them up.

To be sure they were perfectly aligned on top of each other, one was slid (dry, no glue yet) over the BT-5 motor mount tube.

A light coat of glue was spread evenly over the second ring.

I'm not gluing the rings to the tube yet, just joining the rings.

The glued ring was slid over the tube and pressed against the ring already in place.

The two rings were closed using the (flipped) clothes pin clamps.
A second laminated ring was also made.

Friday, February 28, 2025

Estes Star Seeker BT-50 Upscale (Tri-Pack) Kit #0866, Part 1, Parts


After building an interesting BT-5 clone,
this one begs for an upscale. 

There are enough differences to make a larger model interesting.
Mentioned in the previous build, this isn't a 2X build. 
All original kit piece sizes will by multiplied by a factor of 1.8 to get the BT-50 sizes.


I'll be using 13mm motors. I made some 5/50 cardstock centering rings a few weeks back. We'll use them on this build.
In the picture above, the 1/4" lug "jets" tubes and "gun" dowels were cut at the same time as the previous BT-5 based build. They were also cut short. I recut both at the longer, correct length.

Sunday, February 16, 2025

Estes Star Seeker (Tri-Pack) Kit #0866, Part 1, Parts

 
The dowels and launch lugs (shown above) were cut too short. The build will show the longer and correct 1 1/4" long lugs and dowel pieces. Mistakes can happen when lengths aren't listed in the instructions. I took a guess by simply looking at the instruction drawings.

You might assume a BT-5 is 1/2" diameter and the BT-50 at 1" diameter. That would mean a simple 2x upscale. But, the BT-5 is actually .541" diameter and the BT-50 is .976" diameter - Not a 2x upscale.

I'll be building a original BT-5 version and after that an upscale BT-50 version.
To see Jay Goemmer's "Downscale Chart: CLICK HERE
While Jay's chart says to multiply by 1.79, I'll be using a heavy walled (and slightly wider diameter) BT-50H tube.
Here's my conversion chart. Every dimension of the BT-5 parts was multiplied by a factor of 1.8 to get at the BT-50H sizes.


I drew up decals for both the BT-5 and BT-50 version.
The rounded corner "door" rectangle will be fixed with a narrower line.


Gotta' love a model where the parts fit into a 3" x 5" zip bag.

Tuesday, December 31, 2024

Estes Black Star Voyager Build, Part 1, Parts


Quite a few tubes in the kit - 
The long tube in the middle is a heavy wall, 24mm tube.
There is clay for nose cone weight and a 3/16" diameter launch lug.

There are two sheets of laser cut thick card stock.

Five sheets of laser cut balsa, all 1/16" thick.

The water slide decals are printed in white and orange. 
I wish the paper was a light blue, it's easier to see the white against the light blue backing paper.


The nose cone has 12 raised ribs, from the tip down to 1/2" above the shoulder. Something I hadn't seen before.

To the right are the nine basswood strips. Later in the build the are cut at a 45 degree angle and rounded.

Sunday, December 15, 2024

Estes Constellation Build Part 9, Fin Pod Gluing


Each fin will be individually fitted.

Draw a line on the side of the pod side that will be glued to the fin.
Mark the outside edge of the fin with a "1" and the matching pod "1".


Match the edges of the pod and the outside curved edge of the fin. Lightly trace around the side of the pod.

(While not shown well in this picture, the tip of the pod should be even with the leading edge of the fin.)


Carefully cut off the pod recess.


After a bit of shaping checking against a bright light, the pods fits pretty well.

Glue fillets filled in the seams.
The fillets go from narrow at the tip to wide in the rear, the same shape as the teardrop shaped pod.

Saturday, December 14, 2024

Estes Constellation, Part 8, Airfoiling The Fins


I used the rounded side of my old sanding block with 400 grit to sand the recess at the rear trailing edge.

This seemed to be the best way to get a round concave shape.

You could also use some 220 grit sandpaper wrapped around a 24mm engine casing for the round contour.


With the trailing edge facing up - 
Here's how that sanded recess looked after sanding.

You can see how the trailing root edge tip remains thick and less likely to break off. I still have to sand a "knife edge" to the remaining trailing edge.


With the fin held upside down,
On the left is looking directly at the root edge. The tip was rounded off.

On the right is the tapered trailing edge viewed from the rear of the fin.

Friday, December 13, 2024

Estes Constellation, Part 7, Shaping The Fins

The reissue Estes kit has you round just the leading edge of the fins. 
I'm showing an earlier Semroc build that follows the original Estes instructions where the fins are airfoiled. This is difficult because of the sharp tip at the rear of the root edge. 
This post shows one way to airfoil the fin and still keep that extended tip strong.
   

The old Estes instructions tell you to airfoil the fins. That rounded tip on the rear root edge could be a problem. Sand it down to a sharp taper and you run the risk of it easily breaking off.
The fin drawing in the instructions show a shading that suggests the shape penciled in at the right. This leaves the tip at the 3/32" thickness.


The end of the outside edge pod will be replaced so it was cut off now.

It's hard to see the trailing edge taper on the light balsa wood.
The leading and trailing edges were marked with an old, half dried out Sharpie pen.
You don't want a heavy black ink to soak into the balsa! In the end the black ink will be sanded off. Any remaining ink might show through the white paint.
When marking an edge like this, draw the line quickly allowing very little ink to color the balsa.