Sunday, March 31, 2024

Estes Skytracer Clone #1361 Build, Part 15, Shock Cord & Decals


I never liked the thin shock cord loop on the base of some nose cones. It seems like a weak point.

I'll usually drill a hole in the angled side. The shock cord is fed through both holes and tied. Here loose end and knot are tucked inside the center hole.


I drew up some home print decals.
PATREON: These are only available to Patreon members. 
Email me at oddlrockets@bellsouth.net and ask for the Skytracer PDF decals.
Here's the catalog picture showing the positions of the forward decals. Sometimes all I have to work with is a online catalog page.


It looks like the STELLAR FORCES decal is forward, almost to the end of the body tube. The shorter red bar pairs end up on the nose cone.

Saturday, March 30, 2024

Estes Skytracer Clone #1361 Build, Part 15, Gluing On The Thrusters

The instructions say to paint the thruster nose cones flat black.
I still have some Metallic Black and decided to go with that.

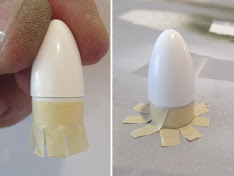
This is how I tape a nose cone down for spraying.
One wrap of tape, cut strips on the overhang and splay out.
Stick to some cardboard for spraying.


Here's that metallic black paint. I like it better than flat black.


Here's the view from the rear.
I found these hard to line up while the glue was setting up..


Both of the thrusters in place.
No color masking! 
The decals will make it more interesting.

Friday, March 29, 2024

Estes Skytracer Clone #1361 Build, Part 14, Detail Paint & Sand


You always seem to find more work after paint is applied.

Just like launch lug bubbles, I found some where the dowel met up with the trailing edge of the wing fin. 
More glue fillets!


Here's the "thruster tube" standoff glue strip with the masking tape removed.
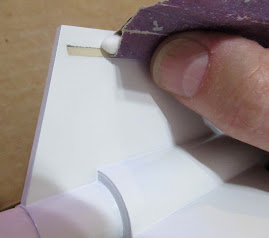
There's a bit of a rough edge where the paint was over the tape.

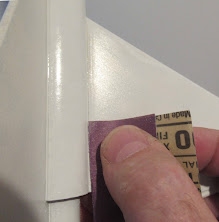
For a smoother fit and stronger joint, some 400 grit was rolled around a Q-tip for softer sanding. This leveled the raised paint edge.
I sprayed the thruster units off the model. It would be hard to get good inside coverage if these were glued on the stabilizer fin.

The upper picture shows some rough paint when the strip of tape was removed. 

A little sanding and the edge is cleaner for the glue joint.

Thursday, March 28, 2024

Estes Skytracer Clone #1361 Build, Part 13, Mask & White Paint


I masked off the glue line for the thruster assemblies. Look close and you can see the thin masking tape line.


The model is ready for the first white coats. In the front end a rolled up paper towel keeps paint out of the tube.

Easy paint - most of the model is an overall gloss white. The small nose cones in the thruster units aren't glued in yet, they will be painted black separately off the model.


Enlarge the picture and you can see some ridges down the fillets.


The glue fillet ridges can be lightly sanded with some 400 grit.  Don't sand into or dip into the balsa! Just knock off the high glue spots.
 
In the picture you can see the paint and fillet have been dulled with the sandpaper.

Wednesday, March 27, 2024

Estes Skytracer Clone #1361 Build, Part 12, Gluing The Canopy

I glued up four canopies to get a good one. I from each try and got better at making them.
   
The back end of the canopy is 1" from the back of the shoulder lip.

I tacked down the front and rear of the canopy using medium weight (not thin) CA glue applied with a toothpick.


After the front and rear are adhered,
Hold the sides down against the nose cone and apply more medium CA using the toothpick to draw a line of glue down the joint.

The canopy is in place!

Be sure the back edge is 1" from the shoulder lip. For whatever reason I set the canopy 7/8" from the back of the nose cone. Later on, this affected the placement of the red stripe decals.

Tuesday, March 26, 2024

Estes Skytracer Clone #1361 Build, Part 11, More Canopy Forming

A little break from the canopy forming - 
.25 oz. of clay weight is rolled into little balls and dropped into the hole at the base of the shoulder. The small balls of clay settle easier into the nose cone tip. Easier to level these small bits of clay than chasing around a "clay snake" with the flat end of a dowel.

I did have to widen the shoulder hole diameter with a knife and half round file.


It takes very little glue to close the canopy tab. Use a thin "skin" of glue.

A flat faced needle tweezers held the canopy tab closed as the glue dried.


On the left is how the canopy looks after gluing 
But, to fit the nose cone, the canopy folds are pinched closed making it sit higher on the nose cone.
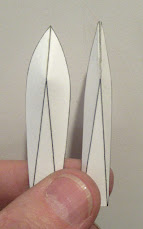


Here's the back end of the canopy - 
The squared back was rolled over a Sharpie barrel to fit the round nose cone.

Monday, March 25, 2024

Estes Skytracer Clone #1361 Build, Part 10, The Canopy


I used the canopy pattern drawn up by Greg Poehlein.
You can use this cardstock pattern to make the proper canopy on a Crossfire style nose cone.
To see it: CLICK HERE

Excuse the distortion in the picture, that upper horizontal line is straight, not tipped down.
TIP: Before cutting out the canopy - 
Pre-emboss the tow long fold lines and the short glue tab. You won't be able to get a sharp fold if you cut out the piece first.

I go old school, a smooth tip (not serrated) butter knife and straight edge. This embossed line method goes back to the old Estes Saturn 1B cardstock fins. 

I cut out the long sides with a straightedge and knife. The rounded sides were rolled over using scissors.

The rounded sides were cleaned up by sanding on a piece of 400 grit.


I started coaxing the folds setting the lines directly on top of the edges of my triangular engineers scale.

A Sharpie barrel was pressed down onto the fold line.

Continued in the next post . . .

Sunday, March 24, 2024

Estes Skytracer Clone #1361 Build, Part 9, Root Edge Scrape & Details


On the left I've scraped the filler/primer of the fin root edge glue area.
On the right - 
NEWBIES: Extend the alignment line over and around the edges of the tube. You can't see the pencil line when the root edge of the fin is set over it.


Here's the pencil line drawn around and a little inside the laser unit tube.


The balsa standoff brace is glued to the bottom of the thruster assembly and even with the rear edge.

Saturday, March 23, 2024

Estes Skytracer Clone #1361 Build, Part 8, Filler/Primer & Dowel Detail


After sanding smooth the CWF - 
The wing fins, standoffs, launch lug and standoffs were taped to scrap cardboard and sprayed with filler/primer.


After drying and before sanding - 
You can see some dulled areas of the balsa needed another shot of filler/primer.


The wing fins were glued onto the main airframe tube.

I thought the dowel went all the way from the engine tube to the outside edge of the fin rear. But - 

The dowel end is about 3/8" from the outside edge. I checked the instruction drawing this time.

Friday, March 22, 2024

Estes Skytracer Clone #1361 Build, Part 7, Stabilizer Fin Fit?


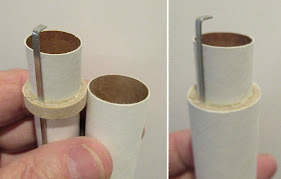
Here's why I sand the exposed centering ring face flat. It will be visible on the finished model where the ring is even with the outside body tube.


I wasn't paying attention to the instructions.

I noticed the root edge on the stabilizer fin that overhangs the engine mount tube didn't touch the engine mount tube.
I thought I made a mistake when cutting out the fins. I sanded the stepped root edge until the overhang edge touched the engine tube.


After gluing the stabilizer fin in place, I took a closer look at the instruction drawings.
I don't know why - but there is definitely a gap!
I left it as is.

Thursday, March 21, 2024

Estes Skytracer Clone #1361 Build, Part 6, Cutting Out The Fins

The fin patterns were traced onto the 3/32" thick balsa with pencil. Pay attention to the grain directions.
NEWBIES: Never trace fin outlines or draw fin lines on a body tube using ink! The ink can bleed through paint and will be seen on the finished model.


Pay close attention to the corners. In this picture, the knife is started before the corner and is being drawn away to the right. That small corner (nearest the 7 1/2" mark on the ruler) can easily break off down the grain lines. 
Note the saw blade is perpendicular (at 90 degrees) to the balsa sheet.


The second cut is also drawn away from the corner.
NEWBIES: Don't try to cut in a single pass. Lighten up the pressure and make a few passes with the blade. Relax, slow down!
Again, the cut is started outside of the corner to prevent the balsa tip from breaking off down the grain.


Square up the inside lines with a sanding block.
That 220 grit on my block is an older piece of sandpaper - still usable though!


Here's the two wings, stabilizer fin and the smaller standoffs.

Wednesday, March 20, 2024

Estes Skytracer Clone #1361 Build, Part 5, Making The Nozzles


Here's dry fit of the nozzle front and rear.

On the left is the first try with the shorter nozzle on the round pen barrel.


On the right you can see the slightly longer nozzle.

Disassembled - and fit together. 
The right side engine block coupler goes into the BT-5 tube. The clear pen barrel will be cut down and short.
That'll work!

Tuesday, March 19, 2024

Estes Skytracer Clone #1361 Build, Part 4, Making The Nozzles

I've asked myself: "Why do I hang on to old parts?" The answer: "For builds like this!"
I switched over to some old, pre-flown 20 sized nose cones. The intake tip needed to be a bit wider.

This nose cone with the gold spiral stripe was off  a Wizard my daughter assembled at school.
I used the back of my knife blade like a cabinet scraper to remove the paint. Why use the sharp side and dull the blade? The back of the blade scrapes pretty well.


The second nose cone was already painted red/orange. It got scraped then smooth sanding.


The tips were cut off with a razor saw.
The tip was cut at a 1/2" length,
The nozzle cut off below that at another 1/2" down.

On the right - 
The rough sawn tip. Below that, the sawn edge sanded clean.

Here's the first try at the cut pieces.
This first nozzle (middle piece) was too short, another piece was cut at the better length of 1/2".


Here's what I meant about cutting new nozzle bells.
On the left is the first try,
on the right is the better longer nozzle.

Another reason I hang on to old rocket parts - I had to cut up two more surplus BT-5 nose cones from the spare parts drawer.

Monday, March 18, 2024

Estes Skytracer Clone #1361 Build, Part 3, Making The Nozzles

It's clever how the Estes designers used the old Centuri kit nozzle pieces. 
Flip around the intake cone and glue into the back end of the nozzle!
   

Here's the back end of my homemade nozzles from the recent Centuri Quasar clone.
I made this end from a plastic pen barrel and a segment of a balsa nose cone.
The intake was made from the tip end of a sharpened dowel.
Here's a link to the Quasar jet intakes and nozzles: 
Are these exact copies of the original parts? 
No, but they capture the feel of the design.


The ramjet tip end needs a base that will slide in and glue into the BT-5 tube.

Trace around a 13mm engine block onto some thick cardstock.
Cut out the circle piece with scissors.


Glue the circle piece over the end of the engine block ring.
Sand and even up the edges even.


Here's the two needed intake bases next to the short BT-5 tube.

The sides don't have to be perfect, they will be recessed a bit inside the tube edge.