Showing posts with label OR Spaced Needle. Show all posts

Wednesday, February 6, 2019

3 Spaced Needles!


As if one wasn't enough!
These new Spaced Needles are just short of 39" tall!
Made for 18mm engines, these skinny Odd'l Rockets feature heavy walled BT-20H tubing and a mid break this time. Much easier to transport to and from the launch site. 12" parachute recovery.

This design may or may not become a kit. Plenty of test launches will follow.

Thursday, January 24, 2019

OR Spaced Needle Build, Finished


These pictures are of the first version of the long Spaced Needle rocket.
The second picture shows how the trim strips placement was staggered. The name decal was applied at the center.
The new versions now being built separate in the middle for easier storage and less chance of damage transporting the model to and from the launch area.

The fins are set away from the end of the body tube. No need for a friction fit, just do a single tape wrap around the exposed engine nozzle end and body tube. Friction fits were never a good idea in BT-20 body tubes. We've all crimped thin body tubes trying to insert and remove friction fit engines.
This model will need a long shock cord and a 12" parachute.

Wednesday, January 23, 2019

OR Spaced Needle Build, Part 9, Trim Strips


Some strips were cut from Monokote chrome trim and Contact Paper blackboard covering material.


I did some test fitting on a scrap piece of BT-200 to check the visual width and spacing before placing the trim on the model.

I tend to leave some of the backing paper on the strip as I transfer to the model. This keeps your fingerprints, dirt and lint off the sticky side before it is on the rocket.


The strips were alternated black then chrome.


An aluminum angle was set on the tube to check and be sure the strips were on straight before final burnishing.


Originally I set all the strips at the same distance from the ends of the tubes at the start of the orange color mask. (See two pictures above)

I found it more interesting to break up the strips and go over the orange color mask line.

Tuesday, January 22, 2019

OR Spaced Needle Build, Part 8, Undercoats and Some Color


I didn't have much luck with the white paint undercoats.

The gray areas are where rough spots were sanded smooth, down to the filler primer coat. More white coats followed.


Even using the Titebond M&TG there was some uneven bubbling along the hard to fill launch lug fillet.
This paint was also sanded a bit. Some of the paint will actually help fill the uneven surface.


Easy, easy mask.
About 1/2" above the fins, the low end gets orange paint.
Masking around body tubes usually gets very clean mask lines.


And on the other end, the upper end of the tube gets a mask around the tube with more orange.

I'm hoping the trim and decal will round out the look.

Sunday, January 20, 2019

OR Spaced Needle Build, Part 7, Fins and Launch Lug

Check out the grain direction near the rear of the root edge. (This fin is upside down) These corners can easily break off down the grain line.

TIP: Notice the direction of the blade cut. In the left side picture I would be cutting away from the root edge.
On the right side I would also cut away and down from the corner.


This picture is from the first build, with the two tubes glued together.

On the left is the fill of the tube butt joint and seams with CWF filler.
I had to go back and fill some areas where the CWF was knocked out of the seams. As I'm sanding I mark the areas to be re-filled with pencil.


The fins were glued on.
This shows the Titebond No-Run, No-Drip (Trim and Molding Glue) fillets right after they were applied and smoothed out.


With a B6-6 engine inserted (probably the largest engine I would ever use in the model) I found the balance point for the launch lug location.

The balance point of the model was marked with pencil. The center of the lug was also marked for positioning when glued.


TIP: Before the lug was glued on the rocket I rounded out and cleaned up the edge of the lug with a sharpened dowel.
I leave the sharpened dowel a bit rough and simply turn it in the lug ends. This rolls down any burrs for a smooth slide up the launch rod.

Saturday, January 19, 2019

OR Spaced Needle Build, Part 6, Engine Block and Kevlar Tie

TIP: I don't recommend the Elmer's Glue anymore. The "New Stronger Formula" glues are thinner consistency and parts that are slid into the glue can freeze in the wrong position. Use Titebond II or Aileen's Tacky Glue.

The BT-20H is narrow, you won't be able to apply glue for the engine block using a fingertip.
The engine will extend 1/4" beyond the back end of the model.
A round end dowel was pencil marked about 2 1/2" from the top. Notice how the top of the dowel is below the top of the engine. This insures the glue bead will be a bit below the final engine block position.


A bead of glue is applied to the sides of the dowel end.
Stick in the dowel and roll the glued tip around the inside of the body tube.


Slide in the engine block and press in place with an engine casing.
Slide up until you reach the 1/4" pencil line at the rear of the casing.


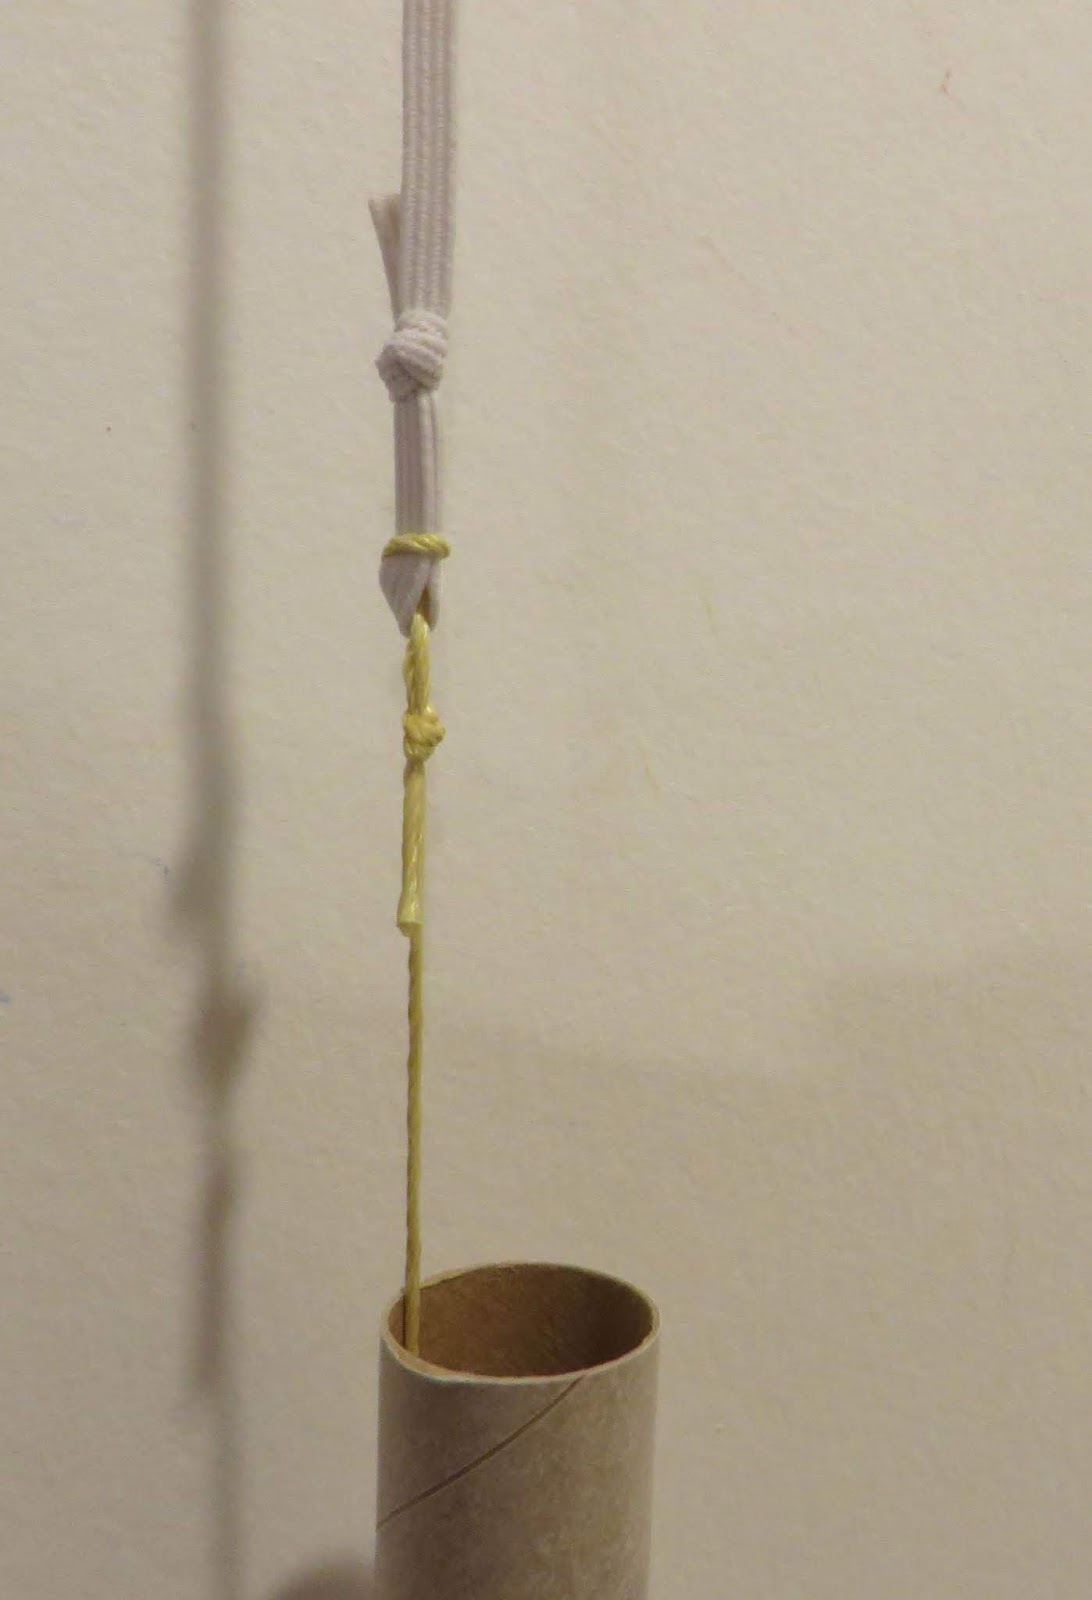
An elastic shock cord is tied to the end of the Kevlar line.
This knot spreads out the strain of the Kevlar and Elastic tie.

To see how to tie it: CLICK HERE

Friday, January 18, 2019

OR Spaced Needle Build, Part 5, Coupling The Tubes Together - The Better Way!

The coupler is slid halfway into the tube. A pencil line is traced around the tube.

The coupler is removed. After sanding the coupler for a better fit in the tubes the outside surface is a bit rough. The lower half (below the pencil line) get a wipe of medium CA glue and smooth sanding.
The sanded CA glue makes a very smooth surface for an easier ejection.


Kevlar is fed through the holes and tied off. The loop at the bottom gives a tie-off point for the elastic shock cord or snap swivel.

The end of the loop was taped to the side of the coupler to tighten the knot on the top of the reinforcement piece.
A drop of glue was applied to each side of the knot.


Before gluing in the coupler assembly, some CA glue was wiped on with a Q-tip.

Left: This tube is shown upside down. The low end of the upper tube will have the coupler glued in. It got CA glue on just the edge of the tube. Inside the tube get wood glue.
I marked the inside of the tube with a "C" to keep track. This "C" end gets the coupler glued in halfway with the capped end facing up.

Right: The low end of the low tube (engine area) got more CA, this isn't a wood glue area.


The coupler is glued halfway into the upper tube with the loop down.

The lower tube is on the right. Both tubes have already had the seams filled and primer/filler applied and sanded smooth.

Thursday, January 17, 2019

OR Spaced Needle Build, Part 4, Coupling The Tubes Together - The Better Way!

Here's how the coupler was made on the new version of the Spaced Needle design to allow the model to break at the middle at ejection and for easier transport.


A pencil line was traced around the brown coupler onto some matte board.
The initial cut was made with sharp scissors. It's not a perfect cut, it'll be cleaned up after this cap is glued onto the coupler edge.


Two holes were made using my rotary punch. A Kevlar loop will be tied through the holes.


A strip about 3/16" wide was cut from the matte board.
This will be a reinforcement band going over the top of the disk.
You can see the strip in the next picture.


A bead of glue was applied along the inside edge of the coupler.

The punched disk with the reinforcement strip is glued on the coupler edge.

Wednesday, January 16, 2019

OR Spaced Needle Build, Part 3, Gluing The Tubes Together

This post shows one way to glue together two tubes.
This didn't work for the first build of the Spaced Needle design, the model ended up too long to easily transport without damage.
The next post will show how to make a coupler so the model will break at the mid point.


Before gluing together any two tubes, roll over the inside taking down any burrs left from when the tubes were cut. It doesn't take a lot of pressure, don't distort the tube.
TIP: Before you glue two tubes together, think ahead. Have a clear, clean flat surface to roll the tubes over and insure they are straight. This is a tall model and will require a pretty big area.

A nice bead of glue was set inside the low tube.

The coupler (with Kevlar line tied and attached) was pressed in halfway.
While pushing in the coupler, try to turn it so the glue is spread out evenly.


Drop the long Kevlar line into the upper tube.

Place a line of glue inside the upper tube. Push the coupler in and turn. Don't let the Kevlar get caught in the joint.


The two tubes are rolled on a flat surface, here I'm using a counter top.

Plan ahead - Gluing two tubes should be done fairly quickly while the glue is still pliable, before it sets up.

Tuesday, January 15, 2019

OR Spaced Needle Build, Part 2, Kevlar and Coupler

I learned something on this build. Really tall rockets have different needs.
The version built here was two 18" tubes glued and coupled together. Long in transport, tall in flight and recovery.
This rocket flew and recovered fine with A8-3 and B6-4 engines. Problem was, transporting such a tall rocket. On the drive back from a club launch, equipment shifted in the back of the car and bent the tube beyond repair. While the heavy walled BT-20 is much stronger than a standard BT-20, the weight of the shifting cargo still bent the tubes.

I'll show how I built it the first time, two tubes glued together. For easier transport, I'd recommend building a long, thin rocket that separates at the middle.


The brown coupler had to be sanded a bit for a sliding fit in the tubes. This is typical of brown couplers, they are a tight fit.

For shock cord retention, some 135 lb. Kevlar was tied around the entire length of the coupler.
Some braided Kevlar ends will fray.
To clean up the end, put a bit of white or yellow wood glue on the end. Spread it our with your fingertips and let dry.

TIP: Never use Super Glues (CA) on Kevlar, shroud lines or elastic. Super glues will run up the line making it brittle and weak.


Now with the Kevlar stiffened out, you can make a clean cut.
I use wire cutters. Cutting with a hobby knife will really dull your blade.

Monday, January 14, 2019

OR Spaced Needle Build, Part 1 Parts

I've never put together a skinny rocket.
Estes has their Fletcher, Skinny Mini, Mean Machine and Mini Mean machine.
The problem with the Skinny Mini and Mini Mean Machine is the thin wall BT-20 tubing. it is prone to buckling.
This one will be made with the new (uh, oh - plug coming) Odd'l Rockets heavy wall BT-20 tubes.


Not much to this one. It's simply a long, minimum diameter model. The parachute isn't shown, it'll be a 12" Odd'l chute.

Parts of interest:
Odd'l Rockets heavy walled BT-20H
BT-20 sized brown coupler
Apogee plastic nose cone.

The Apogee nose cones have a wide shoulder and fit the new thicker wall tube very well.

BT-20H tubes are available only from jonrocket.com!