Tuesday, July 31, 2012

Wolverine Rocketry Phoenix AIM-54A Build Part 26 Panel Covers


The panel covers are glued on over the decal locations.

I've drawn some faint pencil lines inside the border lines of the panel decal.
In this pencil line the decal, paint and primer will have to be scraped off for better glue adhesion.


To prevent chipping of the paint, score a light cut down the pencil lines.

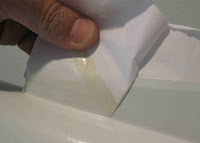
With the tip and sides of an X-Acto knife, scrape away the decal, white paint, grey primer down to the body tube.

Notice the edges are straight and clean, this is because the edge was scored before scraping off the paint.


Here's the panels glued in place. I used white glue, it dries clear and any excess is invisible.

A fillet was added to all sides of the panel edges. This helps hide any gaps and gives the illusion that the fit is better than it might be.

ASP Engine Adapter 13/18 Part 1

A build blog about an engine mount?
The Aerospace Specialty Products (A.S.P.) 13/18 Engine Adapter is different enough to justify it.

Lots of parts - For such a small adapter (13mm to 18mm)
Four centering rings and a central long coupler will make one strong mount.


Enlarge the picture and you can see the cross section drawing better.

In the center of the BT-5 motor mount tube is the coupler and two of the 5/20 rings.
This goes over the engine hook holding it in line.  


To start, you have to peel some outside layers off two of the 5/20 rings.

Peel off enough to friction fit into the brown coupler.


To show how much of the ring is taken off, here's two rings.
Before on the left and peeled to size on the right.

Monday, July 30, 2012

Wolverine Rocketry Phoenix AIM-54A Build Part 25 Decals

There's a LOT of decals to place on this model.
A good reference is Jim Balls's Scale Data hosted by Rocketry Online:
http://www.rocketryonline.com/jimball/jimball/aim-54a/aim-54a.htm

The long (full wrap) wrap around bands are tricky to place.
TIP: Before placing a decal on the model, dip your fingertip in water and set a line of water on the area where the decal will sit. This gives you more time to move the decal into the final position.
That bit of water under the decal "lubricates" the surface so the decal won't lock in the wrong position.

I cut the bottom off the this wrap where the bottom of the panel covers will sit. I only needed the top and sides for alignment.

Be sure any decal wrap with the words: "Lift Here" are in line all the way down the body from top to bottom.

These bottom bands (two say "Lift Here") are set 1 1/4" above the bottom of the tube.

Look straight down on the fin outside edge to be sure the black stripes are in alignment on both sides of the fin.

The two "Lift Here" decals go on opposite sides of the body.
Again - Any decal wrap with the words: "Lift Here" are in line all the way down the body from top to bottom.

The small "No Lift" decals go to the outside rear of all fin sides.
Be sure they read "in" to the root edges of the fins.

Like on the Saturn V build, a card stock window was made.
This was lined up with the outside corner of each fin. The decal wording was lined up with the window edge.

This insures all the eight decals are equally positioned.

Wolverine Rocketry Phoenix AIM-54A Build Part 24 Top Tube Mask


There is a 1/8" wide silver band around the top of the body tube.

I used Scotch tape, masking tape behind that, then a full wrap of a cut grocery bag.

The top was sprayed with 2X Rustoleum aluminum.


This would have been easier using a 1/8" strip of Trim Monokote.

After removing the tape the rocket is ready for decals.

Sunday, July 29, 2012

BMS IMP Kit - $.99 !


Bill Saindon of Balsa Machining Service announced a new kit last night at the NARAM manufacter forum.
It's the IMP, a BT-5 based model made for 13mm "T" engines.
Featherweight (or tumble) recovery.
Only $.99, this is the lowest priced model rocket kit on the market!


This reminds me of the Estes Mosquito, one of the three original Mini-Brute kits designed for the mini engines.

It's a little taller than the Mosquito, the IMP has longer trailing fins.
For $.99 cents you can't go wrong! You'd normally pay that much for the nose cone alone!

Wolverine Rocketry Phoenix AIM-54A Build Part 23 Body Tube Paint

On a model this size, it's hard to get an even coverage on the final heavy coat of paint. By the time you get around the entire body, considering the length of the rocket, the paint is already starting to set up.

To get a "wet" look finish, the final coat is sprayed on heavier.
For a more even coverage of the heavy coat I had to paint the final coat in two stages.

The fins were sprayed first, I wasn't concentrating on the body tube as much.
The fillet area did get a good part of the heavy final coat though.

After the fins were dry, and I was happy with the gloss wet coat coverage, the fins were masked off down the fillet line.
I used masking tape on this. Because the fins are the same color as the body, the sharpest line mask wasn't needed.

After the white body color dried, the mask was pulled up.

Pull up the mask at the angle shown, the same way you would pull away any mask.

In the recess of the fillet area, the mask line (or ridge) will be invisible.


I only had one fillet area where the ridge was evident.

This is a simple fix.
The area was first brushed over with a dry brush to remove some of the loose paint ridge.
A new, clean piece of 400 grit was folded in half.
TIP: Use a new clean piece so no previously sanded color could transfer onto the white paint.

LIGHTLY sand the paint ridge, just enough to knock down the ridge.
Don't overdue it, just a few light passes to remove the visible ridge.

You shouldn't need to sand down every fillet area. just the one or two that are evident to the naked eye.

Friday, July 27, 2012

Space X models back in stock!

Before I start - Today I leave on my last Alaska cruise this season.
Another week of frustrating crappy Internet connections! I'll be back in Orlando on August 4. Until then, if I miss a post or two, you'll know why.

Brian Coyle (Our Orlando R.O.C.K. NAR Section President) sent this information.
The Space X Falcon 9 and Dragon kits are back in stock at Amazon:
http://www.amazon.com/SpaceX-Falcon-Dragon-Flying-Rocket/dp/B006GX14R8/ref=sr_1_1?s=toys-and-games&ie=UTF8&qid=1343234304&sr=1-1

One of the new features of the kit:
"NEW! - Now with full-color pre-printed body tube"

Gee - Imagine that!

Thursday, July 26, 2012

Wolverine Rocketry Phoenix AIM-54A Build Part 22 Nose Cone Mask

This technique was covered in an earlier post and in an article written for the Apogee Peak Of Flight newsletter.
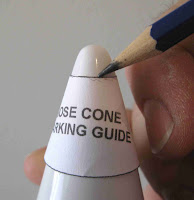
This kit is different, you are supplied with a Nose Cone Masking Guide used for cutting the correct mask arc.


A nose cone marking guide is provided in the kit.
Cut it out, form and close with tape.

Set on the nose cone and trace a very light pencil line around the top.
(Don't use any pressure when drawing the line. You don't want to scar a line in the balsa nose cone!)

This pencil line will assure the painted area mask will be straight around the tip, not at an angle.
Take off the masking guide and open it up.
Here I've taped the paper guide to the Outside of my glass patio door.

On the Inside of the glass a strip of Scotch tape is placed over the small end of the masking guide.
The guide is taped at an angle to make the knife cut easier.

Cut around the small arc of the guide, tracing over the masking guide edge (on the outside of the glass) with a sharp knife.
Try to make it a clean, round cut.

Before pulling up the cut tape, make another cut to the left of the small arc.
This cuts the tape into a masking strip about 1/8" wide.


This is the 1/8" wide mask strip of Scotch tape set right up to the pencil line.
It's a really small mask area on a big nose cone.

Sure you could just brush paint the tip, but a sprayed mask will end up being a smoother coat.


Masking tape is set over the clear tape near the edge.

A plastic grocery bag is taped below that covering the rest of the white nose cone.
After spraying with Aluminum paint. (I prefer the aluminum over using silver. It won't tarnish like silver does.)

This shows the nose cone after the mask is removed.
I did have to "push" some small paint edges back using the tip of my hobby knife.

Wolverine Rocketry Phoenix AIM-54A Build Part 21 Wet Sanding

After spraying the fins with the first coat of white, I had some sanding marks and near "sand-throughs" showing. It looks like I didn't smooth enough with the 400 grit after the initial sanding with 220 grit.
These rough areas will need to be smoothed out.

After the color coats have started, you can consider the wood to be sealed well enough for some wet sanding.
Wet Sanding isn't really WET!

Dip some wet and dry sandpaper in water and shake off the excess water.
Sand a bit and wipe off the "mud" with a paper towel.
Be very aware of the body tube ends, the inside bare surfaces can absorb water and swell up!

When I wet sand I'm only knocking down the surface a little bit. Don't sand down to bare wood - just lightly take off the "top" of the painted surface.
To put it another way, you are dulling the gloss paint a little.

Maintain the sharp tapered edges you've already shaped.

Notice in the picture the edge of the sandpaper only goes up to the sharp edge.
Not over the "ridge"

When I'm wet sanding, I don't sand over the edges. They'll take care of themselves.

This is the same fin after wet sanding.

Near the trailing edge you can see the balsa starting to show through.
I almost sanded to far here. If water gets into the wood fibers you'd probably have to prime and sand again.
After re-shooting with the white you can see the difference.

The flash makes the surface look "pebbled". In person the finish is smooth.

Wednesday, July 25, 2012

Wolverine Rocketry Phoenix AIM-54A Build Part 20 Lugs and Mask


The two 3/16" lugs were glued in line centered between two fins.
Normally I'd use a launch rod to line them up. but the 3/16" rod was much heavier than a 1/8" aluminum rod.

You can use a (lighter) dowel, but be sure it is straight.
TIP: Before you buy a dowel at the hobby store, try rolling it on the floor to make sure it isn't warped. If it is straight it'll roll easily.

The back end of the model was masked to keep the spray paint out.
One long piece of masking tape was set sticky side out around the perimeter of the open tube end.
Paper was rolled up and set in the end.
That paper was taped to the sticky side out tape strip.

I'll probably use a thin coat of epoxy around the inside of the body tube to protect the surface from the recessed engine.

Essential Tools: Cotton Swabs


This seems like a rediculous post - but lately I've ended up using these on every build.

I buy mine at the Dollar Store or get a cheap generic brand.
You'll be throwing them away anyway so don't buy anything too expensive.
I use one anytime I can't comfortably reach an area with the tip of my little finger.
Here I'm removing excess glue from a fillet on the Dr. Zooch SLS.

They also work well at picking up the excess glue at the fillet ends where the glue rolls around and over the top of the leading edge of a fin.
Hold your rocket up to the light and use the swab to remove any glue "flash" you might have missed with your finger. When held close to a light you can see the glue, it's still shiny when wet.

Use them once and throw it away. The glue will quickly harden the cotton tip.

Tuesday, July 24, 2012

Wolverine Rocketry Phoenix AIM-54A Build Part 19 Gluing the Fins


When gluing on the rear fins, be sure they are even with the end of the body tube.

Here the flat side of a sanding block is pressed against the trailing edge of the fin until it's even with the body tube.
All four of the lower fins were glued in place.

This is a preview of a new Odd'l Rockets fin alignment tool.
The picture shows the four fin unit with the extension pieces for fins that don't trail beyond the end of the body tube.

While the fin alignment tool was designed for BT-5 through BT-70 tubes, it worked well on this BT-80 model.

More on the Odd'l Rockets FINTOOL to come!


There is a 1" space between the upper and lower fins.
A 1" wide piece of card stock was cut and wrapped around the tube.
This guarantees all four upper fins will be evenly spaced above the lower fins.


TIP: Clothes pins and craft sticks (Popsicle sticks or tongue depressors) were used to get the upper and lower fins in perfect alignment.

Using the craft sticks also spreads out the pressure of the clothes pin clamps and prevents dents in the balsa.

Wolverine Rocketry Phoenix AIM-54A Build Part 18 Raised Panels


You can check to see if your panels are square by setting them against the corner of your straightedge.


The laminated craft stick was cut to the size of the outside edges of the panel squares on the decal sheet.
I want the edges of the panel to cover up the black panel lines on the decal.


The bottom gluing surface of the panels should be sanded to the contour of the body tube.

Wrap sandpaper around the tube and sand the panel bottom in a straight line.

The inset picture shows the fit after sanding.


From left to right -
1. Marking the sides for the sanded tapers.
2. Sides are sanded, top and bottom are marked for shaping.
3. Tops and bottoms are sanded.

All four panels are ready for sealing, sanding. I'll probably glue them on after the decals are in place.

Monday, July 23, 2012

Estes Thor Agena B Build Part 46 Finishing Up


I finally got around to finishing up the Thor Agena B.

The nose cone was masked and painted black.
I used the scotch tape strip cut in an arc to fit the contour of the nose cone.
The instructions called for igniter wire to be used for the Fuel Tank Vent.
This was an old kit so it should use an old igniter.

These were pulled from an old "diamond pack" of D12-5 engines, circa 1975.
Back then you'd cut this strip into three pieces, between the brown coated areas.
No plastic plugs then, small balls of wadding held them in the engine nozzle.

This is the fuel tank vent in place.
It's so small it's almost not worth the effort - but it's there!
You can see it under the white glue used to tack down the top against the turbine oil discharge tube.

An Estes "tea bag" shock cord mount was glued in with a 36" long x 1/4" shock cord attached.
A BMS 18" parachute was joined to the shock cord with a snap swivel.
The BMS parachute is red and has eight (not six) sides.

DONE!

Wolverine Rocketry Phoenix AIM-54A Build Part 17 Raised Panels

On Jim Ball's Scale site, I saw some closeups of the panel covers.
On the left, these are the raised gray rectangles over the upper blue bands.
They are indicated on the decal sheet but not a raised piece as shown here.

(These are not included in the kit, but I'll show how they are constructed if you want to add addtional details.)


Some great (cheap) wood is craft sticks.
It is harder than basswood and there is no grain to fill.
You will have to seal them after shaping, though.

Taking into account the curvature of the body tube, these will have to be double the thickness of a single craft stick.
The body tube curve will be sanded on the back of the panel pieces.

Two sticks were glued back to back and "clamped" together with clothespins.

Sunday, July 22, 2012

Tampa TTRA Launch July 21, 2012


It was HOT today in Plant City, Florida at the monthly Tampa TTRA launch.
Hot enough to where you'd rather sit under the shade of a tent than chase rockets.

Here's my RED MAX waiting for a pad assignment.
It flew well with an Estes C6-5 to an estimated 625'.


Charlie Sharp flew his carded Saturn 1 SA-5 with a D12-5 engine.
Charlie does some beautiful work with card stock.
You might know him as "Rocket Builder" on TRF.

He flew another scratch carded sport model with a long thrusting Quest D5-4.


My SCAVENGER (with the Dollar Tree wine "glass" nose cone) didn't get any altitude when the new E9-6 engine had a fireball blow-through.

It was a loud CATO that blew out the nozzle (see inset) and sent a fireball through the body tube and 100' up.

Luckily, no damage to the model except for a little charring and a pin hole burn through the Nomex blanket and parachute.

Immediately following my CATO, Mike Kochel had another with a new Estes E12-4 engine in his BT-80 Bomarc!


Hank Moleski brought out his original Estes Phoenix.
Still very very flight worthy, the white paint was slightly yellowed.

I'm building the Wolverine Phoenix on the blog right now, I found it a coincidence Hank had his Phoenix today.

I had my doubts about a D engine flight in this large model, but the D12-3 gave it a great ride.


I only had three models in the air.
Like I mentioned, it was hot and I spent more time visiting friends than launching models.

My last launch was the Semroc POINT with a B6-2 engine to 250'.
The "rigid chute" recovery worked like a charm.