Showing posts with label RSG Alice's Star Rocket. Show all posts

Friday, February 4, 2022

Rocketship Games Alice's Star Rocket #R6, Finished


What a fun little rocket.
Some great engineering is shown in the engine mount with the integrated launch lug, fin slots and Kevlar tie point.


A BT-20 is about as large a diameter as you want in a MicroMaxx rocket.

On a model this small, I have no problem with the fins slots showing.

Thursday, February 3, 2022

Rocketship Games Alice's Star Rocket #R6, Part 7, Assembly


The instructions show glue rings inside the tube end for the engine mount.
The way the model is designed, the fins lock the engine mount in place. For that reason, I only applied a line of Fabri-Tac glue inside, just above the fin slots.


The Kevlar line was fed through the back of the mount. The launch lug slid through the large slot and up into the glue ring.


With the lug in the slot, all the fin slots are in line!

Fabri-Tac glue was set on the root edge of each fin and pressed through the tube slot and into the engine mount slot.


The rip-stop nylon Streamer is attached using the supplied sticker.

Wednesday, February 2, 2022

Rocketship Games Alice's Star Rocket #R6, Part 5, Paint

This is one of those rare builds where I really don't have to do any masking!
If you don't glue in and fillet the fins at this point, you can skip masking.

The nose cone was sprayed yellow, off the model.
The picture on the right shows the fins stuck down on tape for a blue spray on the flip side.


The kit comes with a very clean cut sheet of vinyl stars.
I didn't have an appropriate pink paint so I went with orange. The orange color would still give a good contrast to the stars.


Mentioned earlier - 
The face card has the launch lug in yellow, I painted the lug orange with the engine mount in the rocket.

The face card shows the stars spiraling down the body tube.

I placed the larger stars first, then filled in the open areas with the smaller ones.

Tuesday, February 1, 2022

Rocketship Games Alice's Star Rocket #R6, Part 4, Assembly Prep

I waited until after the filler/primer was sanded to remove the fin slots pieces.

With the launch lug slid in the longest slot, the fin slots line up perfectly. 
I tested the fin fit making sure the rounded leading edge on the fins was facing up. It's a good friction fit "grab" in the slots. Be sure the leading edge is facing up - or the outside edge could end up scarred.


Here I've set the fins onto sticky side up tape for the white undercoat.
Spray one side, let dry.
Flip over the fins and spray the other side.


The Kevlar shock cord is tied onto the attachment point at the top of the engine mount.
The long, loose end is tucking inside the mount and trails out the back for gluing into the body tube.


The face card shows the launch lug in a different color than the main body. I thought that drew some attention to the launch lug. I sprayed it while slid in place the same color as the body.

Saturday, January 29, 2022

Rocketship Games Alice's Star Rocket #R6, Part 3, Balsa & Tube Seam Filling


The instructions are very will drawn.
Here you can see how the fins fit thru-the-wall and into the slots printed into the 3D engine mount.


The BT-5 tube had the seams filled with CWF.
On the left the tube top is squared up on a block with 320 grit sandpaper.

The inside ends of the tube were masked off to keep the filler/primer coat out.

The fins were separated from the balsa sheet.

On the right side - 
The six fins were taped down for a good shot of filler primer. 
Notice the root edges are butted against each other  to keep off the primer for stronger gluing.


I tested the fit of a MicroMaxx motor.
The engine mount needed a very slight adjustment for a better friction fit of the engine.

Friday, January 28, 2022

Rocketship Games Alice's Star Rocket #R6, Part 2, Parts Prep

I normally separate the fins and apply CWF with a brush, but these fins are thin.
This fin stock is 1/16" thick. I decided to apply the CWF filler using a fingertip while the fins were still on the sheet.
The thinner coat should keep the chance of water warping low.

This picture shows the fins from an earlier MMX Hawkeye build, but the filler on this model was applied the same way.


Here's all six fins, still on the sheet drying underneath my kitchen cutting board.
The top of the board has a pebbled surface, the underside (setting on the balsa) is smooth.
This wet balsa will take a while to dry with the sheet of plastic sitting on top.
The nose cone finish is smoother than the engine mount. The engine mount has the more typical "ribbed" 3D surfaces.

After testing the fit in the BT-5 main tube, I did sand some of the roughness down. Don't sand too much - I still maintained a good slip fit in the body tube.

Thursday, January 27, 2022

Rocketship Games Alice's Star Rocket #R6, Part 1, Parts


Here's a fun Micro Max rocket design.
I have a feeling that this model was designed for the daughter of the Rocketship Games family. Her name must be Alice.

Note in the picture above, the sheet of pre-cut vinyl stars. There are a few extras.
The six fins are laser cut from 1/16" thick balsa.
Through the wall (TTW) fins on a 1/8 A, MMX rocket!


The red piece in the inset picture is the one piece 3D printed engine mount.
Notice the slots for holding the root edges of the fins.
Integrated into the engine mount is the launch lug and a small Kevlar tie loop.
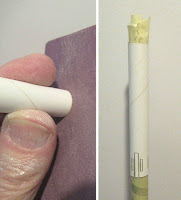
The yellow square is a sticker for streamer attachment to the Kevlar shock cord.
The white nose cone is very smooth, 3D printed. On the base is a crossbar to tie on the Kevlar shock cord.
The streamer is cut from rip-stop nylon.


Two coloring pages and an additional sticker sheet is included.

This could be a perfect model for a young girl who likes Unicorns.