Friday, January 31, 2020

Quest Future Launch Vehicle #3013 Build, Part 5, Fin Skins


Here you can see the difference in the kit fin laminate on the left -
and my thicker fin laminate on the right.


For a leading edge that won't peel back, cut the top edge long, not down the gray print line. This top extension will roll over the leading edge for smoother coverage.


Here's how the laminate sits, glued on with a glue stick.

On the right is the top rolled over and onto the other side. The right side laminate print glues over this side.


All three fins -

I did mess up, nothing major. One fin should have a triangle on both sides, the second has circles and the third fin a square. I got them mixed up.
Look close, you can barely see the rolled over top edge under the skin.

Thursday, January 30, 2020

Quest Future Launch Vehicle #3013 Build, Part 4, Fin and Shoulder Fix


I mentioned earlier, the central core of the laminate fins is very thin, maybe 110 lb. card stock.


This definitely needs  an upgrade.
One fin core was cut out and traced onto some .050" thick centering ring stock.


A small through the wall tab was added.

This will require me to cut a tab slot into the 15mm SRB tubes.
This isn't necessary, but will be a good exercise making a stronger model. I'd feel better knowing the root edge is glued into the body tube, not just end glued to a glossy wrap.
I was only supplied with one nose cone shoulder, I need two more.
These 15mm nose cones don't have a molded shoulder, a coupler is glued into the base of the nose cone.

I have some BT-5 coupler material. I cut off three 5/8" lengths. It took two wraps of copy paper to get a good fit. The paper shim strips were glued on with a glue stick.


There is some molding flash on the nose cone edges. These were trimmed and sanded smooth with 400 grit on a block.


Uneven Paint Gloss? TIP

From the Facebook Model Rocket Fanatics page:

"How do you fix paint that’s unevenly drying? It’s matte paint but some areas are glossier than others. Paint has been cured for like a day. Thinking a coat of gloss clear should fix it."
My response:
The more detailed the rocket (more than 3FNC) the harder it is to get an even matte or gloss finish. Gloss finishes are harder to get even.  
You can't get the proper spray coverage in the nooks. The glossier areas simply got more paint.

DON'T paint your models by sticking a launch rod in the dirt, sliding the model over it and spray vertically.


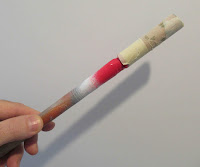
DO: Make a painting wand. 
Cut a 12 to 16" length of 1/2" dowel and glue an used 18mm engine over the end. Slide the casing into the engine mount. You can also slide a 24mm casing over the 18mm casing already on the painting wand.
Using a wand keeps your hand clear from over spray and fingers off the wet paint.

Spray the nose cone tip and trailing edges first. Those are the areas where you might miss when spraying from the side while the model is horizontal. 


SPRAY HORIZONTALLY turning the model (like a slow rotisserie) while spraying.

Spray a side, turn a bit and stop. Spray the next horizontal area, turn again.

Check the sunlight reflection on the rocket while spraying. Try to get the wet paint "gloss" even as you turn and spray the rocket.

The trick is to lay the paint on a bit "wet" but not enough to form runs.

Bear in mind - Spray paints bought from a Home Depot, Lowe's and Ace Hardware is meant for a one-time use by a homeowner wanting to paint the patio furniture. It can work rockets, but it is not the necessarily the best paint for hobbies.

Wednesday, January 29, 2020

Quest Future Launch Vehicle #3013 Build, Part 3, Engine Mount

I'm not a big fan of the thin walled yellow engine mount tubes. This one was cut about 3/16" short of the normal 2 3/4" length.
If assembled by the instructions, using the engine hook slot - the engine block ring would extend beyond the top of the short tube!
I'll replace this tube with a Odd'l Rockets Heavy Wall BT-20H.


The fit of the centering rings is too loose in the main air frame tube. While it could be used, it would take too much glue to fill the gap.


The rings also needed a small relief notch for clearance over the engine hook. I used a rotary punch to make a partial crescent cut.
To make up for the loose centering rings, I made some balsa gussets. Cut them wide and sand to fit. These make the entire mount much stronger without adding any real weight.

To better seal the upper loose ring, a bead a glue was set around the edge and allowed to dry before gluing the mount in the body tube.

Tuesday, January 28, 2020

New Sanding Block from Apogee

The Great Planes Easy Touch Sanding Block is probably my most valuable rocket building tool. I have two of them on my bench, one with 220 grit, the other has 400 grit.
They haven't been produced since Hobbico went out of business.

Apogee Components saw a need and filled it -
This is their new 11" long Sanding Tee.
To see it: CLICK HERE

You can hold a piece of folded sandpaper around the sides with your fingers while sanding. I find I have more control using some sticky back sandpaper, you can certainly use that here. With adhesive backed sandpaper you can concentrate on sanding instead of trying to keep the sandpaper tight and still.
Apogee added a rounded side, Tim says it is for sanding fillets. You've got to be careful sanding over a hard edge like this. You can easily sand into the balsa fin.
This new Sanding Tee is sold in an 11" length.
My two Great Planes sanding blocks are both 5.5" long, a perfect size for me. If I were to buy an Apogee Sanding Tee, I'd probably cut it in half and have two blocks with different grades of sticky backed sandpaper on each.

This looks to be an essential addition to any work bench.

Quest Future Launch Vehicle #3013 Build, Part 2, More Parts


The body wrap sheets are the highlight of the kit. The art is very well drawn and printed. The lower wrap is on the right side. The wrap paper stock is pretty thin.

Here I'm laying them flat to take out some of the curl after being stored in the body tube.


Here's the thin fin (center) core card stock.

Below the core piece are the fin covers.
At the bottom is the single layer nozzle shrouds. They are are thin as copy paper, printed on glossy 20 lb. stock. Not as strong as I would like considering these nozzles will touch down first and could get bent.


I found the face card sticker interesting.
When the kit was first produced the warning read: "Recommended for ages 10 and up with adult supervision for those under 12."
Later a white sticker covered up that information and the ages were changed to "under the age of 14."

The 14" Quest parachute is flexible, not "crispy" like some of the older ones. The tape disks (rounded squares) look to be made from Tyvek.

Monday, January 27, 2020

Quest Future Launch Vehicle #3013 Build, Part 1, Parts


All the parts - This is going to be an interesting build. While the model will build and fly fine as supplied, I'll be doing some light weight upgrades for stronger assemblies.
The tube wraps are rolled up, inside the large 40mm diameter Quest tube.

Parts of interest:
Some of these will be switched out.

On the left are the center core sheet for the 3 ply laminate fins - 110 lb. card stock, very thin.
The engine hook isn't spring steel. The thin yellow motor mount tube was cut short, by about 3/16".
Three small SRB nose cones are there, but I only got one nose cone shoulder coupler!
The centering ring outside diameter is small, a loose fit in the main air frame tube.

Semroc (Centuri) Excalibur KV-43 Build, Finished


The touch-ups worked well, you have to look close to find them.
I did make duplicate decals, some in red. The black decals looked better, there was already plenty of red on the model.

This is another build I was always curious about. A good looking tall, skinny scale-like model. I'm not a fan of the fiber fins. There is no filling. Centuri probably was aiming for an easier build. At the time fiber fins were probably cheaper than including balsa in the kit.

Sunday, January 26, 2020

Launch! Schoolyard, January 25, 2020


The wind was just starting to pick up at about 7:30 a.m. I decided to first launch the MicroMaxx model to judge the launch rod angle.

I can't believe I actually captured a MicroMaxx launch! In the next burst series picture the MMX BIRD BIRD ZERO was out of frame.
I tried to launch this one last time out, but the batteries were too old. With new batteries installed, ignition seemed faster. Estimated altitude is not what the Semroc face card claims, but closer to 60 feet.


A good second flier is my old Quest VIPER with a Chinese A6-4 motor.

Under the kite tail streamer, it bounced when it hit the ground. I thought there might be a cracked fin but no damage.
Estimated altitude was 250'.

This one was built for fun in one evening. A blog build will be featured later on.

Except for an Odd'l BT-20 heavy wall internal tube, most all of the HIGH ROLLER was made from toilet paper tubes. A tip of the hat to Jim Flis, the tubes were stacked at slight angles like the Acme Spitfire.

It was stable with a Estes B6-4, altitude was around 250'.


At ejection the new shock cord broke!
Considering the body nosed in and dug itself into the ground, it's actually in pretty good shape.
On the right is the nose cone and parachute drifting away. I looked but couldn't find it in my neighborhood.
Time to save more toilet paper rolls for a re-build!


The first launch of an upcoming blog build,
The Quest FUTURE LAUNCH VEHICLE.

With a few small strength modifications it seemed heavy, I should have went with a B6-2 instead of today's B6-4.

Altitude was about 250'. No damage on recovery.


Last launched was the Centuri ARGUS clone with an Estes B6-4.
Good thing I reefed the upper section parachute or it might have landed in the street. Perfect launch to about 275'.

Five launched, one lost T.P. rolled nose cone and parachute on the High Roller. Almost a perfect start for a Saturday.

Saturday, January 25, 2020

Semroc (Centuri) Excalibur KV-43 Build, Part 11, Tying It All Together

The motor mount tube extends below the main air frame tube.
The catalog picture shows the tube extension painted black.

I used the Contact Paper Blackboard covering material.
A strip was cut and started under the engine hook. This was rolled around the tube, the trimmed end stuck under the engine hook.


Here's the finished look.
The overhang was shaved off with a razor blade.

Looks like there is some paint or filler inside the launch lug end. I'll have to clean that out.


The shock cord and parachute were tied on.

This model required a long shock cord so the upper section and nose cone wouldn't hit the lower body during descent.


The adapter shoulder was loose, it took wrap of masking tape to fit.

TIP: Notice the masking tape is rolled over the rounded shoulder edge. This helps prevent the tape from rolling back onto itself when sliding it into the lower main tube.

Friday, January 24, 2020

New Shock Cord Knot?

On Y.O.R.F., Bernomatic found a good knot for attaching a shock cord to a nose cone screw eye or plastic eye on a nose cone shoulder.

Imagine a screw eye in place of the fish hook.
To learn how to tie it: CLICK HERE

"Winner of Dupont‘s “Best New Knot” from 498 entries. Dependable and easy to tie in monofilament or fluorocarbon line. Created by Gary L. Martin of Lafayette, Indiana this terminal tackle knot was selected by a panel of outdoor writers as the best new, easy to tie, all-purpose fishing knot in Dupont Corp’s Great Knot Search. He named it the World’s Fair Knot because he first demonstrated it at the 1982 Knoxville World’s Fair. 

Semroc (Centuri) Excalibur KV-43 Build, Part 10, Decal Placement

The tricky decals are the vertical fin stripes.
The fins are thin fiber stock and I won't be able to roll the ends over the top. There isn't a real  rounded edge.

On the left the two parallel lines are cut to size while still on the backing sheet before soaking.
When I got the length right, I used it to cut the next piece for the second left side of the fin.
The right side angles are reversed.


The ends were trimmed right inside the edge.

The only area that got (or needed) some clear protection was on the edges where the decal could peel back.


Here's the top wrap around decals.

Notice the black decal print isn't opaque. It's okay, but not a full black.
This is typical of a home print black decal set on white paint. You could use a double layer decal, but it might look too thick.

Thursday, January 23, 2020

Semroc (Centuri) Excalibur KV-43 Build, Part 9, Yellow Mask


The yellow is masked.
The yellow bars are between the two vertical red bars. They aren't as tall and sit inside the ends of the red.


I use a Q-tip to press down and seal the edges of the Scotch tape masks. Take extra care in the corners where the tape overlaps.


When the tape was lifted I lost some of the red edges. The brown tape lifted them when it was pulled.


With the color masks so close, this was probably to be expected.


Some of the same red was sprayed in a cup and touch-ups made using the side of a good brush.

The Ace premium paint "melds" very well with the paint already sprayed on. On the left it shows some of the touch-ups.

Wednesday, January 22, 2020

Centuri Move to Estes?


Somewhere around 1976 most noticed a familiar launcher in the new Centuri "Newspaper" format catalog -

That Centuri "Power Tower" tripod launcher sure looked like something we've seen before! Of course it was the Estes Porta Pad, but molded in black. Centuri added some metallic trim, but you couldn't hide the design. We all had the Estes launcher in orange.

Estes, Centuri and Vashon were all owned by Damon. Vashon was now being sold in the Estes catalog.

Little by little the product lines blurred. The eventual move and assimilation of Centuri to Penrose had begun. In the early 1980s, I remember reading a club newsletter about the shock of receiving a Centuri order filled and sent out from Colorado.


In 1982, the Centuri ST sized body tubes were gone! The catalog page was almost a copy from the Estes catalog. The newest Centuri branded kits now used Estes BT sized tubes. The great Centuri Sure-Shot igniters were simply renamed Estes Solar Igniters, now called Sure Shot II.
In the 1981 Centuri catalog, 58 kits were offered.
In 1982, 36 kits were sold.
In 1983, 25 kits were sold. 1983 was the last Centuri catalog.

Semroc (Centuri) Excalibur KV-43 Build, Part 8, Decal Draw & Red Mask

Mentioned earlier, I'll be trying to duplicate this version from the Centuri Big Shot catalog page.

There were decals included in the Semroc kit, but these were mostly in red. The Centuri model decals were black.
I drew up new decals, some with a bit of red. 


This is an interesting mask - the red and yellow vertical stripes are split in quarters down the tube. Problem is, the four verticals are centered around three fins.

I did a paper wrap around the tubes and folded it into fourths. One vertical bar is centered over one fin, the rear red bar is centers between two fins on the opposite side. This is on both the upper and lower tube sections.


Here's the mask.
On the left is the lower, larger tube. To cover the two white fins, some copy paper was folded around and taped shut.
The third fin is left open and painted red.
The balsa adapter on top is also red. The nose cone is gloss black.


After the masks were pulled -

The model looks good with just the red. I am going to add the yellow in two days after the red paint is thoroughly dry.

Tuesday, January 21, 2020

Semroc (Centuri) Excalibur KV-43 Build, Part 7, Prepping For Paint


Here's another rough shoulder on a balsa nose cone. The picture on the left shows the before and after.

On the right - Slide the nose cone out of the tube a bit, wide enough for a folded over piece of 400 grit sandpaper.
Gently run the folded sandpaper around the joint knocking down the rough edge. You should notice a difference in the fit.

The glue fillets are shallow. I like to make glue fillet radius' that match the size of the model. BIG model, large wide fillets. Smaller model, narrow (but still round) fillets.

Before spraying on the gloss white undercoat, a piece of 400 grit was tightly wrapped around a Q-tip shaft. This gave me a round sanding tool. Go light, you don't want to sand into the fin or body tube. This is subtle, you are just knocking down any high or rough spots.


The rocket is tall.
It's easier to get smooth paint coverage spraying smaller segments. This model was separated in two parts and hit with the gloss white.


The fiber fins are still uneven, I'm not happy with the side surfaces. I've done enough smoothing and filling, it's going to stay as is.