Showing posts with label MPC. Show all posts

Saturday, May 20, 2023

MPC Lambda Payloader Build, Finished


This one brought back memories of the smaller rockets from the 1960s and 1970s. Most rockets are typically much bigger now.

The four fins had one of my better masks.
Here's the payload section -
The molded shoulders on the adapter and nose cone should have been longer.

If the adapter was used as a boat tail - those four molded recess lines could be used for positioning fins.

I pretty much built this one as per the instructions but added a string to keep the payload section together at ejection.

Friday, May 19, 2023

MPC Lambda Payloader Build, Part 14, Loose Ends


The elastic shock cord was tied to the adapter loop.
The loose end was stuck inside the open hole at the bottom.


The parachute was attached to the shock cord, about 1/3 the way down from the top. This way the payload section won't swing through the chute shroud lines. It also keeps the payload section far enough away from the rocket body when descending under the chute.


The body tube isn't very long. 
Here's how much room is left when the parachute is packed in. The wadding isn't even in place. There would be no room for the shock cord or adapter shoulder.


In the above picture, the parachute was "spiked" and folded in half. 

To get everything to fit, spike the chute and fold into thirds. Then wrap the shroud lines.


To finish things off,
I like to scrape the paint off the metal engine hook.

It's a cleaner look and the paint won't bubble up when the engine flame hits it.

Thursday, May 18, 2023

MPC Lambda Payloader Build, Part 13, Stine Shock Lock


Here's how the instructions show the lacing of the round elastic shock cord. 
They suggest gluing the mount down 1" from the top of the tube.


The next illustration shows the mount in place - but not recessed a full inch.


Here's the kit enclosed shock cord mount. It's 110 lb. cardstock with three holes punched in line down the center.

I pre-curl the cardstock to better fit the inside of the body tube.


The round elastic is laced through the mount

On the right, the back gets a thin coat of wood glue.
TIP: Set the elastic line beside the other exposed line to keep the mount as flat as possible.


The glued mount is pressed against the inside wall with a dowel.

Lightly pull on the elastic to pick up any slack and to tighten the laced line.

Tuesday, May 16, 2023

MPC Lambda Payloader Build, Part 6, Payload Compartment

Aw crud! I skipped Post #6. 
I'm usually posting after Midnight so I might have been tired. So here's the post that should have been. I'll put it in the correct order after the build is complete.
   
The nose cone and adapter have end caps with tie down lugs. 
You need one on the low end of the adapter but not on the nose cone. I will use the end cap on the nose cone, explained below.

The fit of these caps is very tight. That's a good thing, the shoulder length is short.

I sanded down the ends for a flatter and better glue joint.


I tied a cotton shroud line from the nose cone base, through the clear tube and adapter. The low end was tied to the adapter cap tie loop.

We've all lost nose cones off a payload section when the ejection charge goes off. 
The string will retain the nose cone and prevent it from flying off.

Leave some slack on the string so you can pull off the nose cone to access the payload. 


The low end of the adapter is loose in the body tube.
There isn't much length on the shoulder for a proper tape wrap.

Monday, May 15, 2023

MPC Lambda Payloader Build, Part 12, Fin Stripe Decal


Sometimes you swing - and miss! So you compromise.

I hoped to place the fins stripes on both sides of the fins with the tops meeting up, rolling over the leading edge.

The first stripe was set down, parallel to the root edge.


Flipped to the other side - 
The ends were rolled over, ending up at an angle on the other side of the fin.


The second stripe was set, overlapping the first side decal over the top and bottom.

A new single edge razor blade cut a straight line through both thicknesses of overlapping decals. GO LIGHT with the cut. You are only cutting through the thin decals, not into the balsa.

You may have to hold down the overhang ends tight as shown on the right.  

Before the decal sets up and is still a bit wet - 
Lift up the decal ends and remove the overlaps.
Wet the lifted end and press them back down.

Sometimes this works, it depends on the fin shape and the angle of the leading edge. 
In this case it didn't work! There wasn't a good flow over the round leading edge.


I cut the top ends back a bit, just at the start of the rounded edge.

The two-sided decal stripes were also placed on the opposite fin. The kit box only showed one fin with the stripe. I decaled two fins for a better visual balance.

Sunday, May 14, 2023

MPC Lambda Payloader Build, Part 11, The Checkerboard Wrap Decal

I went ahead a re-drew the decals needed to match to box illustration.
There are three slightly different width checkerboard wraps. The kit supplied wrap was 2 1/2" wide. That width seemed to fit around and match up going around the tube.
With a wrap, I usually make extras that are a bit narrower and another wider. If the original width doesn't fit, one of the other two could be closer.

I don't like to waste decal paper, why not fill it up with other needed decals. In the middle are decals for the Klingon Battle Cruiser. I had built two of these, one kit had some decals that were old and wouldn't release.

At the bottom is an Odd'l Rockets F-18 Fighter Jet decal set that will be bagged in a kit.


I sprayed a scrap piece of a clear decal with gloss white paint.
This will be used as a white undercoat for the checkerboard wrap decal. 


The white decal goes down first and is allowed to dry.

The checkerboard wrap is applied over the white band.

TIP: Notice the decal is set right below the lip of the body tube. That small gap will prevent the decal from peeling back at the top of the tube.
Well, I screwed up - but in a small way, so did MPC! I didn't consider the high-low checker box position when the decals were redrawn.

On the left: The MPC checkerboard ends don't meet in an alternating pattern! My decal didn't match either. I'm leaving it as it is.
The decal ends meet up above the launch lug and won't be seen on the pad.

Saturday, May 13, 2023

MPC Lambda Payloader Build, Part 10, Painting The Fins & Pulling The Tape


The remainder of the fin faces are covered with brown paper masking tape.


Here's the mask lines after the tape was pulled.
I was very happy with the results. 
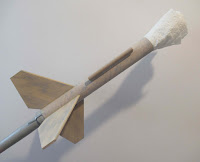
If your fillets are smooth with no bubbles or dips, your fin masks should end up straight and sharp.


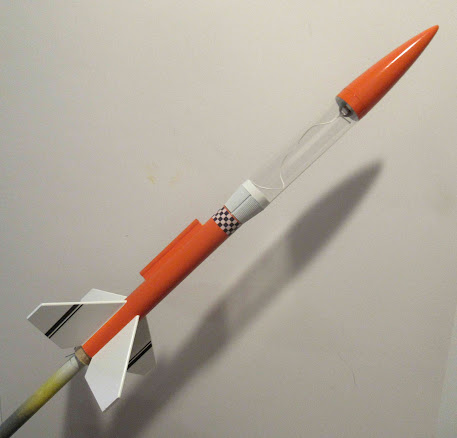
Here's the color scheme I was shooting for.


Too bad the generic decals don't give you what was shown on the box.

You do have a checkerboard roll decal, but it is blue with a white background. 
That blue will not go well with the orange on the body tube.

Friday, May 12, 2023

MPC Lambda Payloader Build, Part 9, Masking The Fins

This mask is different. Normally on a model rocket, the tube is white and the fins are a darker color. This one is the opposite - darker body and white fins.


Left: A strip of marked tape is cut over twice the root edge length. 
Set the tape strip down the root edge with the other half of the strip overhanging the top of the fin for now.
Right: With the body turned over, roll the strip under the fin. Keep tension on the tape and lightly pull as you lay it across the fin. 


Left: The body is upright again. Roll the tape over  the root edge making the edge as round as you can while still keeping the tape sealed (stuck) around the top.
Lay the tape down the root edge.
Right: Roll the tape under the trailing edge like you did on the other side. Lay the remaining tape across the fin race.


The two pieces of overlapping tape leaves an open  "V' under the trailing edge where the bottom of the trailing edge touches the tube.

A final piece of tape covers the tip of the "V" squaring off the trailing edge joint.

Paint and the results in the next post.

Thursday, May 11, 2023

MPC Lambda Payloader Build, Part 8, Mask & Paint The Payload Section

With the nose cone and adapter slid all the way in - 
The Scotch tape masks were applied around the clear tube. I wanted the paint to cover the shoulders where they are seen under the clear tubing.

In the pictures on the left, 
the nose cone and adapter were slid out a bit so paint would be on the shoulder lip. 


Here's the complete mask,
Brown paper masking tape covered the middle of the clear tube.


The adapter was sprayed gloss white, the nose cone gloss orange.

Here you can see how the paint goes over the top and bottom of the of the clear tube so you can't see the shoulders inside. 
The box art shows the shoulders painted black. If you were to paint the shoulders, chances are the paint would be scraped off when you slid them into the tight fit tube.

If you have doubted how well Scotch Tape masks work, try it sometime on a smooth surface like a clear payload tube. I've been doing it this way for years.

Wednesday, May 10, 2023

MPC Lambda Payloader Build, Part 7, Lug Fit, Paint & Chute

I sanded a light curve into the bottom of the launch lug standoff.
I wrapped some 400 grit around a 1/4" launch lug and ran it up and down the length of the standoff. I should have also done this on the top side of the standoff before gluing on the lug.

TIP: If you ever need to sand a curve into the bottom of a standoff to better fit the body tube, sand with a smaller diameter tube than what you are gluing it on to. You'll get a better fit.


Here's the model ready for a white undercoat.

It does really remind me of the Estes X-Ray.


The lower body will initially be painted gloss white.

A painting wand (dowel with a glued on engine casing) is slipped into the engine mount. At the open top, a rolled up paper towel will keep paint out of the tube.
I didn't use the six separate red shroud lines included in the kit. I used the more recent three long "loop" method. It's difficult to get six separate lines evenly tied and attached to the plastic adapter loop. 

I also added a snap swivel.

The parachute was stored in a small zip bag with the snap swivel out the top. This prevents any tangles.

Tuesday, May 9, 2023

MPC Lambda Payloader Build, Part 5, Engine Mount

The 20mm MPC tubes are sider than a BT-20. They require a inner sleeve to bring the inside diameter small for a better fit of the engine.
This inside tube also acts as an engine heat insulator.

The instructions say: "Sand the engine compartment so that it fits into the body tube very easily."
The words "very easily" should have been in bold type and underlined! 
The fit of the tube without the addition of the engine hook was very tight!

I sanded the tube and also rounded off the top edge for an easier start in the main tube.


To find the position of the top bend of the engine hook, set the blue engine block on the side and mark with a pencil. This gives a much better position for the engine hook slit. 


I marked a position to center the engine hook between two fins.

Here's a dry fit of the inside insulator tube with the engine hook in place. 


At the second dry fit, the mount was so tight I couldn't remove it!

I added some wood glue into the open areas right around the hook. Some CA glue was set onto the joint and allowed to seep into the crack.

I know, I should have more glue farther up. The main tube is short, I added a wood glue fillet down from the top opening with a dowel.

Monday, May 8, 2023

MPC Lambda Payloader Build, Part 4, Fin Sanding & Standoff


The instruction drawings were a bit rough, some illustrations hard to understand.

You are instructed to cut two strips of scrap balsa and glue them together to make a launch lug standoff. You need the standoff for the launch rod to clear the larger diameter payload section.
Here's the two stacked strips of balsa cut a little longer than the launch lug. 
I prefer to cut things long, then sand them to the correct length after the glue dries.


The leading edges were rounded.
One coat of CWF and sanding.

Then one fairly thick spray of filler/primer and sanding.

On the lower right is the launch lug and the standoff now at the correct length.


MPC tube diameters are sized to millimeters. This is a "minimum diameter" heavier than normal wall tube at 20 mm outside diameter.
It's a very clean tube, spiral seams are almost non existent.

TRIVIA: At the time, Metric tubes were only found in MPC kits. You now find metric tubes in Quest parts and kits.

The engine mount is a slightly smaller sleeve tube for a closer fit around the standard 18mm motor diameter.

Saturday, May 6, 2023

MPC Lambda Payloader Build, Part 3, Cutting OutThe Fins


Oh the horror -
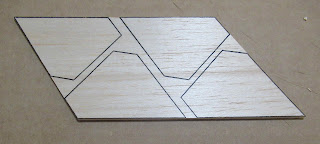
No die-cut or laser cut fins!
At the time, Estes would have you cut out a cardstock template, pencil trace and cut out the fins.

These fin cut lines were silk-screened on the 3/32" thick balsa. Centuri kits also had printed balsa. 


Notice how the fins were printed on the sheet.
Six of the cut lines line up!

Fewer cuts and straighter fins -


All four fins cut out.

There is still some cut line ink around the edges.
TIP: This should be sanded off or the ink could bleed through your finsl paint!


These four fins did need to be stacked and gang sanded.
Standard practice in the 1960s!