Showing posts with label Shaping. Show all posts

Tuesday, September 1, 2020

Semroc Micro Mars Lander, KMX-02, Part 5, Base Disk Shaping


The base disk has a light line laser cut around the outside to mark the inside of the edge taper.

I sanded the side by holding the piece at an angle and turning against a sanding block.


Here's the shaped piece ready for filling.
Both the formed nozzle and base disk got a coat of CWF and sanding.


On the left:
The shaped pieces are ready for a shot of filler/primer.

On the right:
The pieces after sanding smooth with 400 grit.

Saturday, March 26, 2016

Madcow Bomarc Build, Part 7, Rounding The Conduit Ends


Mark both the front and back end 1 1/2" from the ends.
The first rough cuts were made with a knife.


Don't round over the ends yet, just sand the side profile.
After the sides are tapered and even then round the top.


Here's the finished front and back.
Round over the edges down the entire length of the conduit strip

When rounding the ends remember, the front end is twice as high as the rear rudder end.

Saturday, January 9, 2016

New Way A-20 Demon Build Part 5, Nose Cone Shaping


I tried to fit the nose cone shoulder into the body tube but could see it was too large. The shoulder corners were being compressed and torn.

Like the connector in the last post, the shoulder width was reduced and the corners slightly rounded.


Once in the body tube you can see the nose cone overhanging the tube.
The sides were sanded down to the body tube sides with a block.
The nose cone corner sides were also rounded to match the tube.


The original Demon had a rounded nose cone tip.
You could leave the nose cone squared off but I rounded it.


Here's the shaped and fitted nose cone ready for filler.

Saturday, August 15, 2015

Estes Lynx, Kit #7233, Build Part 8, Intake Tube Cutting

The instructions have you tape the intake tube pattern over a BT-5 and cut through both the pattern paper and tube at the same time. I thought that would lead to some shifting of the pattern while cutting.

I taped it on and used a pin to make small holes around the pattern.
The pattern was removed and the holes connected with a pencil line.

The kit supplies two BT-5 tubes. If you carefully place the pattern on the other side of the tube, you can cut both intakes from a single body tube.

Cutting the intakes was easier than I thought it would be.
The intakes were cut with a sharp knife. Notice the intake back end (inset picture) wasn't rounded off, yet. For now it's easier to just follow the cut curve to a point.

The rounded end (final shape) was done with sharp scissors.


The intake edges were sanded down until the needle holes were gone.

Some 400 grit was wrapped around the BT-20 main air frame tube and lightly sanded to contour the edges for a better fit.


Here's the inside and outside of the intake top after contour sanding.
On the left you can see the edge isn't square but sanded at an angle to fit the curve of the body tube.

Thursday, July 19, 2012

Wolverine Rocketry Phoenix AIM-54A Build Part 12 Upper Fin Fill Sand

You'll need a sanding block to sand the filler down and keep the taper edges sharp.
Here I'm using 220 to knock down the bulk of the filler. I'll switch to 400 grit for final smoothing.

Don't just sand back and forth and hope for the best -
Set your block down on the outside taper. Before moving the block, be sure the flat sandpaper side is laying flat on the taper you sanded earlier.

Sand a few inches at a time, always being sure the flat side of the block is laying on the same plane.


After the long outside edge is sanded, switch to the upper taper.
Sand only one tapered side at a time - don't jump around between surfaces.

This picture shows how I'm setting the block on the same angled plane as the upper taper before sanding.

After sanding the upper taper, sand the large flat area of the fin.

If you maintained the block angle on the outside (long) and (short) top tapers, sanding the large flat area of the fin should "reinforce" and keep the edges sharp.

Wednesday, July 18, 2012

Wolverine Rocketry Phoenix AIM-54A Build Part 11 Fin Tapers Part 2

With the fin edge marked (or left dark brown from the laser burning) you can clearly see how thick the edges are as you sand.

Sand a few strokes, and check the edge.
Turn over the fin, sand a few strokes and check the edge on the other side.

Some builders will sand an equal amount of strokes on each side. I tend to sand a little, turn it over and sand a little. I'm constantly checking the darkened edge to be sure it is straight and an even thickness down it's length.


This is the top of the forward fin after sanding the short leading edge and forward edge tapers.

The side of a pencil lead was rubbed over the inside edge on the right side.
This inside edge will take care of itself as you sand the leading and forward edge tapers.

If sanded correctly, it should be pretty straight.


This is the root edge of the lower fins.

Be careful sanding here. You can see where the taper starts to "scoop" in a bit at the base or start of the 1" taper.
The CWF filler should help fill that slight concave in the taper.


This is all eight fins ready for filling.

Without a doubt, this was the longest part of the build.

Tuesday, July 17, 2012

Wolverine Rocketry Phoenix AIM-54A Build Part 10 Fin Tapers Part 1


Cut out the fin taper template and trace it onto the face of the fins with a sharp, soft pencil. A softer pencil will make a darker line.


TIP: If the laser cutting process left a dark brown edge, don't sand it off!
You'll be able to use that dark edge to better see the thickness of the taper as you sand.


If the edges are light you can darken them up with the flat side of a pencil.
Make this coloring as dark as you can using a soft pencil.


This method is not recommended for this model.
The fins on the Phoenix will be painted white - a Sharpie marked edge might bleed through the white finish coat.

If you use a Sharpie, mark quickly not allowing the ink to soak into the balsa.
A black edged fin will be the easiest to see when sanding the taper.

Wednesday, June 6, 2012

Semroc Goblin Build Part 5 Balsa Sanding & Filling

Everyone should know how to round the edges of a fin.
For those who might not, this is just one way to do it.
If you don't have a sanding block, pick one up at a hobby store. Preferably one that allows you can change sandpaper easily.


If you were to follow the original Estes instructions:
On the Goblin, only the leading edge and trailing edge of the fins are rounded.
The root edge and outside edges remain square.

For a consistent round edge use a sanding block with medium grit 220 grit sandpaper.


Using the block gives a more uniform pressure on the balsa and the square corners won't get rounded.
Look down the leading and trailing edges to make sure you have them sanded to a half circle.


Rough form the rounded edges with the 220 grit then switch over to a small piece of 400 grit, set into the soft pad (inside of the first joint) of your thumb or index finger.
Use the 400 grit to knock down any squareness or edges on the rounded edges.

Thursday, February 23, 2012

Super Alpha Build Part 4 Fins


It's hard to see in the picture, but the balsa sheet from the kit was made from two pieces of balsa, glued together parallel down the grain line.

The Super Alpha instructions have you round only the leading edges of the fins.


The original Alpha instructions say to round the leading edge and taper the trailing edges. The illustration showed a rounded leading edge and a short taper at the rear.
Enlarge the illustration at the left and look at the "A - A" section.
I decided to round all the edges, except for the root edge.

Saturday, February 11, 2012

Mini Honest John Build Part 9 Fin Shaping 3


When sanding the upper and lower surfaces flat, it helps to set the block edge to the side of the high point pencil line.

While sanding, constantly check the diamond shape profile on the root and outside edges for continuity.


Here's the finished fin.

In this picture, the balsa coloration makes it look like the taper doesn't extend to the middle root of the high point pencil line. It's there, it's just subtle and should show up after filling and painting.

When the balsa grain is filled, the filler will help sharpen the high point line. You'll have to be careful when sanding the filler to keep the leading and trailing edge thickness consistent.

Friday, February 10, 2012

Mini Honest John Build Part 8 Fin Shaping 2


While the pictures show one side of the fins being sanded, here's what the leading edge would look like. As mentioned before, I don't sand to a knife edge but leave the top a little square for strength.


After the sharp tapers of the leading and tailing edges are established, then flatten the upper and lower face surfaces leaving the pencil line or high point in the middle.

Start flattening out the top and bottom surfaces of the fin. You'll be removing the pencil line areas shown in the last blog entry picture.

As the upper flat surface is sanded, you'll take off the outside end of the (high point) pencil line.
There is no way to avoid this and it will make the outside edge a little thinner than the root edge, just like the real HoJo fins.

The pencil tick mark at the left shows where the sanded taper took off the pencil line.
When you sand the lower face flat, the high point line will again follow the pencil line to the outside edge.

Mini Honest John Build Part 7 Fin Shaping 1

From the instructions: "Use alternative fin profile for a more scale like appearance." (That's the way it's worded.)

The dimensions are wrong. 5/32" or 40mm? They meant to say 4mm.
17/32" or 135mm should read 13.5mm.
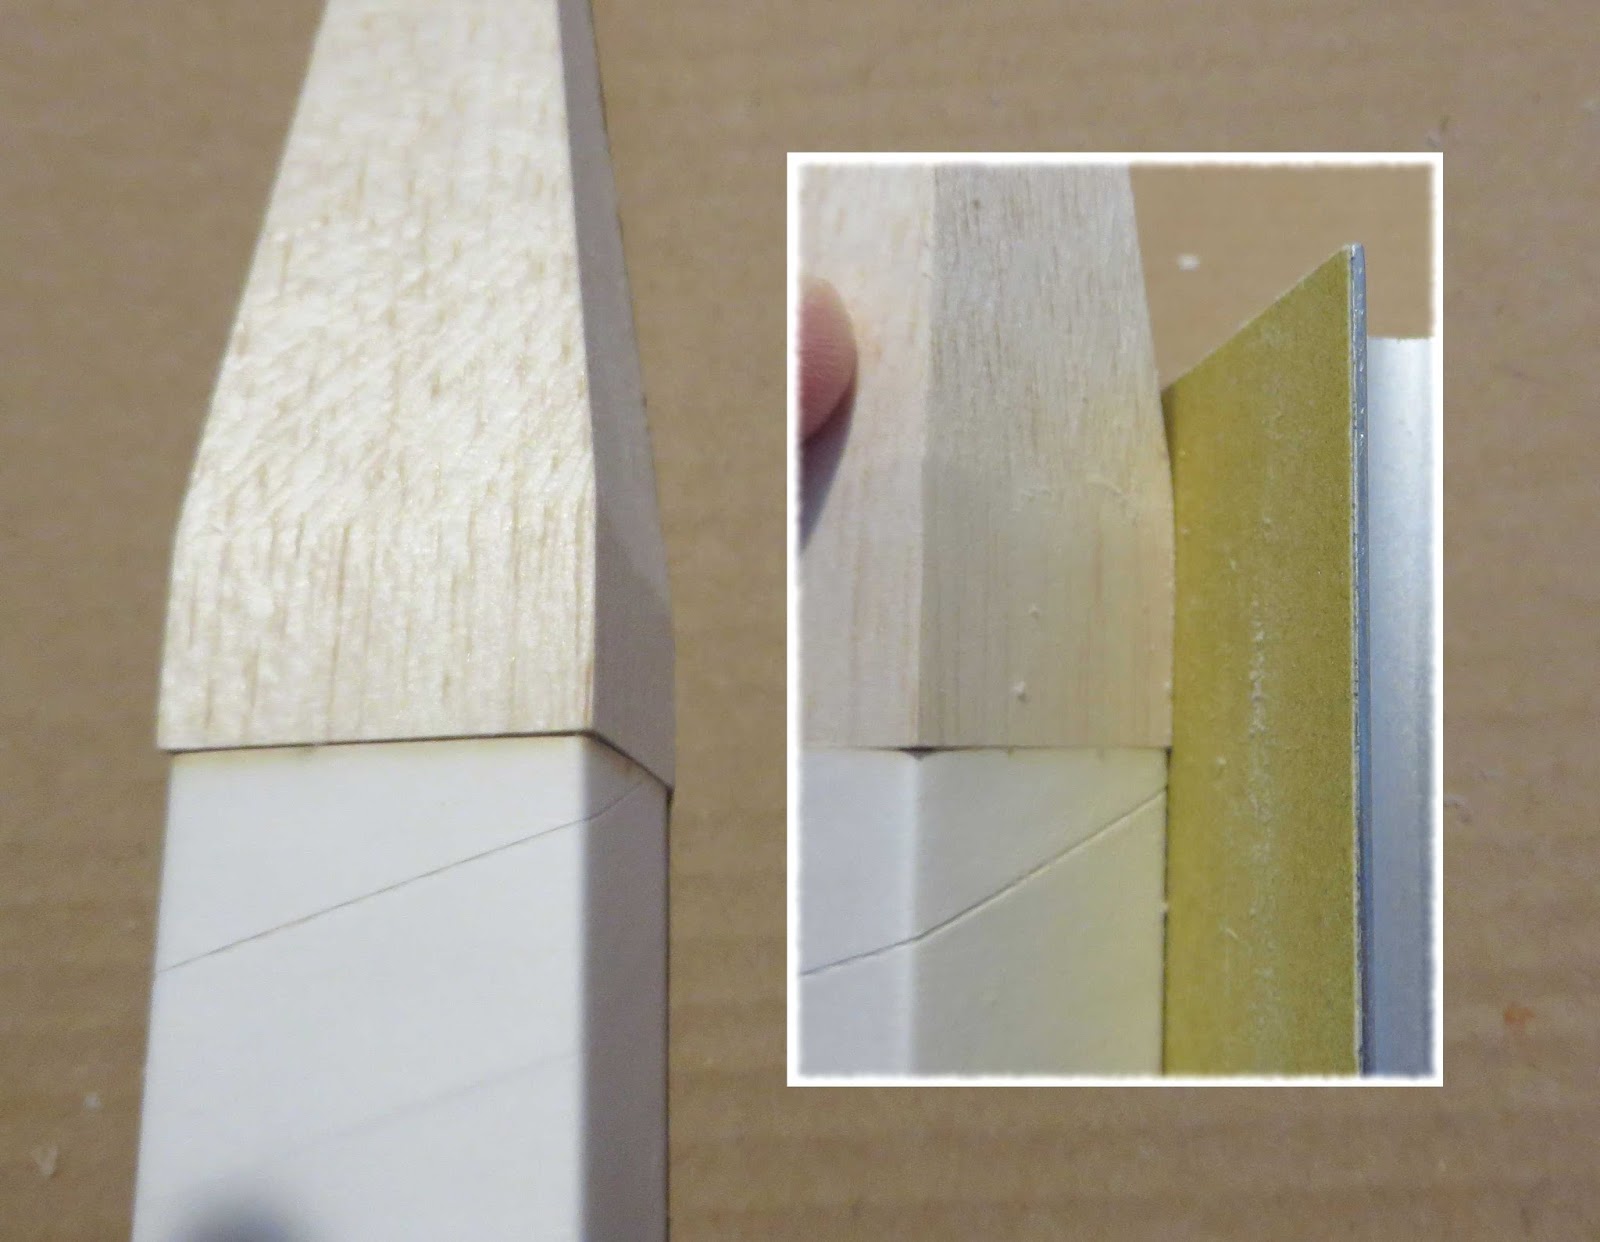
Enlarge the picture to see the detail.

When you sand this profile, the fins will end up wider at the root edge and narrower on the outside edges.
I'll try to explain how I'd sand this shape step by step, you might have other successful methods.

Draw a light pencil line across the fin. Draw light, don't scar a line in the balsa, but make it dark enough to see.

The kit balsa is stiff and strong, it should be good for sharp lines when sanding.
I'll be using 220 grit on my sanding block. This adhesive back, rolled 220 grit (made for the Great Planes block) is a little finer than a hardware store 200 grit.


Sand from the pencil line on the outside edge. Sand part of the taper only as wide as the line at the outside edge.
I've drawn a pencil line where the high point is now after the first stage of shaping.

Sand the leading and trailing edges almost to a knife point taper. Note I said "almost". I keep the leading and trailing edges a little flat for strength.
On the outside edge you can see 1/2 of the diamond shape taking form.

Tuesday, January 31, 2012

Super Alpha Nosecone Part 3 Final Shaping


The sandpaper was switched over to 220 grit.
The center dot is still visible.


More shaping and the center dot is almost gone.


The balsa cone was taped to the wall.
I held the print a little forward of that to check the profiles side by side.

Is it perfect? No, but it's close enough for me.
Over the years the same catalog nose cone changed shape depending on how old the grinder was.


A half an hour later, the new shaped nose cone.

Sure, it would have been easier to order a new nose cone.
Not to take any business away from Semroc, but I just saved $7.10 off my next order.

Friday, December 9, 2011

Mars Snooper Build Part 11 Pods and Fins


Here's the cross section airfoil of the largest fin.
Shaping was done with 220 grit sandpaper on a block.


The nose cones were glued into the pod tubes.

Sand their shoulders to the diameter of the BT-5 tubes.


I went ahead and filled the balsa, tube seams and the body tube breaks.

The assembly on the right has been brushed with thinned CWF.
The assembly on the left is after it was sanded sown with 400 grit.

Wednesday, August 31, 2011

260 Space Booster Build Part 12 Nose Cone Shaping


I extended the sides on the nose cone drawing to show where the balsa adapter is right now with the upper shoulder removed.
The top will have to be shortened. The new length was drawn on with pencil.


Here's the top with the excess sanded off.


The squared off top was rounded over with 220 grit sandpaper.


The finished nose cone.

Tuesday, August 30, 2011

260 Space Booster Build Part 11 Nose Cone Shaping


The nose cone is made from a TA-550 balsa adapter.

The upper shoulder is sanded away and rounded.
First the shoulder is reduced by matching the angle of the sanding block to the side angle of the balsa adapter.


While you could cut out and use the template, I did most of the shaping by eye. I continued to sand until the upper shoulder was nearly gone.
While sanding, be careful not to sand down the lower shoulder.


Here's what the nose cone shape will look like when the upper shoulder is removed. As it is now, the nose cone is too tall to match the template.