Showing posts with label MPC Taurus 1. Show all posts

Saturday, February 16, 2013

MPC Taurus Finished


This is a pretty slick looking BT-5 sized model.
A black fin would have looked better but I didn't want to risk masking over the aluminum., or any other metallic paint.
I wish the decals would have transferred off the backing sheet, but the final results were good.

Friday, February 15, 2013

MPC Taurus - 1 Build Part 10 Decals


I didn't want to do another mask for the white under color of the roll pattern.
A piece of white (sprayed) decal paper was cut into a rectangle, long enough to do a full wrap around the tube.
TIP: Notice I set the white wrap "decal" about 1/8" down from the top of the body tube. This exposes a band of the aluminum paint and gives another color separation without masking.
Below the white wrap is a piece of paper divided into fourths for a marking and positioning guide. Pencil tic marks were lightly drawn on the dried white decal.


My favorite self adhesive trim material is Contact paper for blackboards.
Strips the correct width and length were cut with a straightedge and razor blade.


The pieces were lifted with the tip of my hobby knife and positioned over the pencil lines.
Don't burnish down the pieces yet, wait until everything is in place.


Two final horizontal bands were set over the vertical strips.
As mentioned in an earlier post, be sure to overlap the band ends. They could shrink up over time.

Check all pieces for straightness and burnish down. Be careful not to scratch the white decal surface.

MPC Taurus - 1 Build Part 9 Paint and Decals


I would have liked to paint the rocket like the face card, silver with black fins.
Masking any metallic paint can discolor the metal finish, so the fins won't get a shot of black. The booster tubes will be black.
The nose cone is gloss red.
This is my favorite part of the build, when all the prep work comes together.
The roll pattern decals got a coat of liquid decal film. These decals are old and I wanted to insure they would transfer easily.

These roll patterns all have a white undercoat.
Four colors -  red, aluminum black and white should be more than enough on a model this size.

Even after coating the old decals with the decal film, they wouldn't release from the backing paper after soaking in water!
I even tried rubbing off the paper backing thinking I could just glue the decal on like a wrap, but no luck.
I'll have to improvise, this model really needs a roll pattern below the nose cone.

Thursday, February 14, 2013

MPC Taurus - 1 Build Part 8 Undercoat Paint Mask


The "booster tubes" will be painted separately and glued on afterwards.
A thin line of masking tape was set down just short of the top of the booster tube length.
The model was set down a 1/2" dowel for a painting wand.
The entire model got a coat of white.

The face card shows the body in silver.
Black and white fins would look good against the silver body tube. But masking tape over any silver (or aluminum) paint could discolor the silver. On to Plan 2.

Wednesday, February 13, 2013

MPC Taurus - 1 Build Part 7 Fin Gluing

These fins are small! I haven't built a BT-5 based model for a while.
The trailing edges are flush with the end of the body tube.
You've got nothing to line up the back on, the fin covers the pencil line.
Extend the fin lines over the back end around the base edge of the tube.


I'm not sanding the back end of the tube.
I'm checking to make sure the tailing edges are in line and flush with the end of the tube.
Set your model on a flat surface (here a sanding block) and hold up to a light.

MPC Taurus - 1 Build Part 6 The Tubes!

I had forgotten how great the MPC tubing was!

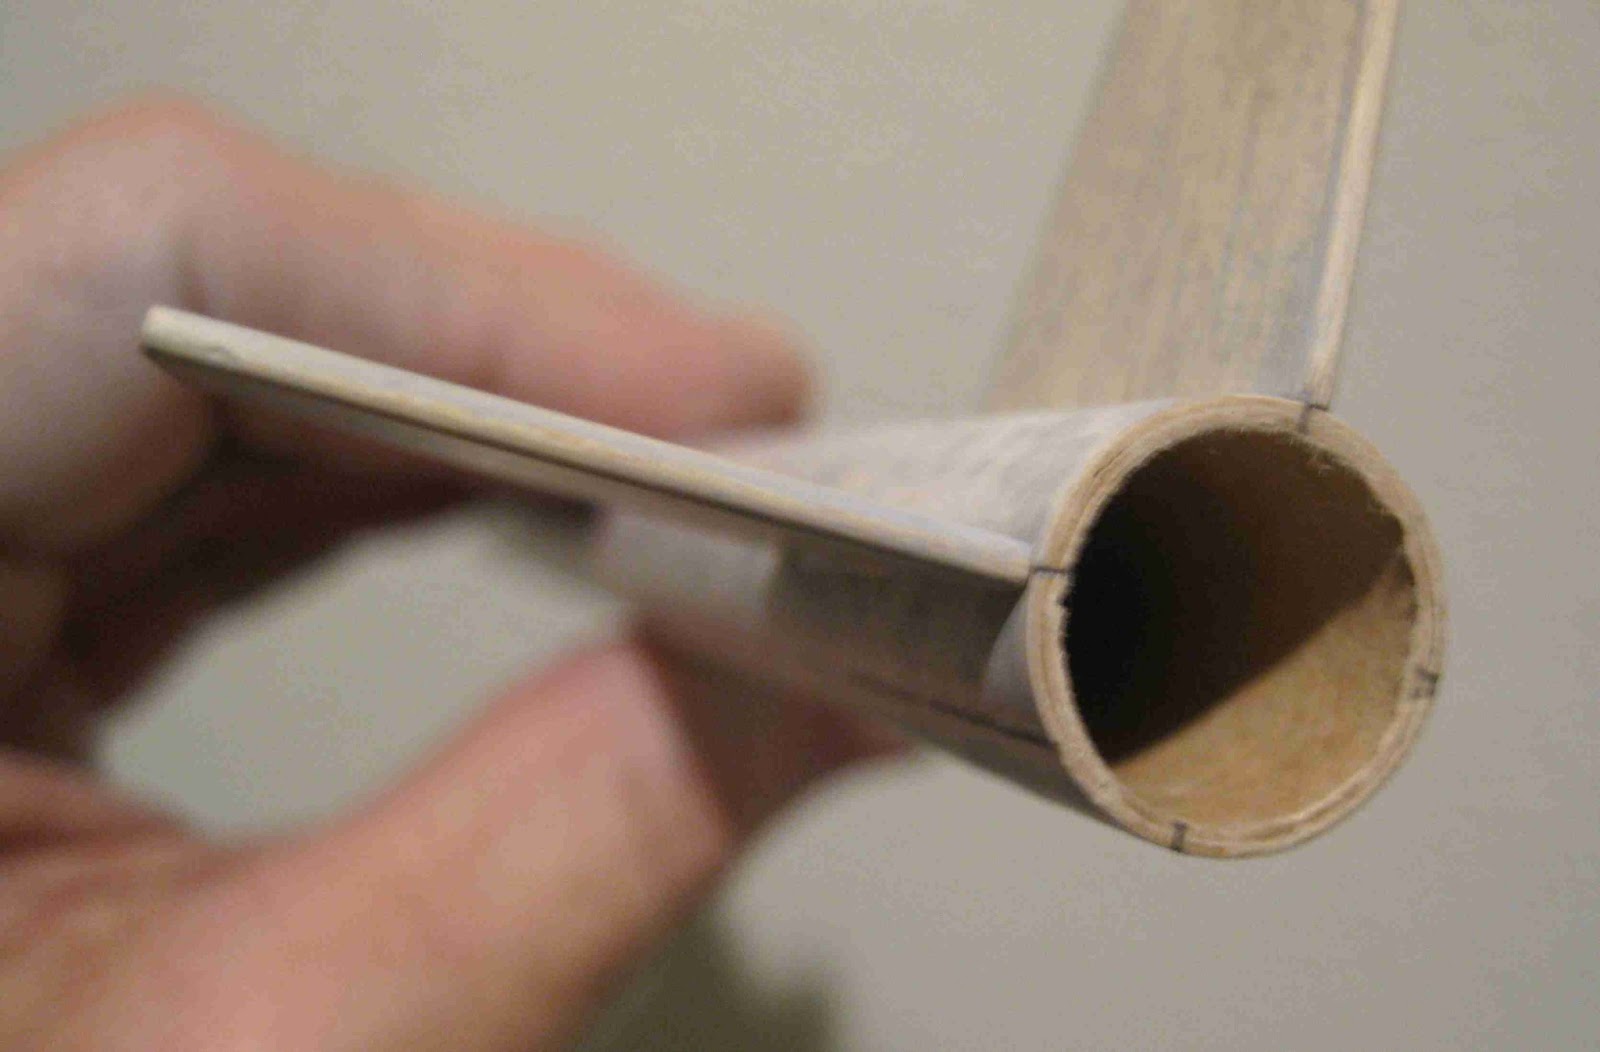
The tubes have a thin white outer layer. When you first see the tubes you probably think they are poorly made. They aren't smooth as other kit tubes.
But - there are no seams to fill!
The white layer actually overlaps itself slightly - very slightly.

The first picture is the booster tubes.
the upper one is a little shiny, right out of the package. Look close and you can see the slight overlap of the outer white cover layer.

The lower tube has been lightly sanded with 400 grit. It doesn't take much, you don't want to remove the whole white layer, just the overlap
The second picture is the main air frame tube after sanding.
No Seams!

Sure, you still should prime the tubes before a color coat.
These are superior tubes, thicker and stronger than an Estes BT-5.

The only tube that'll require seam filling is the launch lug. It's a little rough.
Notice it's not white Mylar but a rough brown wrap.

Tuesday, February 12, 2013

MPC Taurus - 1 Build Part 5 12" Parachute?


The enclosed 12" parachute is too big for a model this size.
8" diameter would be better, by mistake I cut this one down even smaller!
I simply cut straight lines between the the intersecting points of the first inside ring.


My parachute ended up about 6 1/2 " diameter. A little small but still usable.
The self adhesive tabs were replace with plastic page reinforcement circles.


Small holes were punched with the rotary punch. You'll need to have some card stock behind the parachute sheet to punch the holes cleanly.

The finished parachute with a snap swivel attached.

Monday, February 11, 2013

MPC Taurus - 1 Build Part 4 Engine Mount and Kevlar


The Taurus l used a cardstock Stine Shock Lock.
This makes for a tight fit in the 10mm body tube. I'm concerned the parachute and shock cord might get caught up on it during ejection.

This model will get a Kevlar upgrade.
After the engine block was glued flush with the engine compartment tube, the side was opened up with a sharp awl.
The kevlar was tied through the opening using two half hitches.

I didn't glue the open side shut, it was just pressed back down.
This way, I could replace the Kevlar if it ever burnt through.


The Kevlar was rolled up inside the engine compartment tube.

Glue was spread 2" inside the main body tube with a dowel.
The engine compartment tube was slid in and flush with the end of the main airframe tube.

Sunday, February 10, 2013

MPC Taurus - 1 Build Part 3 Fin Prep

Newer kits tell you to stack the fins and sand them together. With laser cut fins and there shouldn't be any difference in the fin sizes.
Sure you should sand off the burnt edges but there is no reason to group sand laser cut fins.

This kit has the old style die-cut fins.
Die cutting is done on a press. A block of wood has long razor blades set in the shape of the fin outlines.
The fins are cut (think of a stamp) when the razor block is pressed into the balsa. The quality of the cut was dependant on the blade sharpness and how hard the balsa was.


The upper picture shows the stacked fins,. It's easy to see how different they were.

To the left are the stacked fins after sanding on some 220 grit on a block.
When gang sanding fins, keep the root edges square or at a 90 degree angle to the face of the fins.

Saturday, February 9, 2013

MPC Taurus - 1 Build Part 2 Parts Prep


Here's extra "parts" many never noticed in the MPC Minirocs kits.

Molded into the sides of the blister packaging are small nozzles and canopies. The inset picture shows the vacu-formed corrugation on the bottom of the package.


Back to the parts prep:
The base of the nose cone shoulder was as wide as the outside diameter of the body tube!
After a bit of sanding the fit of the nose cone was where it should have been.


After the shoulder was shaped to fit in the tube, the nose cone base was a "muffin top" over the body tube top.

The overhang was sanded off  with 400 grit on a block.

Friday, February 8, 2013

MPC Taurus - 1 Build Part 1 Parts


I bought this one off EBAY for about $10.00.
In the mid 1970s I built and flew many of the MPC Miniroc series - except for the ASP and this one.

This kit was billed as a "customizer kit". It included some extra chromed plastic parts.


All the parts:
That's a 12" parachute - too large for a BT-5 based model.
Two sheets of decals are included. One sheet has roll patterns, the other has "United States" , numbers and the Air Force Star and Bar logo.
Four die-cut balsa fins cut from 1/16" thick balsa.


There is two small booster tubes. They are thick walled, about 3/16" diameter.
The two chrome nose cones fit into the tubes.

That's a Stine "Shock Lock" in the center.
The cotton string is the only shock cord on the model. No elastic, just a thick cotton string.

The parachute shroud tabs will be replaced. Most of the adhesive has lost it's grip.

Here's a closeup of the chromed pieces. All were still on the trees except for the small nose cones in the previous picture.

The pieces on the left look like they were taken from a plastic car kit.
The pieces on the right probably came from a Apollo based model.
In an optional step you are told to use the long silver pieces on the left as a nozzle in the booster tubes.
All the other pieces aren't mentioned in the instructions.

After the model was built I saw an MPC Moon Go kit on sale on Ebay. The same chrome parts were included in this larger kit.
The box illustration shows the "hub cap" looking pieces at the base of two fins. Small chrome details are glued over the leading edges.
The same Taurus boosters are used in the Moon Go kit.