Showing posts with label C Flying Saucer. Show all posts

Wednesday, August 26, 2020

Centuri Flying Saucer #5325, Fix and Finished!

Remember the clear coat made the motor tube wrap a bit transparent? The brown tube underneath was showing through.

This was probably the weirdest mask I've ever done. The interior core tube was masked off with many pieces of masking tape. The tape wasn't pressed in place, I didn't want to tear or peel up the card stock.
The Main shroud was covered with cut copy paper.

I carefully aimed the gloss white paint to hit the center motor tube and C and L supports.
Finally, much better. Not perfect -  but better. I can sleep tonight.

It's already loaded with a C6-0 motor for a upcoming schoolyard launch.

Tuesday, August 25, 2020

Centuri Flying Saucer #5325, Part 12, Glow In The Dark Dots

Here's a case of a single guy with too much time on his hands. I'm going to add the glow in the dark dot "lights". These were a special added feature of the Centuri kit.

From the instructions:
"SPACE GLOW DECALS" There are over 70 of these round dots, more than enough to decorate your model. One goes into every round embossed area on the main shroud and around the core tube. These dots, printed with a special ink are phosphorescent. This means they soak up available light and then glow in the dark."

Using a Michael's 40% off coupon I bought a can of Krylon "Glowz In The Dark" paint for $4.80.

Half of a peel and stick self adhesive page was sprayed with the glow paint.
A simple 1/4" punch was used to knock out many small dots.

TIP: If your dots aren't cutting clean, flip over the sheet and punch with the backing side facing up.


Place the dots using the tip of your knife blade and lightly burnish.


With my pantry door shut and the lights off - Here's the saucer with glowing dots. There is also some glow dots in the center core.
Rocket Nerd SUCCESS!
No . . . this wouldn't make the saucer more visible at a night launch.

Monday, August 24, 2020

Centuri Flying Saucer #5325, Part 11, Finished?


This was fun, and a good challenge getting everything to fit!

This smaller 75% size makes it more manageable and will get a better altitude with C6-0 and C5 engines.

The only thing different is the engine mount tube sticks out the top. I could have had it extend out the bottom, but it might be more stable with the engine weight forward.
As with all home print models, you do need to clear coat the water soluble printer inks. If the model lands on wet dewy grass, the home print inks will run.
When I sprayed the copy paper wrap around the engine mount tube - it turned a bit transparent! The brown tube was showing through the white wrap. The glued areas stayed white.

It wouldn't matter to some, but it bothered me. We'll fix it in an upcoming post.

Sunday, August 23, 2020

Centuri Flying Saucer #5325, Part 10, Trim Pieces & L Brace Gluing


The fit of the minor shroud was very good. It covers the cogs on the inside of the large ring.
The three L braces also needed some trimming on the outside edge to fit between the core tube and engine mount tube.

It's difficult to get the l braces in place without making a glue mess - try gluing the outside edge first - then glue the root edge to the motor mount tube, explained below:

The outside edge of the L brace is glued to the interior ring first (one side) and allowed to dry. This makes a glue "hinge" to swing the root edge away from the motor tube pencil line.
On the left you can see the faint pencil gluing line. The picture on the right are some small glue dots. Notice the root edge of the L piece is turned away (hinged) from the glue. After the glue dots are applied to the pencil line, swing the L brace and slide it into the glue. Wipe off excess glue and glue fillet both sides of the joint later.


The bottom detail strips were placed using a glue stick.


These fit along the bottom edge of the core tube.
The hatch is centered in the gap between the cutouts. It was also too tall and needed trimming to fit.

Saturday, August 22, 2020

Centuri Flying Saucer #5325, Part 9, Gluing It All Together


Instead of putting a line of glue down the outside edges of the C braces, I applied some small glue dots on the inside of the core tube using a sharpened dowel.

The outside of the C braces were turned into the glue dots and the excess wiped clean with a Q-tip.


Here's where we're at -
Now onto the large ring at the bottom.


The inside "cogs" were also too tight, against the core tube distorting the shape.

This took some tight trimming, cutting off slivers from each of the interior glue points.


With the large ring in place, the outside overhangs the main shroud a little under 1/16"
I glued and inch and taped on either side of the glue area trying to keep the overhang even all the way around.


With the ring glued all the way around, a fine fillet was applied and smoothed with a fingertip.

There were some uneven areas. These were evened up with 220 grit on a sanding block followed with 400 grit.

Friday, August 21, 2020

Centuri Flying Saucer #5325, Part 8, Oops! Re-Fit Again


Even after the first trim of the C braces, the fit was too tight, still  distorting the roundness of the core tube.

The side of the C braces had to be trimmed even more! I had enough disappointment for the night.


I waited a day or two before removing the card stock wire form retainers and then trimming the outside of the C braces again.

This made for about 1/16" total trimmed off with this second adjustment.


Here's how I fit the new retainer strips. The ends were cut on an angle to match up in the corner.
On the available PDF, the wire form retainers have been reduced to fit this smaller model. The PDF doesn't have all the shroud pieces, just the 75% reduced antennas and retainer stripes. The shroud prints are listed on YORF - CLICK HERE and look for post #21.


After the wires and retainers were in place, the outside edge was flattened with a burnisher.
Flattening the outside edge gave me a slightly wider gluing area.

Thursday, August 20, 2020

Centuri Flying Saucer #5325, Part 7, First Fit of the C Braces


TIP: You can get a rounded leading and trailing edges on carded fins by applying a glue bead down the edge. Apply a fine line of glue, then run your finger down both sides of the fin to even out the glue bead. Let dry and sand lightly with 400 grit.

This glue bead will also strengthen and seal the edges of the fins.
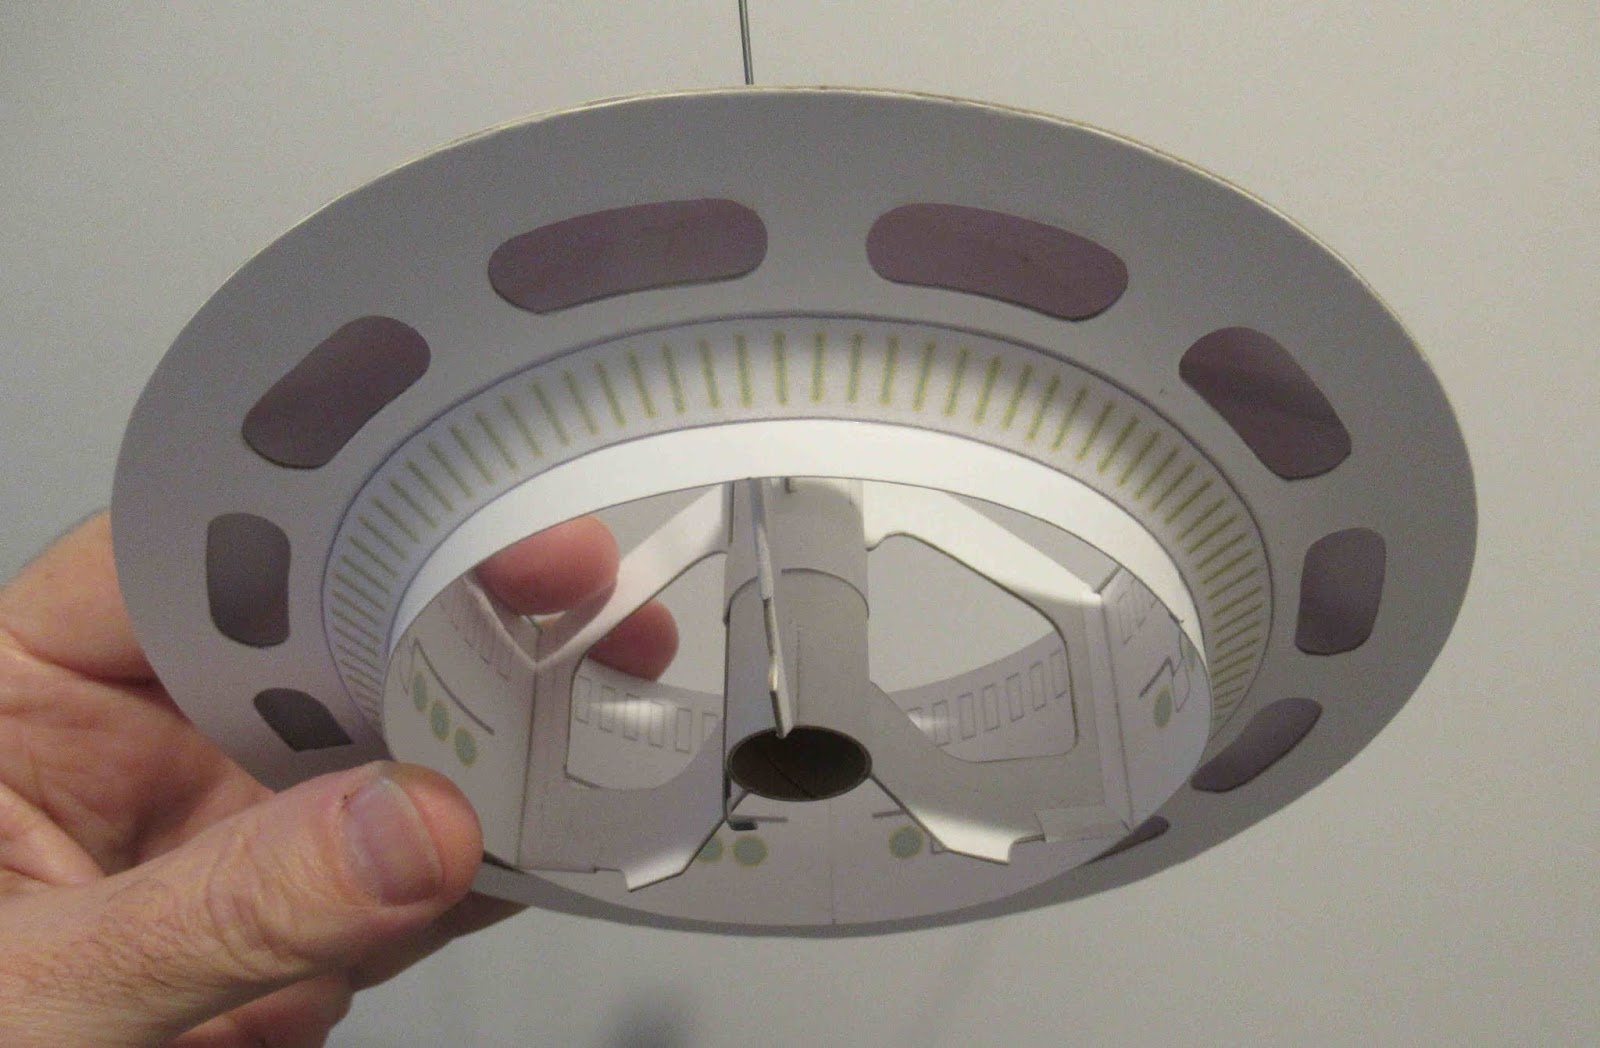
I tried to slide the engine mount assembly into the center core. The fit was too tight!
With the addition of the wire thickness the span was now too wide! I trimmed off about 1/32" from the outside edge of the C brace.

I later learned this wasn't enough! You'll have to trim off almost 1/16" for the proper fit.
I'll continue with the build to show what happened - but be aware, on my build it required some extra fitting and time.

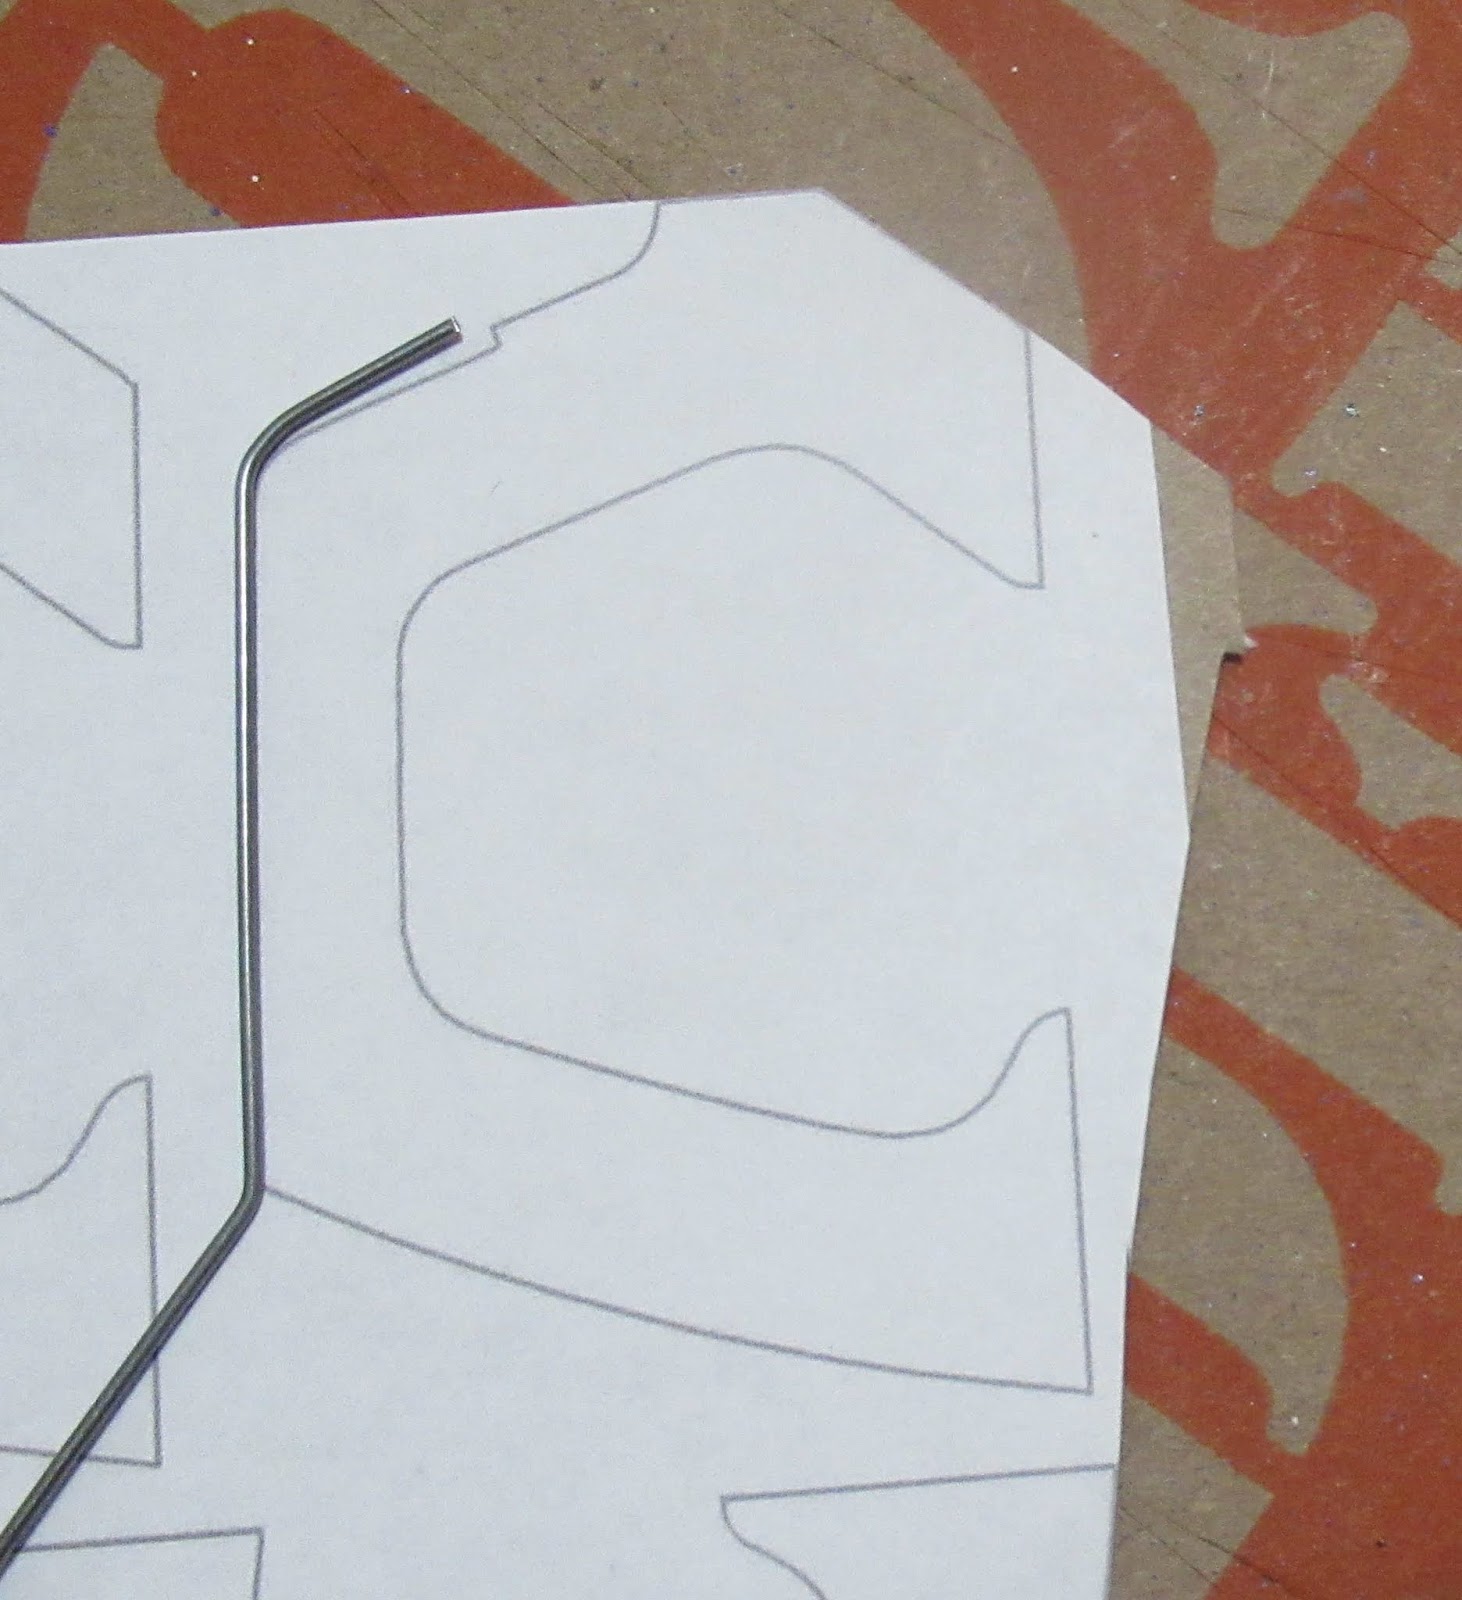
I made some "Wire Form Retainers" from 110 lb. card stock. These were just strips of card stock about 3/8" wide.

On the left it looks like a simple fold. The center is actually a double fold, to roll over the wire antenna positioned in the center.

I drew up some Wire Form Retainers along with an Antenna Template. This PDF is available to Patreon supporters. Email me at oddlrockets@bellsouth.net and ask for the Centuri Flying Saucer PDF.
Note: I do not have all the templates, just the 75% size antenna and the antenna retainers. All other PDFs for the main body parts are listed in the first Background Post: CLICK HERE


Here's how the antennas fit -
And the retainer strips over that. That angle joint at the upper right is cut and fitted.

When first gluing on the antennas (left picture), don't use much glue. They hold better when the glue is about half dry and tacky.

Wednesday, August 19, 2020

Centuri Flying Saucer #5325, Part 6, Engine Mount & Large Shroud Gluing


The engine hook is removed and the low end of the tube is set on the marking guide

Notice the brace gluing positions aren't all the way down the tube. I set the braces against the tube and only marked the gluing areas. I wasn't planning to paint anything and didn't want pencil lines on the finished model.

After the tube was marked the engine hook was set in the slot. A card stock strip was glued on to hold the hook. Center the retention strip in the open middle area of the C brace positions.


I was surprised how well the round core tube fit into the main shroud. A perfect fit!


The old instructions say to make a "glue point" in four locations around the joint. It is very tight, you can't just drop in glue.

I used a sharpened dowel to set a small drop of glue in the wedge joint. The dowel tip was used to spread the small glue drop evenly. You should keep the glue amounts under control. Too much and the card stock could end up distorted after the glue dries and shrinks.

Four drops of glue are set and spread out at 90 degree intervals. Let these dry, then come back and fill in the rest of the gaps. You should end up with a small, even glue fillet all the way around the circle joint.

Tuesday, August 18, 2020

Centuri Flying Saucer #5325, Part 5, Shrouds


The C and L braces are cut out.
Note the pencil mark along the top. That's to fit the short end of the antenna top bend.

Cut the interior curves first, then the straight lines connecting them with a straightedge and sharp blade.


Before cutting out the shroud pieces,
The backings are peeled off and stuck to 110 lb. card stock. The  pieces that are curved into a circle are two layer and don't have a thick cereal box board center.

Cut the centers out first, then the outside curve. This picture shows the Minor Shroud that ends up on the bottom of the model.

The main shroud is also peeled and stuck to 110 lb. card stock, again two-layer.
Use white glue on the tab! It will dry clear. Wood glues dry yellow. You'll want your saucer to have a clean, white surfaces.


Finally the two piece "Core Tube Halves" are glued into a circle with the print to the inside. The picture shows the core flipped. In the end, those light green dots should end up down towards the bottom of the model.

Sunday, August 16, 2020

Centuri Flying Saucer #5325, Part 4, Wire Antennas

The instructions had a print of the original kit antennas. Since this is a 3/4 size downscale, I drew a 3/4" box and reduced the 1" span box to the 3/4" length.
Below the print are the three finished, bent antennas.

You'll need some music wire. I found some at Hobby Lobby - K&S wire, #602201, #5497, .039" diameter.


I tried bending the outside round circle shape around a dowel, but wasn't successful.
I had better luck with needle nose pliers. Don't try to bend in one movement. Make many small bends around the circle shape. Check against the print as you go.


Keep the circle bend flat. It's very easy to have it end up going out to one side.


The bent wire matched the template print.
I set it on the 75% size "C" shape brace. The upper bend needed to be a bit sharper.
Notice the end of the wire, it is shorter than the notch allowance. I made the notch a bit lower to fit the end of the wire.

The antenna wire and reinforcement piece template is posted in Frank's build at YORF - CLICK HERE, Page 6, Post 51

Saturday, August 15, 2020

Centuri Flying Saucer #5325, Part 3, The Large Ring


The large ring and C and L center braces (and large ring) got a cereal box cardboard lamination.
You could probably use a thin coat of white glue, but a shot of Supper 77 spray adhesive is much easier. Some self adhesive paper went on the bottom covering the brown cereal box stock.


Cut our the rounded ends first using a new blade in your knife.

After the circles are cut, cut the lines with a strait edge.


The small arcs on the inside edge are hard to cut with a knife.

TIP: Use a rotary punch on the tight inside circles.


After the circles are punched,

Cut off the sides with your knife.


On the left is the rough cut slots.

Smooth them out by sanding with 400 grit sandpaper wrapped around a dowel.

Friday, August 14, 2020

Centuri Flying Saucer #5325, Part 2, Laminations

The printed side of the cereal box cardboard should be lightly sanded to remove some of the printing and glossiness. This will remove some of the ink so it won't show through the overlay. It also makes for better adhesion of the self adhesive sheets..

The two 110 lb. card stock prints were sprayed with 77 adhesive and stuck down to cereal box cardboard. The cereal box cardboard backs got a sheet of self-adhesive backed paper.

These two ended up as a three layer laminate -
1. TOP: Print on 110 lb card stock,
2. MIDDLE layer of cereal box cardboard,
3. BOTTOM: The lower layer of self adhesive backed paper.
I was trying to build up the thickness to match that from the Centuri kit.


The two prints on the self adhesive backed paper ended up as two layers. The self adhesive prints were stuck onto 110 lb. cardstock.

These two prints ended up as two layers -
1 TOP: Print on self adhesive backed paper
2. BOTTOM: 110 lb. card stock.

The brown engine mount tube got an outside layer of peel and stick paper.
The top was sanded smooth.


A slit was cut for the upper bend in the engine hook.
A engine block was glued in the top against the upper bend of the hook. The hook retainer ring is added later on.

Thursday, August 13, 2020

Centuri Flying Saucer #5325, Part 1, Parts

Here's the home prints. Again, to get the PDFs, CLICK HERE and go to post #21. 
The major and minor shrouds (on the left) are printed on 110 lb. card stock.
The rings and the C and L braces (on the right) were printed on self-adhesive (peel and stick) sheets.
In the center is a 2 3/4" length of BT-20 tubing, a standard 2 3/4" engine hook and a 2 3/4" long x 1/8" launch lug. A standard 1/4" long engine block is not shown.
Also not shown is the antenna landing gear. You'll need some wire for the antenna/landing gear. I bought some K&S wire at Hobby Lobby, .039" diameter, #602201, #5497.
The hook retainer wrap will be made from scrap card stock. 


You'll need some cereal box cardboard to back up the "flat" pieces, the  largest ring and the "C" and "L" shaped center braces.
These flat pieces are a three layer laminate,
1. The Print on 110 lb. card stock
2. Center layer of cereal box card board
3. Third layer of white peel and stick, no print.

The pieces that are formed into circles (large shroud, interior core and bottom narrow ring) are two layer - the print on 110 lb. card stock and white self adhesive paper. 

The lower inset picture shows the self-adhesive paper set over the cereal box cardboard. You can almost see the print underneath. Some of the cereal box print was sanded down with 400 grit for a cleaner white finish.


I would recommend printing off the Centuri instruction sheets from Jim Z's website: CLICK HERE