Friday, July 31, 2015

Estes Mercury Redstone #1921 Build Part 28, Decals


According to the older Estes instructions, 
The side of the roll pattern decal lines up with the left side of the UNITED STATES decals already in place.

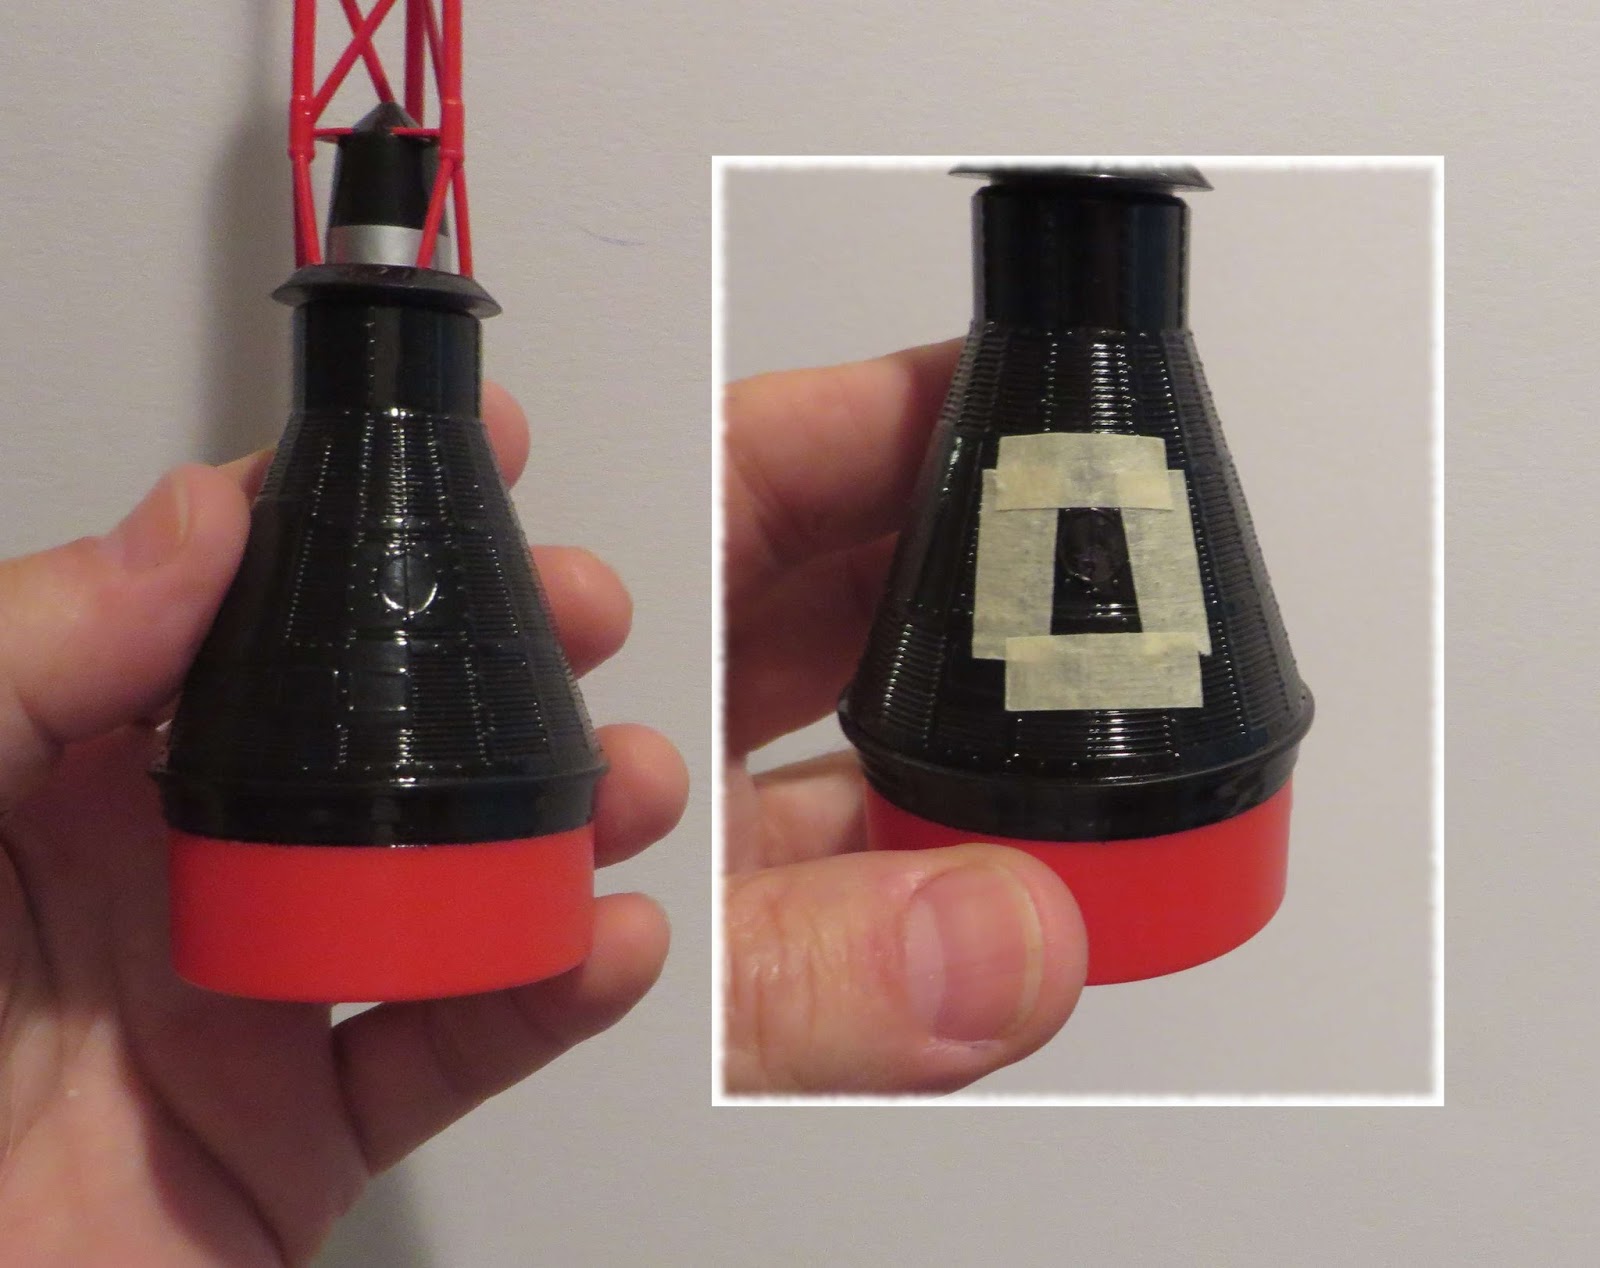
TIP: Notice the masking tape set inside the body tube. With a decal so close to the end of the tube, water might get inside. The masking tape prevents any chance of water getting absorbed in the open tube.

You'd better have a tall glass to soak the tall decal.

The inset picture shows a spot that wouldn't absorb any water. On that area the decal had to be torn off. There was a stretch mark there, good thing it was on a clear portion of the decal.
The wrap is BIG and feels slimy when transferring.
I always rub some water on the area where the decal will be placed so it can be re-positioned easily. The water under the decal made the decal very slippery.
Be ready, it takes extra time to line up and work out air bubbles.

All the pink boxes and bars got a red decal overlay. Wait until the wrap decal is completely dry before laying the red decals on top of the pinkish areas.


With the nose cone in place there is some white showing on the body tube lip.


TIP: I marked the checkerboard areas black so it continued the black squares over the top of the tube.

Go slowly and carefully with the Sharpie marker. The decals must be completely dry before using the marker.

Installing and Removing Tight Engines?

On TRF, Ron Lemke (Shade) asked the question:

"First for existing built rockets I have several that have very tight MMTs. I have difficulty getting Estes BP engines in them to the point where I feel I am going to damage the rocket, any suggestions on how to deal with this? Some are 18mm some are 24mm, The rocket affected are both Semroc and Estes and or components from either company.

Second, are there better/looser MMTs I can use for engines in general that will fit all engines?"

Some replies suggested peeling layers off the engine casing.


From Solomoriah: "Estes engines are often a bit tight in Estes tubes.  Quest engines (both the old German and the new Chinese) are smaller and never stick. Rockets with Centuri-sized #7 tubes work better with Estes engines, because the ID is just a hair bigger; makes flying most of my Semroc fleet easier.
Getting the engine in doesn't usually trouble me,  but getting the casing out is sometimes a bit of a bear.  I have a pair  of pliers with curved jaws that I got as part of a gift years ago, which is darn near perfect for removing 18mm engine casings, but even so it's still tough sometimes."

I agree with you on engine fit being easier in the stronger ST-7 tubes.
Estes engines (especially the 13mm engines) bulge above the nozzle area.
I don't peel the engines, sometimes a peel can get away from you and you can take off too much.
I'll sand down the bulge a bit with sandpaper on a block.

Fred Shector gave out some great advice about engine removal -
Remove the engines right after a flight while it is still warm.
You'd think it would be easier to remove when the engine cools down but it is removed easily right after the flight.
This is especially true when an engine has been friction fitted.

Thursday, July 30, 2015

Estes Mercury Redstone #1921 Build Part 27, Decals

The kit decals didn't have the 1/8" wide lower black bar.
I cut mine from old decal sheets.

Notice how the MR8 decal is set over the bar, no space between it and the black band.
I used online pictures of the actual launch and Alway's ROTW as a reference. The low bottom line of the MR8 box overlaps the black band and disappears.

Online rocket data searches can be misleading. You'll find incorrect painting and detail photos especially on rockets that are on display at some museums. Every few years a rocket is repainted, sometimes incorrectly!
In the end it's a compromise. I try to get my decals and decal placement as close to the original as possible.
I often refer to Alway's Rockets Of The World for colors and detail placement.


I placed the 1/4" wide center black band 8.75" down from the top of the body tube edge.

I used paper wrap to be sure it was going straight around the tube.
The decals are slippery! This horizontal band can easily slide after you think you have it straight.

As mentioned earlier:
The older instructions say the vertical UNITED and STATES are set 3/16" above and below that line.

It's hard to see in the picture but you can line up the UNITED STATES by the reflection of the fins sharp leading edge.
When you look down the body tube you'll see the leading edge reflected in the glossy, wet decal.


After positioning my home print UNITED STATES decal, I placed the kit supplied decal next to it for comparison.

You can see the pink tint of the kit decals.

New Painting Wands


It was about time to make some new painting wands.
I bought a 48" long, 1/2" diameter dowel and cut it into three 16" long pieces.
An empty engine casing friction fits over the 1/2" diameter dowel perfectly. You might have to round the edges of the dowel to get the casing to slip over the end.

I left the dowel recessed at the top for a glue fillet.


This painting wand even works on this two engine cluster Magnum rocket.
I'll put another casing in the other empty motor mount to keep out the sprayed paint.

I usually leave the dowel wand in the model after painting. Sometimes it helps to have the extension dowel left in for wet sanding and decals.

Wednesday, July 29, 2015

Estes Mercury Redstone #1921 Build Part 26, Still More Decal Questions

I don't know what this decal is for!
It's the same length as the 1/4" middle band so I assume it simulates the bolts in the band right above the fins.
The dashed line looks too thin. The older instructions say it's 1/8" wide. For right now I'll just add a line of black from some old decal sheets.


Here's the fins from the Mercury Redstone on display at KSC.
Check out the bolt band recess right above the fins.

The pull out plugs (lower right side) are raised a bit above the end of the body!


I added the low 1/8" black band to the decal sheet.
Below the solid black band is the band with the bolts. I tried to make them look 3D.

I'll use the simpler 1/8" black band cut from an old decal sheet.
I make no guarantee that the second bolt wrap will fit or be evenly spaced. I've printed up too many decal sheets trying to get the other stuff close.

If you have one of the pinkish, MR7 decal sheets in your kit, the PDF is now available if you print your own decals.
If you are a Patreon supporter, email me at: oddlrockets@bellsouth.net and request the Mercury Restone decal PDF.

PLEASE NOTE: The line thickness of the MR8 boxes may vary on your PDF decal sheet. This is typical of some PDFs. That's why there are extras, pick the best ones for the model.
The two lowest 1/8" wide bolt wraps may also have varying shading thicknesses. Again this is a PDF thing. If it doesn't look right to you, use the plain black band above it.

Polishing Plastic? Tips

Dale Bills wrote:
Chris, 
 I searched your building blog for any mention of how to polish and buff plastic parts such as the fins and nose cone in the Estes Pro Series II E2X Mammoth. The fins and nose cone are molded plastic. The fins are two-piece molded plastic that you glue together with CA. The nose cone is also injection molded plastic. After gluing the fins together, I had a few CA drips and finger touch points that I sanded off with #0000 steel wool. I also used the steel wool on the mold seam of the nose cone. 

Now, to avoid having to paint these black plastic pieces, I'd like to polish and buff them back to their original plastic shine (not high gloss, but an acceptable matte shine). Any suggestions on how best to do that?

Best to you, Dale  

My response:
Hi Dale,
A few years back I assembled a Magnum model for the Quest demo launches at a NARAM.
I was surprised how well the black plastic nose cone and adapter polished up without any paint.

I got there by using finer and finer grades of sandpaper.
A bead of medium CA was used to fill any recesses at the molding seam. That was sanded smooth with 220 grit on a block.
From there I went to 400 grit and all the way to 1500 grit.
(You can get the fine grits at auto supply stores)
Then polishing compound and final rubbing with a soft cotton cloth.

It ended up very smooth and with a good gloss black finish.
The picture at the right is my Magnum model from the Quest website.
Good luck and I hope this helps out - 
Chris Michielssen 

Tuesday, July 28, 2015

Estes Mercury Redstone #1921 Build Part 25, More Decal Questions

To help with decal placement, go to the older Estes instructions: CLICK HERE
Decal placement is at the bottom of page 7.


The single, long kit body tube is 19.5" long.
The older Estes instructions say the two kit tubes were the same length.
The 1/4" wide black strip was placed over the body tube seams at the center. This would center the decal on the new kit at 9.75" from the top.
The older instructions say the vertical UNITED and STATES are set 3/16" above and below that line. After looking at many M.R. pictures, that spacing looks too tight against the wide black band.
I'm spacing mine at 9/32" away from the horizontal band.

The face card decal placement is incorrect. See View 2 in the above older instructions.
The UNITED STATES should be centered over the next fin or 90 degrees to the right of what is shown.
The area above the "half-half" black and white fin quadrant has no decal.

Am I nit-picking? Yes.
If the decals are positioned like the face card picture it is still a good representation of the Mercury Redstone. At a club launch nobody will know the difference.

NARAM Live Scale Pics Posted


The Scale turn-in pictures have been posted at the NARAM Live website:
CLICK HERE

Monday, July 27, 2015

Estes Mercury Redstone #1921 Build Part 24, Fin Masking

Masking a Mercury Redstone is a bit deceiving.
It looks like a such simple pattern. One hour into masking you think you are close to being done, then realize there is more tape to be set down!

I did my typical Scotch tape masks at the color separation lines then brown masking tape outside that.
The Scotch tape was set set on a glass patio door and a permanent marker line ran down the middle.
The marker center line was cut in two with a knife and straightedge.
That's the black on the tape line you see in the second picture.


The masking tape strips were set down on my pant leg and pulled up three or four times. This reduces the stickiness of the tape and makes for an easier removal.
TIP: The tape on the rudder piece has a lift tab on it. Just fold the tape over on itself the last 1/4" or so.


Here's the finished fin mask.
I know, it looks pretty messy. My main concern is the Scotch tape masks, those edges are well sealed and clean.
The masking tape is what makes the mask look clumsy. There are some extra small pieces covering up any areas I thought might still be open.

The horizontal color separation line height I picked was 15/16" from the bottom of the tube.

Mosquito Fin Airfoil?

Scott Johnson sent me this comment from the post about Streamer Recovery on Engine Eject Models:
"I saw another method for tumble recovery rockets as well. The current Estes Mosquito has you rocket air foil its fins (symmetric air foil), which just turns it into a fire and forget lawn dart. However, I saw old plans (it was an old mosquito like rocket on YORP or Semroc) where the fins were airplane foiled (asymmetric air foil), which would cause the rocket to rotate on liftoff and perhaps tumble during recovery."

The asymmetric air foil would make the model spin during boost but probably wouldn't make it tumble down on recovery. If the model were to nose in, it would spin on the way down, nose first. A spinning recovery would slow it down some, like the Gyroc.
Proper tumbling "featherweight" recovery has more to do with a change in the center of gravity after the engine ejects, more like the old Estes Scout.

Estes doesn't use the term Featherweight anymore. Some of the small "tumble" recovery models tend to nose in like the 220 Swift.


I can't find any kit or plan that shows an asymmetric air foil. I do remember seeing that in the Estes Yellow Pages. 
This is from the 1971 catalog.


TIP: Don't cant the fins at the severe angle shown in the middle drawing. It takes very little cant to make the rocket spin stabilized. Those fins might reach the "Speed Of Balsa" (S.O.B.) and shear off!


The original Mini-Brute Mosquito instructions said to do a symmetric airfoil the on fins.
To see the instructions, CLICK HERE


Later on, the BETA Mosquito version suggested you round the fins
To see those instructions, CLICK HERE  
Scroll down to the second set of instructions
The latest version of the Mini Mosquito (also the one included in the Mega Mosquito kit) don't say to round or airfoil anything!
Those instructions were criticized for being too vague.

Sunday, July 26, 2015

Estes Mercury Redstone #1921 Build Part 23, Capsule Decals


I went to Alway's Rockets Of The World for decal placement.
The kit only gives you one "UNITED STATES". I'll set it on the opposite side of the window as shown in the overhead drawing.

The white decals are very hard to see on the decal sheets so they are outlined with a dashed line.

The inset picture shows how I cut them just inside the dashes.

Here's how the decals were placed.
Rolling over the decals with a wet Q-tip will help the decal fit better into the corrugations.


I've had a bottle of Micro Sol for a few years and use it rarely.
It's needed for this kit so the decals will go all the way into the corrugations.
It you use Micro Sol correctly, the decal will look like it is painted on the model.
I didn't use a brush but dabbed the Micro Sol over the decal with a Q-tip.
On the left is the decal before using the Micro Sol, the inset picture shows the decal after using it.

There was a slight distortion on the "RTY" of Liberty and the "LL" of Bell.
On the capsule, the left side of that decal area is smooth. The right side has corrugations. The decal could shrink a bit where the decal is pulled down into the corrugations.

Estes Mercury Redstone Kit Decal Fix

This isn't a repeat post, but an update.
I received a comment from Steve Stokes -

Steve Stockes July 25, 2015 at 8:46 p.m.

I just received my kit on Monday and 
The decals show MR8 and the red looks ok. 
From my experiences Estes has great customer service. I ordered my kit from Tower Hobbies. Back ordered for 3 months. When it finally arrived Monday, the body tube was damaged beyond repair so I contacted Estes to see if I could purchase a new tube. The new tube showed up yesterday, no charge. Mike at Estes said they were a sister company to Tower so they help correct any issues with them.
From the previous post:
On the inside front cover of the July/August issue of Sport Rocketry is the new Estes full page ad.
Look close at the inset picture. The MR7 decals have been replaced with MR8 decals.
This might indicate new decals in the next run of kits.

Saturday, July 25, 2015

Estes Mercury Redstone #1921 Build Part 22, Capsule Window

The first Mercury Redstone had an round window, this kit is based on the second Redstone launch and should have had a trapezoid shaped window.

I can't paint the fins with all the Summer rain so I decided to cut in a more correct window shape.

On the left is the molded round window. On the right are some taped guidelines.


This was a little iffy with the tower already glued on.

I used a combination of knife cuts and small diamond filing.
The final shape might not be totally correct but it's closer.


The clear window was cut from a fluorescent light cover.
It's already curved and should fit the inside of the capsule.

It was cut oversize so glue could be brushed on the outside overlap and not fog up the plastic.


Here's how it ended up. You can still see the top of the rounded window. I didn't want to sand down the rivets and deal with painting the capsule again.
The inside edges showed red plastic. I used a Sharpie to blacken it.

I know there should be another layer of "glass" on the outside but this is good enough for me.

NARAM Live Is Back!


The next best thing to being there!

NARAM LIVE is back with complete coverage.
I always look forward to the Scale pictures and Manufacturers Forum.

Check it out: CLICK HERE

Friday, July 24, 2015

Estes Mercury Redstone #1921 Build Part 21, Fin Fillets


The lugs were lined up with a ruler and double checked with a 3/16" rod.

The kit supplied 1/8" diameter lugs were swapped out with 3/16" lugs.
I felt the model was too large for the 1/8" lugs.


Looking at the Mercury Redstone on display at KSC, you can see the rounded fairings on the lower 2/3rds of the root edge area.


You can build this up (to an extent) with a few more fillet layers of Titebond M&TG.
While it won't give you as wide fairing it will build the area up some.

Best Estes Sale Value?

Here's my vote for one of the better values in the Christmas In July Clearance Sale at Estes.
It looks like the sale is going on through the end of July, but could be stopped at anytime.
24mm power, over 20" tall and a large BT-60 payload section. The lower body tube is a BT-55.
To see the listing, CLICK HERE
The normal retail price is $18.79, the clearance price is only $3.79!
That's right around 80% off.
I know a lot of people are buying the clearance models for parts. The large payload section alone is worth more than $3.79.


The fin design might look familiar.
Here's the S.C.R.A.M. from the 1986 Estes catalog. The SCRAM was part of the Mini Tri Pack. Three 13mm models in one kit.

The three piece fin design is also like the Custom Rockets M320 rocket.


The Laser Lance is a good sized model with strong BT-55 and BT-60 tubes.

The inset picture shows the 24mm engine mount with added Kevlar.
The fins are a three piece military missile style. While I like the look, the thin middle fin looks fragile.

On TRF, Etoyoc wrote:
"My daughter loves her Laser Lance, but the original fins were prone to damage and we ended up redoing them at least once. I haven't had to do a repair in a while and she usually launches it a few times a year." 

The inset picture shows a fin I drew up to replace the kit fins. I'd probably cut it out of 3/32" stiff balsa or basswood.

The instructions say to glue in the nosecone, but why would you?
Heck, for $3.79 you have the basis for a strong, sport payload model.

Thursday, July 23, 2015

Estes Mercury Redstone #1921 Build Part 20, Fin Placement


The body tube was roughed up down to the bare tube with 220 grit.

The sides of the fin closest to the root edge were also carefully sanded for better adhesion in the fillet area. Rough up the primer coat just a little bit down the side.
I do this because the fins were shot with primer / filler and sanded smooth before gluing onto the body tube. The primer / filler seals the fin and the glue fillets wouldn't have been very strong.


Even if you were to draw double lines, these fins would be harder to line up than normal. They are thick and the penciled alignment line is covered.

Glue was applied to the root edge.
Looking down from the top, the back end of the fin was set down like a hinge.
Once it was centered down the line, the front end was set down onto the body tube.


Look across the rear to be sure the fins are in line with each other.

Streamer Recovery On Engine Eject Models TIP

Scott Johnson reminded of an engine eject streamer recovery method from Centuri.
In the Satellite Killer model, Centuri used the empty space in a 1/2A6-2 engine for a streamer!
I found the instructions at oldrocketplans.com.


To read it, enlarge the illustrations on the right.

It involves rolling up a streamer and setting it into the casing itself.
Don't forget the wadding set right on top of the ejection charge cap!

This method could be used in 18mm engine eject models. There isn't enough room in 13mm engines.
See the Semroc version of the Satellite Killer below for a 13mm idea.


On the Semroc Satellite Killer reissue,
A streamer is wrapped between the 5/20 centering rings.

The original Centuri Satellite Killer used 18mm engines, the only recommended engine was a 1/2A6-2.
On the Semroc model, 13mm engines are used. This gives you some room around the engine mount tube for a rolled streamer.


TIP: A streamer just rolled around an ejected mount or engine might not unravel.
Instead of rolling the streamer around the tube, roll back and forth. Wrap around the tube for one turn, fold over the streamer and roll one time around the other direction. Continue until the streamer is fully wrapped.
Folding a wrap around streamer in a accordion "zip-zag" style will open easier and faster at ejection.
It will take an extra minute or two to get right, but most odd-ball type models take extra time to prep.

Wednesday, July 22, 2015

Estes Mercury Redstone #1921 Build Part 18, Fin Marking Guide


I didn't want to cut up the instructions for the fin marking guide.

The fin, lug and DT lines were extended beyond the edges of the marking guide with pencil.

A slightly smaller piece of copy paper was taped over that.
Using the extended lines, new lines were drawn on the overlay paper.
This was cut out and wrapped around the tube for marking.

Problem: The ends of the guide didn't match up! The original on the instruction sheet was off.


I ended up making my own guide by wrapping paper, folding into fourths and marking.

Here's the guide in place. The marks were transferred.
The engine hook and launch lugs were in line on the same side.