Showing posts with label NW N-21 Sky Fighter. Show all posts

Thursday, March 16, 2023

New Way N-21 Sky Fighter Build, Finished


What a great design taking clever advantage of the square body tube!

The white underside. 

The small decal details make the model look larger.


The rear top showing the white wing decal underlay.


The front end with the well fitting cardstock canopy.

New Way has some of the better quality kits! Highly recommended!

Wednesday, March 15, 2023

New Way N-21 Sky Fighter Build, Part 11, Two-Tone Paint & White Decal Background

The instructions suggest the underside is painted white, the top surfaces light gray. For a brighter look, I decided to paint the top side  Silver/Aluminum.
The instructions mention setting the white side down and carefully spraying gray over the top surfaces. 
I'm sure I could get good results that way but decided to play it safe and do a bottom, underside mask of the white.

The top picture shows the tape edges just sticking out over the wing sides.
The lower picture shows the complete white paint bottom mask.

Results were good with very little touchup.

The Square Stars and Bars logo is great!
All the decals are black. I wanted to make these two stand out a little better.

I sprayed a few inches of a white decal sheet with clear acrylic.
The Stars and Bars were measured. The shape needed was drawn on the decal sheet with pencil.


To check the size - these were cut out and set over the black decal still on the sheet.
I wanted the white area to fall just inside the black border lines. The upper picture shows the white decal when first cut out.


Here's the decal edges just inside the black border after trimming.


The white background decal was set in position on the upper wing first and allowed to dry. 


The black decal was set on top. 
The clear areas allow the white decal underneath to show through. 
It's a subtle change that adds some contrast.

Tuesday, March 14, 2023

New Way N-21 Sky Fighter Build, Part 10, Decals, Final Fillets, Ready For Paint


I did make a few changes to the decals. 
There is nothing wrong with the kit decals. I just printed up some minor changes.

The U.S. Square Force name decals looked a bit small. 

On top are the kit supplied two sets of decals.
A real plus! I've never seen two complete sets of decals included in a kit.

Below the kit decals are the U.S. Square Force decals I printed up, the name is about 1/4" wider.

I made some hatch decals using a thinner outline.


After the first white coat, I noticed some air bubbles in the fillets. 
More glue, sanding and more white paint.


Here's the model after sanding down some glue boogers. 

TIP: I did an overall light sand (800 grit) being careful not to go through to the tube or balsa. This helps get a smoother final finish on the final, heavier spray coat.

Monday, March 13, 2023

New Way N-21 Sky Fighter Build, Part 9, Canopy Forming

You are supplied with TWO canopies in the kit.
Great idea - you've got a backup in case the first try doesn't go well.

The fold lines are lightly laser cut, allowing sharp folds without having to emboss the lines.
First you fold the lines back with the lines facing you.
On the right side picture, I'm using my long tweezers to get a sharper fold near the tight tips.
The canopy is then flipped over and the folds reversed with the laser cut lines now on the inside.

On the right, I used my Sharpie pen burnisher to get sharper creases.

I was concerned the laser cut lines may have been too deep and the repeated folds might crack the cardstock. The laser lines are light and there was no cracking.


I used very little glue on the glue tab, just a wet, thin skin.
The glue tab was held closed with tweezers while the glue set up.

The formed canopy was set in position and the edges traced.
The glue area paint was scraped down inside the pencil line.


Again I used the Sharpie burnisher to press down the inside glue tabs onto the body tube.

Sunday, March 12, 2023

New Way N-21 Sky Fighter Build, Part 8, Filler & Glue Fillets


I did get a good fit of the wing edges at the top.

I still brushed on a line of CWF to fill any gaps.
This was sanded with 400 grit on a block.


At the front and rear of the wing center joints I did use some CWF applied with a knife blade.
This was carefully sanded.

There's a bubble in the left side fillet needing one more pass of wood glue.


I didn't do glue fillets all the way around.
On these square tubes, they are very slightly bowed out on the flat sides.

Making smooth, bubble free fillet would take many passes of wood glue.


Here's the fillets on the rear top.


I didn't do glue fillets on the underside of the wings.  
The gaps were pretty wide. 

Even using Titebond Quick and Thick this would be a tough fillet to lay and smooth without bubbles.

Saturday, March 11, 2023

New Way N-21 Sky Fighter Build, Part 7, Rudder & Wing Gluing


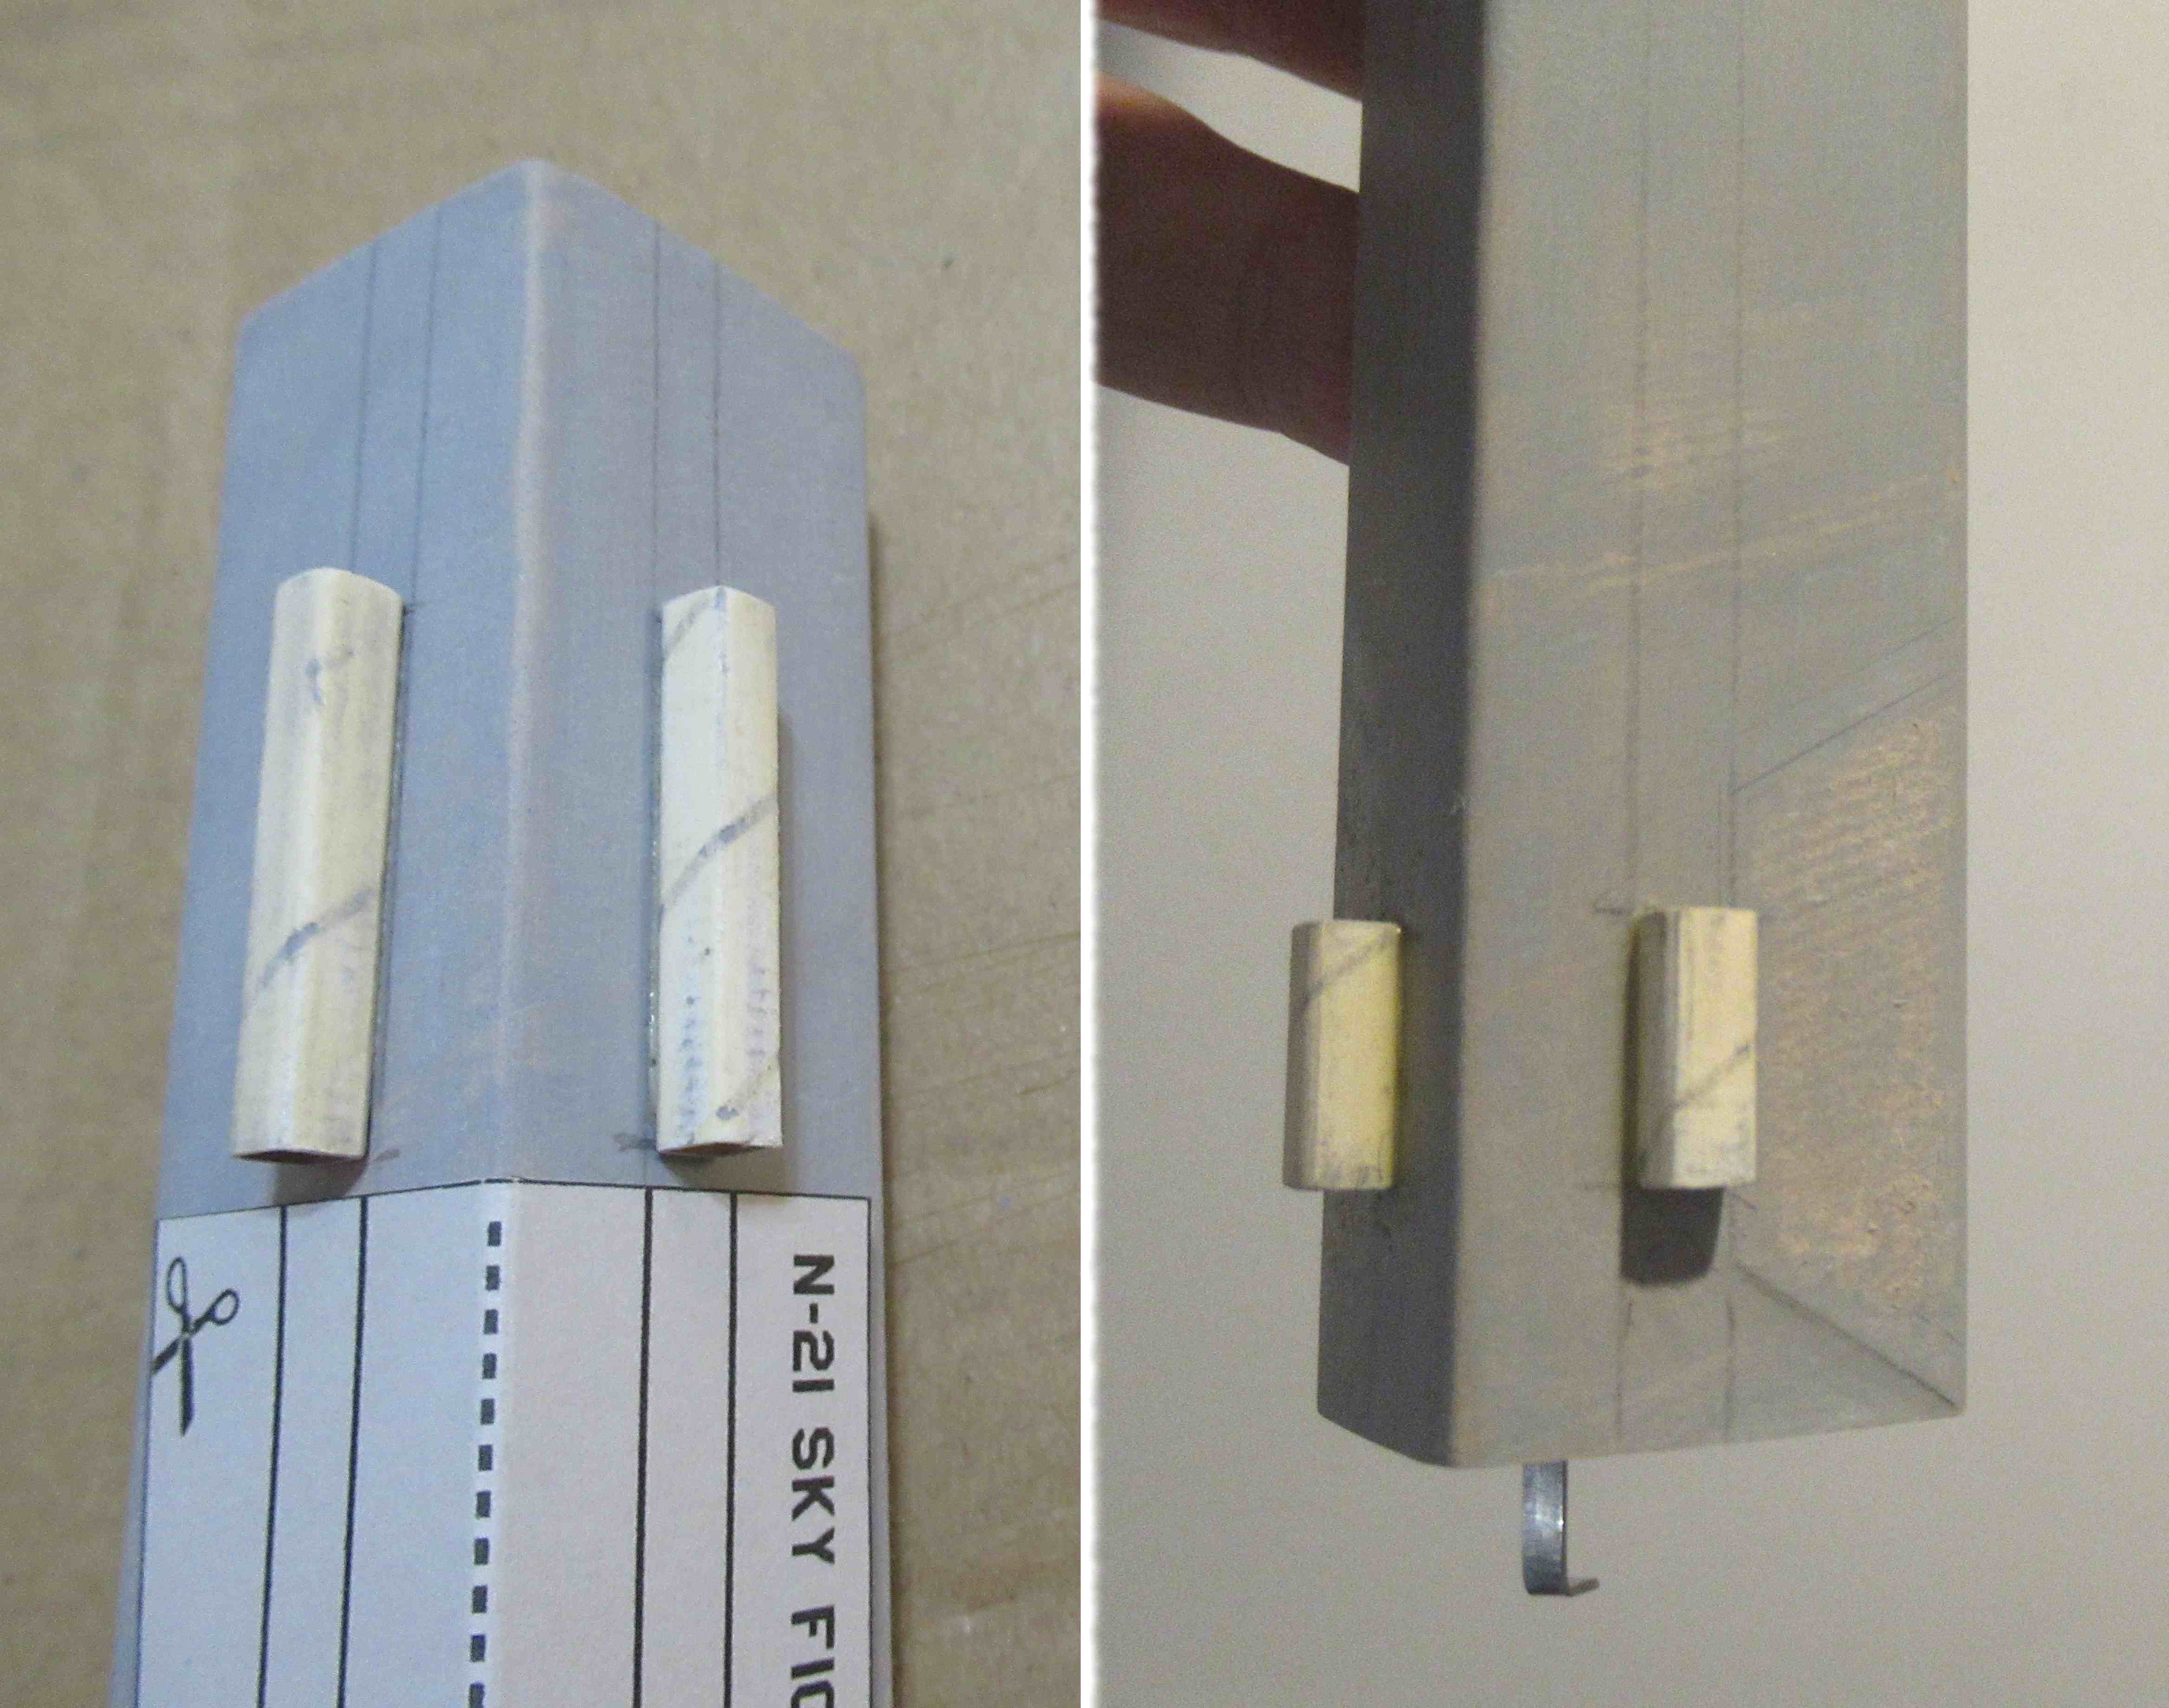
The "rudders" are glued onto the bottom (note the engine hook position) centered on top of the small lugs.

On the right side picture, the gluing area was sanded for a better bond.


Looking at the bottom of the model, 
here's both of the lower fins in place.

Both of the "root edges" are centered and glued to the lugs. 
Notice the leading edge point is in line with the corner edge of the body tube.


The gluing areas of the wing sides were also sanded. The gluing area of the body tube was scraped and sanded.

One side is glued on first.
Before the glue sets up, set the other side against the root edge and adjust (slide) to get the best fit. 


Here's where we are - 
Ready for a white undercoat.

Friday, March 10, 2023

New Way N-21 Sky Fighter Build, Part 6, Engine Mount Gluing & Lug Gluing

The engine mount is glued in with the engine mount tube and outer tube ends even.
I used my flat sanding block to press the mount in and even it with the outside main airframe tube.

A rear fillet was applied using a Q-tip. 
The marking guide is folded on the dashed line.
Set it on the corner bend in the tube, over the engine hook extension.

The launch lug locations are marked and the lines extended down the length of the tube.

Since I already sprayed and sanded the tube, the filler/primer was scraped off for gluing on the launch lugs.


The long lugs (guns) go in front,
The shorter lugs are at the rear.

The lugs are in line to be slid over a launch rod.

Thursday, March 9, 2023

New Way N-21 Sky Fighter Build, Part 5, Parachute, Filler/Primer & Nose Cone Fill

The New Way kit parachutes use (no-tear) Tyvek ring labels for shroud line attachment.
There are holes punched into the corners of the parachutes for the reinforcement tab locations. 
Center the round side under the punched hole.

The white parachute is 9 1/2" from "flat" to "flat". It seems a little small, I would rather have a 12" diameter chute on a model this size and weight.


Fold the other side of the "dumbbell'" shaped reinforcement directly over the round end under the chute corner.

This leaves a fold just outside the corner of the parachute to tie on shroud lines.


After a first coat of CWF and sanding - 
The wings, fins and launch lugs were taped to some cardboard for spraying with the filler/primer.


The New Way nose cones are very smooth for a 3D print.

After sanding down the filler/primer, you can see how little was left in the very slight layer ridges. 
3D printing has come a long way!

Wednesday, March 8, 2023

New Way N-21 Sky Fighter Build, Part 4, Balsa & Lug Fill

The most difficult part of the build is sanding a 45 degree angle in the wing root edges. Use a sanding block for a consistent line.
This angled edge allows the wing root edges to fit over the top corner of the body tube.
Be sure to sand the angles in a "mirror" image. 

I sanded my angles a bit wider than needed. 

Notice the underside has a pencil line to show the gluing area against the flat sides of the body tube. 

On the left is a Q-tip holder to allow all sides of the launch lug to be painted with CWF in one pass. 

Be careful not to get CWF inside the open ends. 
TIP: Start you brushing from the middle of the lug length and work the filler out to the ends.

On the wing bottoms - 
I didn't brush any filled on the tube gluing area of the wing sides.

Tuesday, March 7, 2023

New Way N-21 Sky Fighter Build, Part 3, Smoothing & Filling Tubes

This square tube didn't have any recessed seams. There was a 1/8" overlap of the outside layer.

I sanded down the raised overlap layer with 400 grit on a block. The corners were hit with some sandpaper over a fingertip. This left the tube rough with plenty of fuzzies.

The seams didn't need any CWF fill. The tube should be good to go with a shot of filler/primer and sanding.


The small square launch lugs had a seam, shown on the left.

On the right is the second longer lug after sanding and removing the ridges with 400 grit. 


The four lugs (two smaller and two longer) needed a brush of CWF followed by sanding. 

The picture shows the lug after sanding just the flat sides.
The corners still show a visible seam. This will need another small CWF fill.

Monday, March 6, 2023

New Way N-21 Sky Fighter Build, Part 2, Engine Mount


As with most kits, construction of the engine mount is first up.

Some kits recommend a wrap of tape to secure the middle of the engine hook. This New Way kit provides a two-piece laminated ring to hold the hook. 


Two Square rings are glued 1/4" from the top and bottom.

A Kevlar line is tied on and is run through a small hole in the upper centering square.
Here's another highlight of the kit -
A length of thin heat shrink tubing is supplied. 
It slides down the Kevlar and rests against the upper square ring.

Hit the Kevlar cover tube with a heat gun on the low setting.
On the right side picture, you can see the blue tube does shrink and is now tight around the Kevlar line.
Time will tell how well it protects the Kevlar. It makes sense - If the tube can withstand the heat from a heat gun, it should stand up to the ejection charge.

Saturday, March 4, 2023

New Way N-21 Sky Fighter Build, Part 1, Parts

This will be a fun one - I've wanted to tackle this rocket since the first time I saw the design.


All the parts.
Some of the sub-assemblies were in separate zip bags.


Parts of interest:
A heat shrink tube that protects the Kevlar line near the engine mount.
Engine Hook retention rings
Square centering rings
A very smooth 3D printed nose cone
Sandpaper, emery board and Q-tips package.


In a small envelope were the laser cut cardstock canopy.
Two are included. A great idea - you get some card forming practice on the first canopy.