Showing posts with label Shock Cord Mount. Show all posts

Wednesday, August 27, 2025

New Estes Shock Cord Anchors

Estes has just released new Shock Cord Anchors 
for BT-50, 55 and 60 tubes: CLICK HERE

These are certainly an upgrade from the paper tri-fold anchors.
Still, no improvement for BT-5 and 20 sized tubes.

These are adhered with 3M peel and stick tape.

Centuri developed a self-adhesive shock cord mount in 1971.
Initially claimed to be "permanent", they did loosen and pull loose over time. Later kits would include an addendum to the instructions reminding you to burnish the fastener between launches.

The 3M tape in the new Estes mounts should hold better!

Monday, April 21, 2025

Not A Tri-Fold Mount - Tip

This type of shock cord mount feels stronger than a thin paper ti-fold mount. It can be used on BT-55 and larger tubes. I wouldn't recommend using this in a BT-20 or BT-50. In smaller diameter tubes, the shock cord knot might block the ejection of a parachute.


Cut a rectangular piece of body tube, from the same diameter as your main airframe tube.

Tie your shock cord around the rectangular piece.


Glue into the body tube with the tail of the shock cord pointing up. The rectangle mount is already rounded to match the inside curve of the main airframe tube.

Be sure to recess the mount deep enough to clear the nose cone shoulder.

This shock cord mount design was used in some Centuri kits.

Friday, March 7, 2025

Estes Star Seeker BT-50 Upscale (Tri-Pack) Kit #0866, Part 8, Nose Cone and Shock Cord Mount


On the Apogee plastic nose cones, 
there is sometimes a raised lip on the shoulder edge.
Sand this down a bit.

The nose cones can have a slight bulge at the tip.
You can sand the tip so it follows the contour of the nose cone sides.
The shoulder cap was glued in using Beacon Fabri-Tac glue.

If you can't find a good plastic glue (most don't contain Acetone to "weld" the plastic pieces) Fabri-Tac is a good substitute.
Run a ring inside the nose cone, slide in the base and turn to even the glue bead and get better coverage.


I don't normally use a tri-fold mount, 
I didn't feel good about a Kevlar loop under the upper (homemade) centering ring. They're probably strong enough to handle an ejection pull, but I played it safe with a folded mount and elastic.

A 12" Odd'l chute was tied onto the shock cord.

Monday, January 27, 2025

Estes Black Star Voyager Build, Part 26, General Assemblies


In the shock cord mount instructions, note where the glue is placed. You fold the mount into a pool of glue.


TIP: You'll make a cleaner mount if you apply a thin coat of glue on the section to the right and fold onto the dry section on the left. It doesn't take much glue (a thin skin) when gluing paper to paper.


With the backside of the mount dry, press and form the still wet mount into the inside tube wall to form the curvature of the tube.


This kit was bagged in 2014 or so, when many kit shroud lines were weak. 
A quick, easy pull and the string breaks!


The shroud lines were cut off the parachute.

I used a plastic Avery reinforcement disks to strengthen the tie off points.

New #10 cotton embroidery thread was cut. 
It's easy to re-tie knots using long tweezers.

Wednesday, May 8, 2024

New Estes Mini Alpha Instructions - Shock Cord Mount


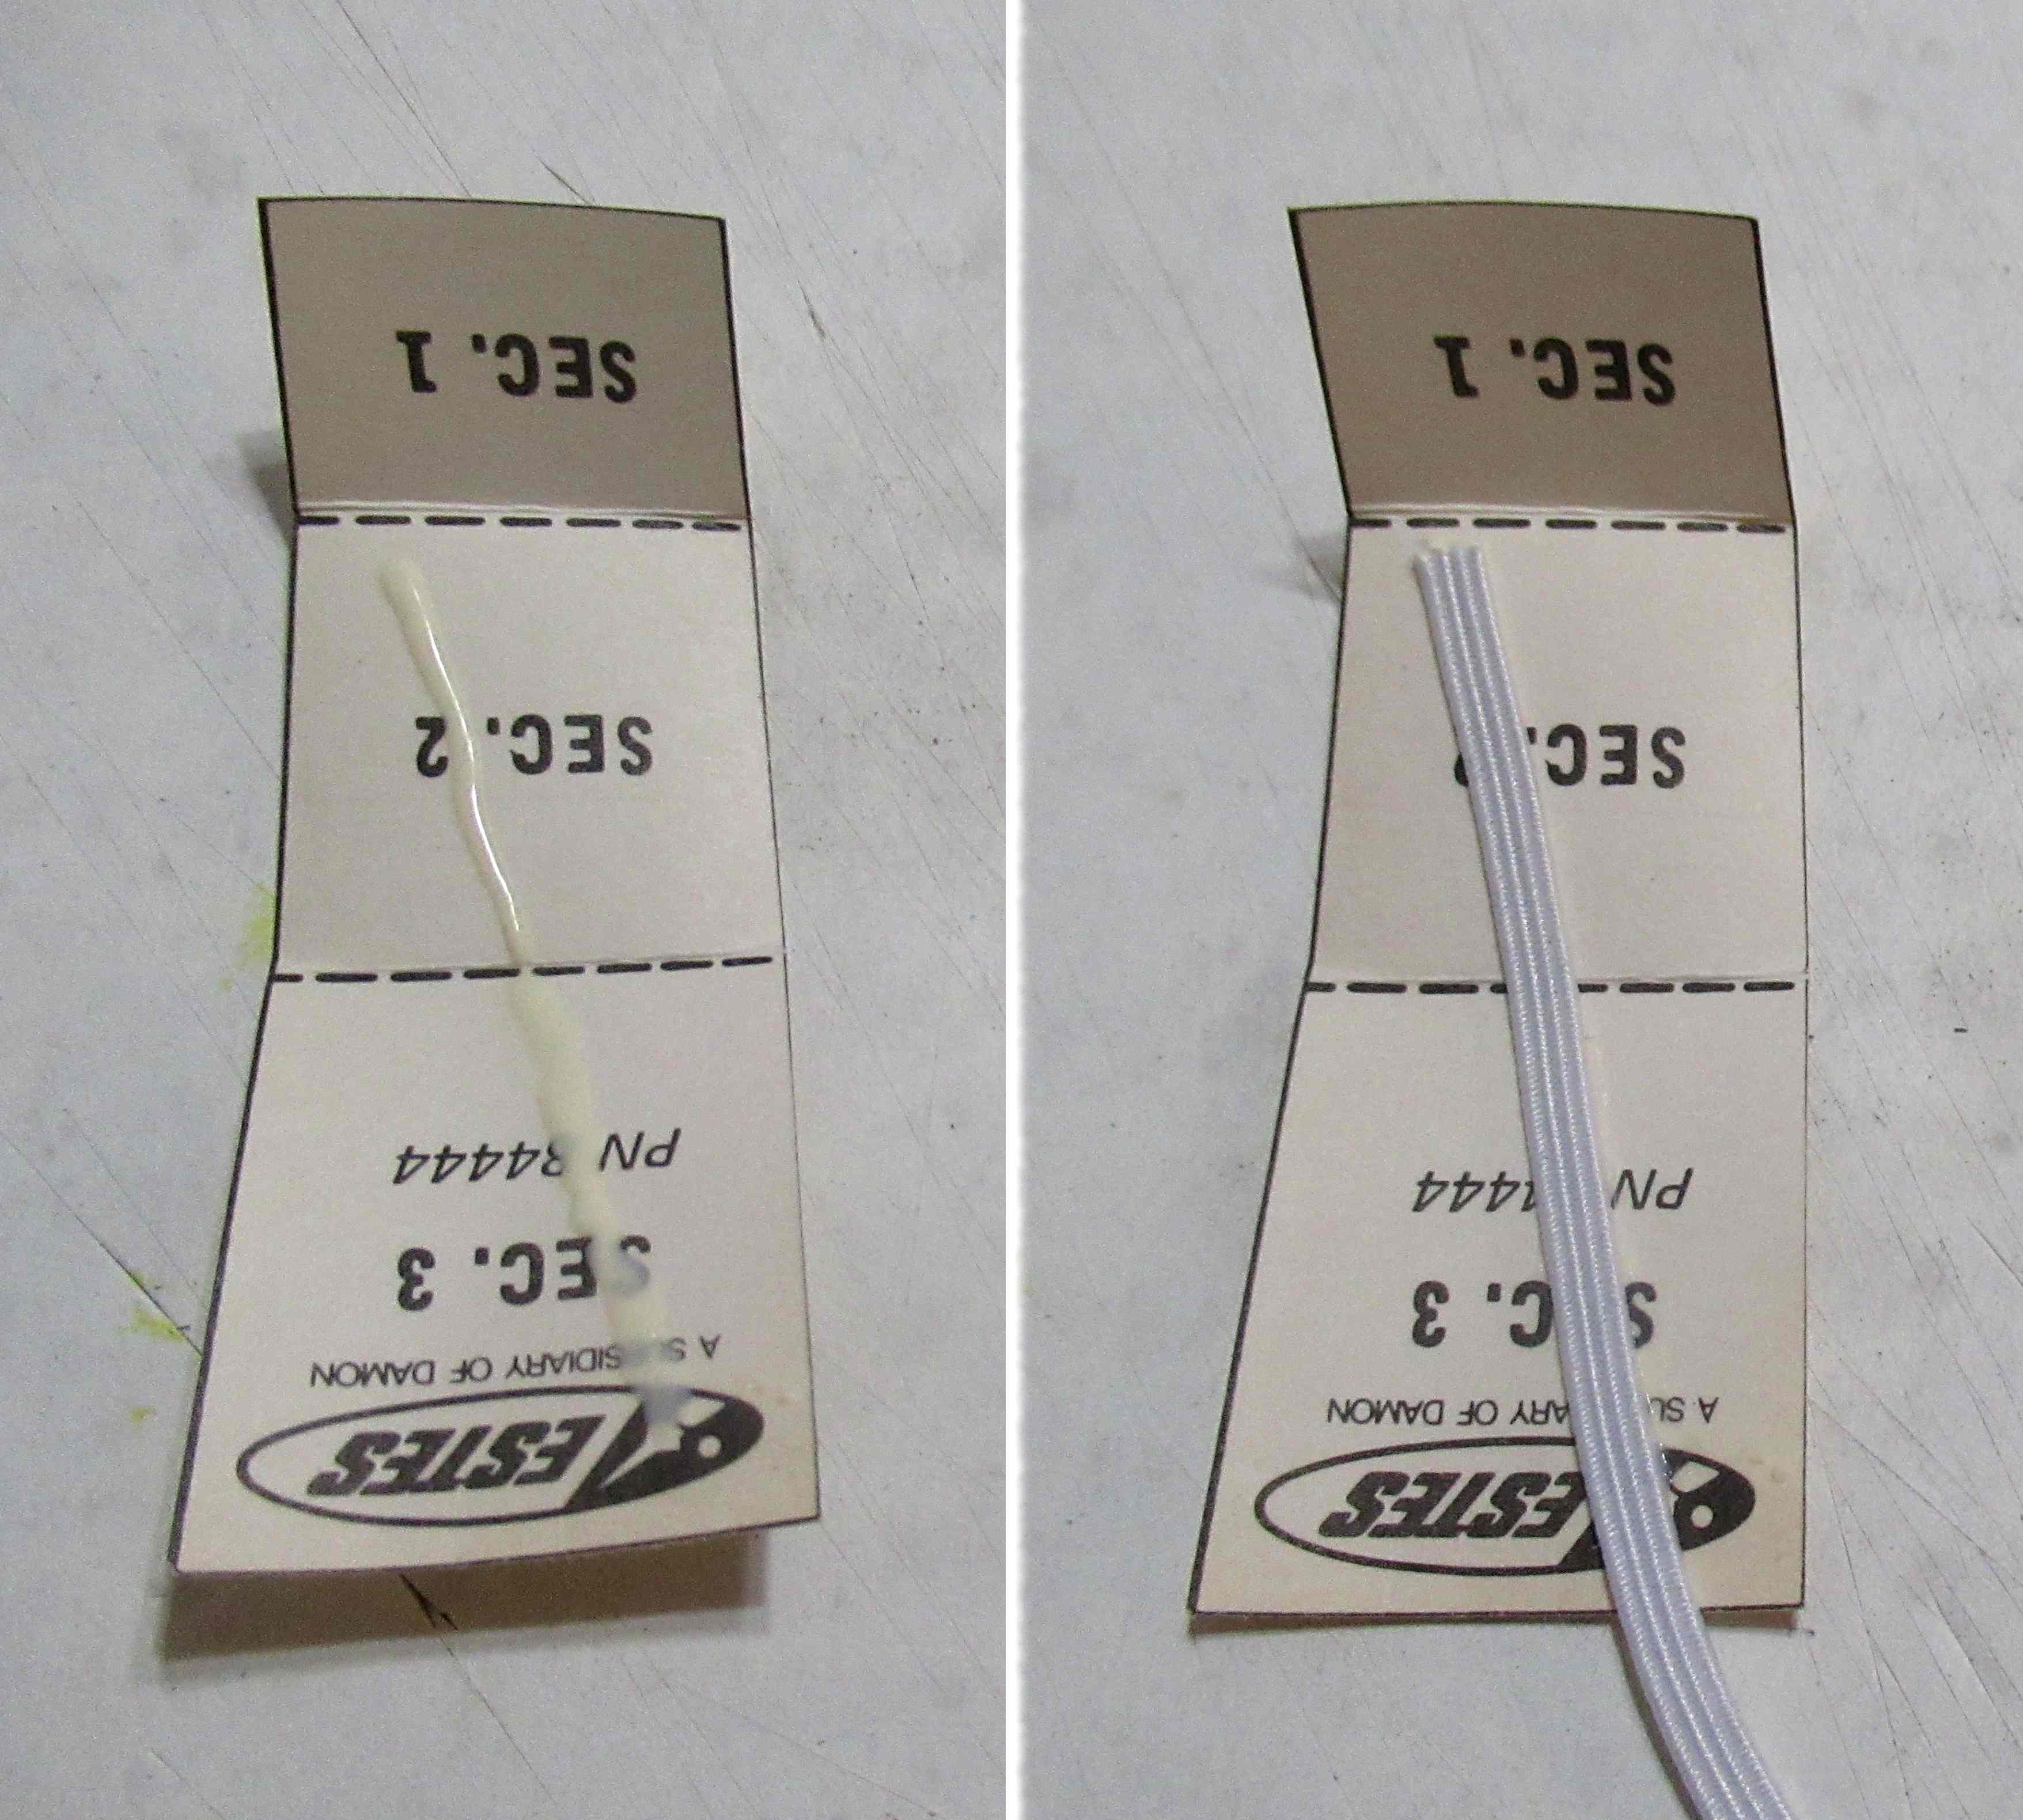
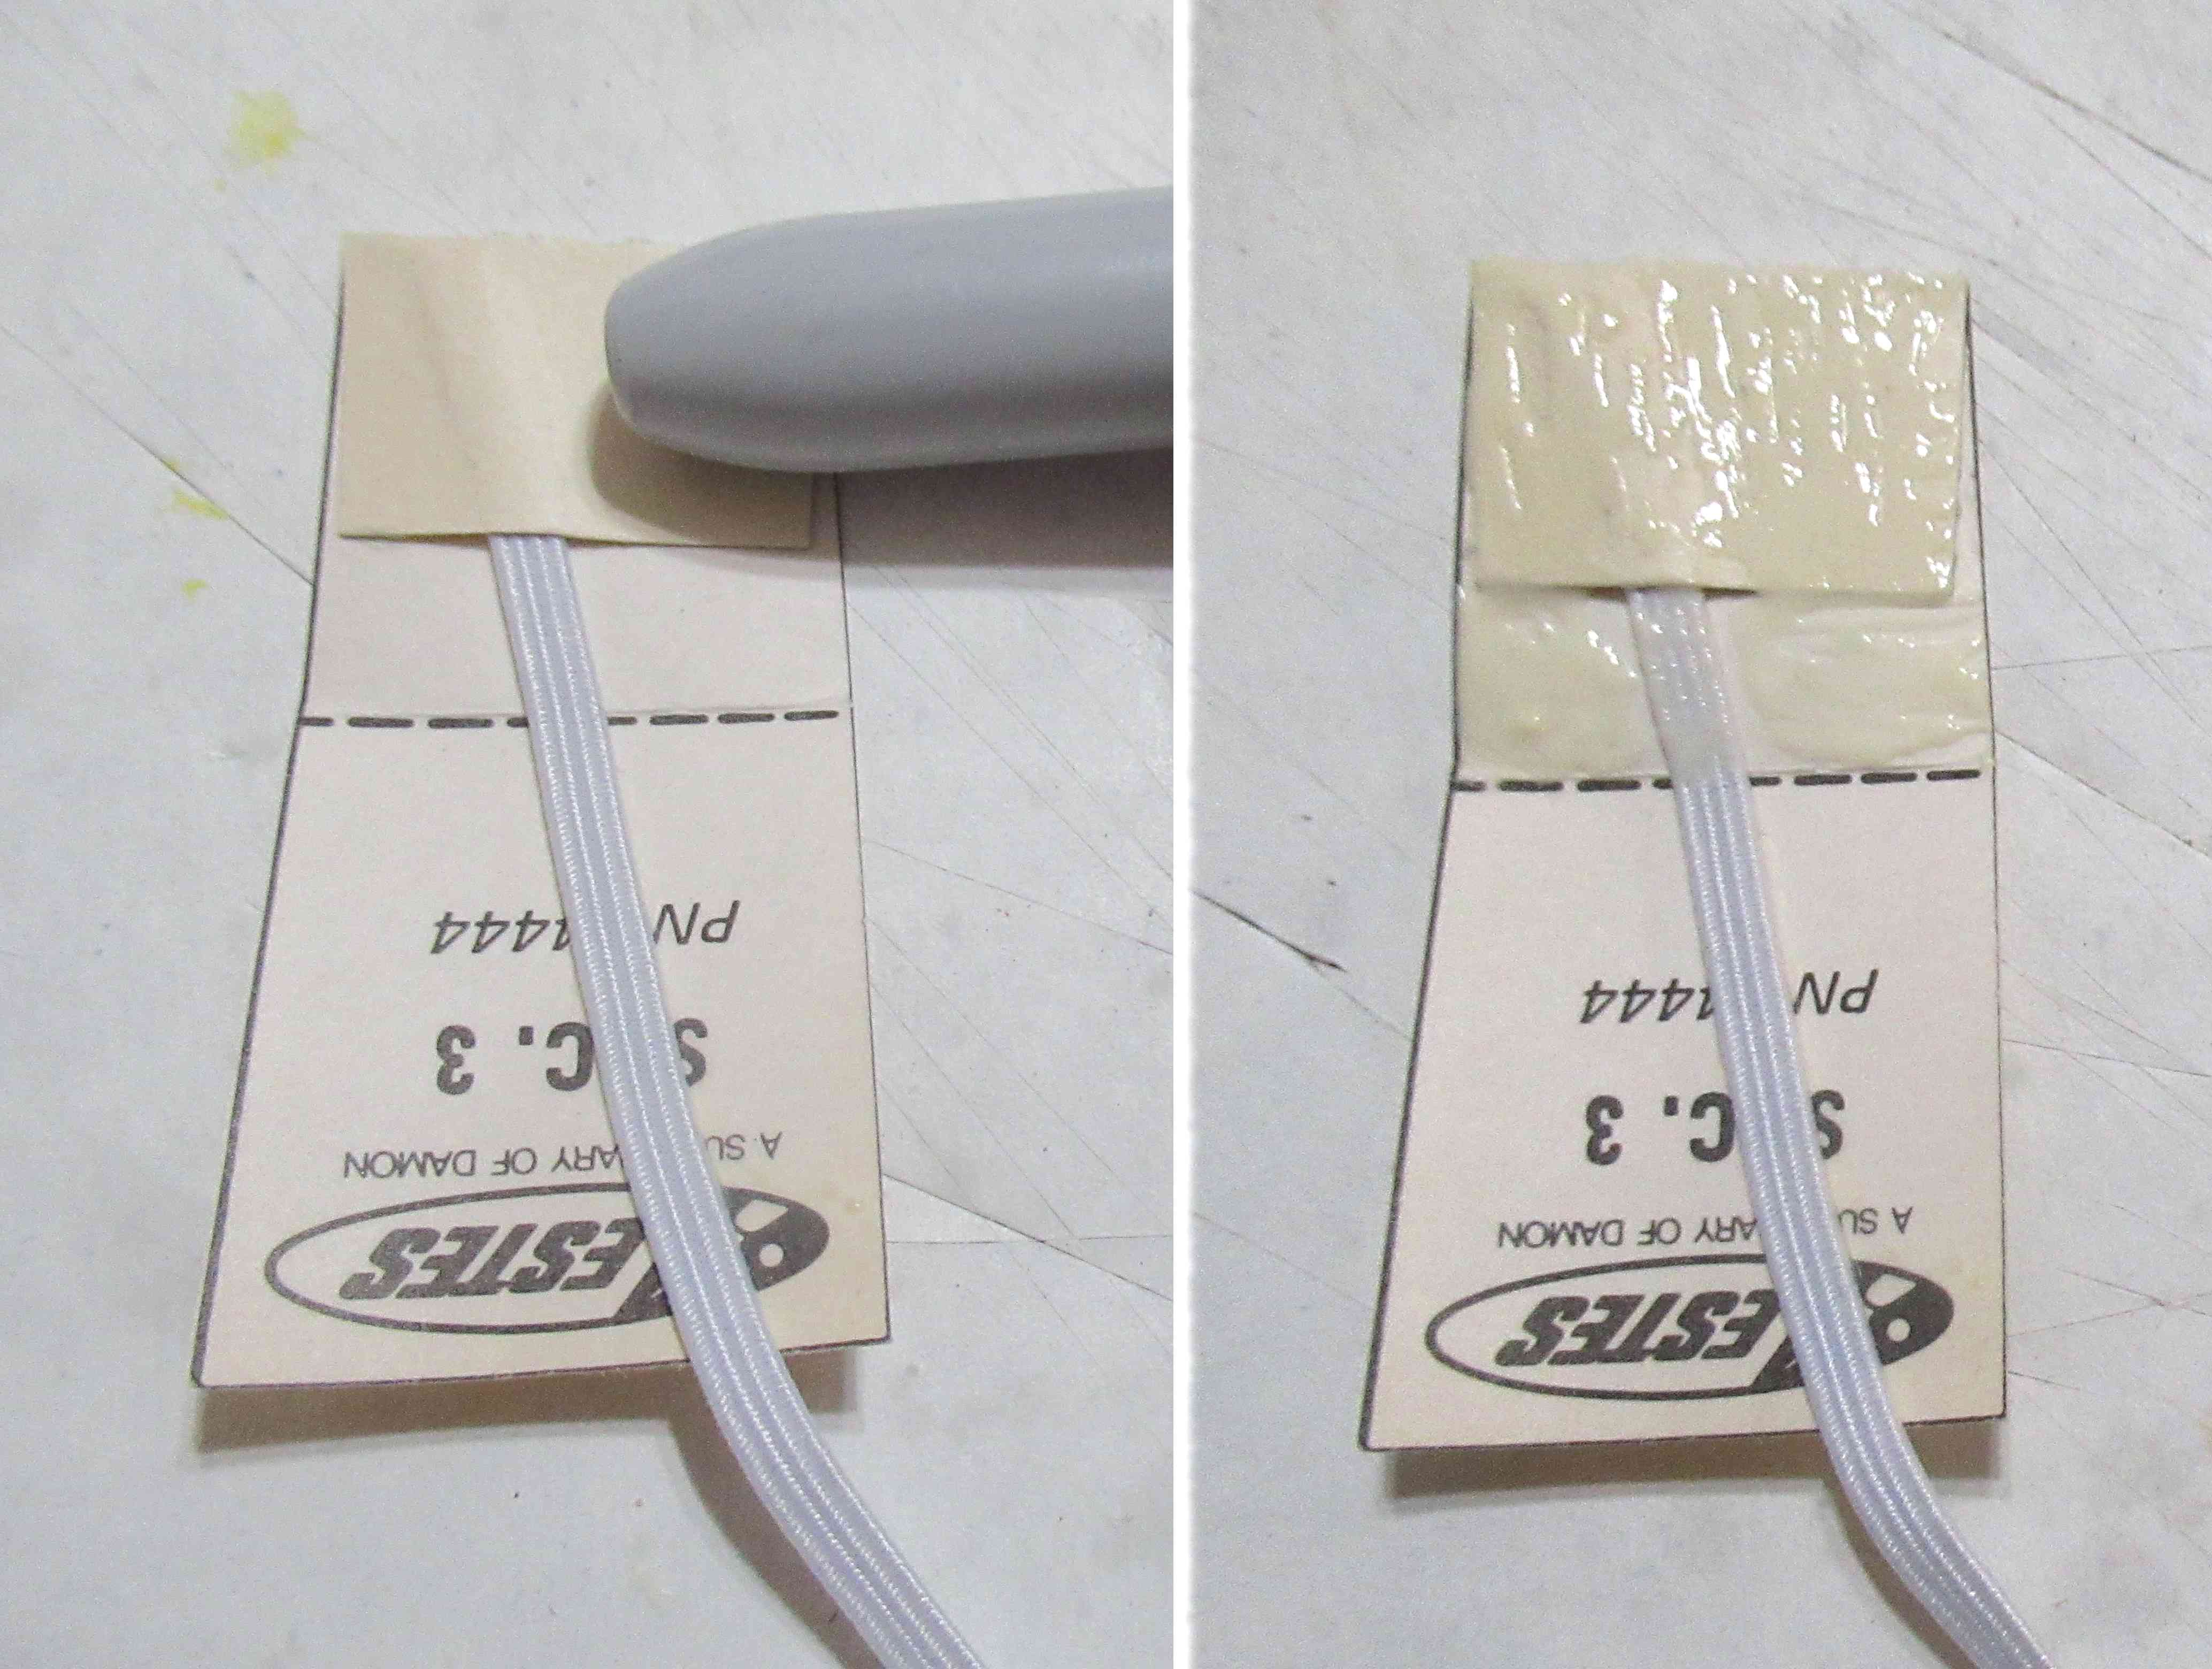
The new Estes Mini Alpha kit instructions have been posted online: CLICK HERE

Most instructions tend to say tie a "double knot".
This implies tying two overhand knots which gives you a "granny" knot. They are prone to slip and open up. Unless you were a Boy Scout, a first time builder probably doesn't know the difference between the two knots. 

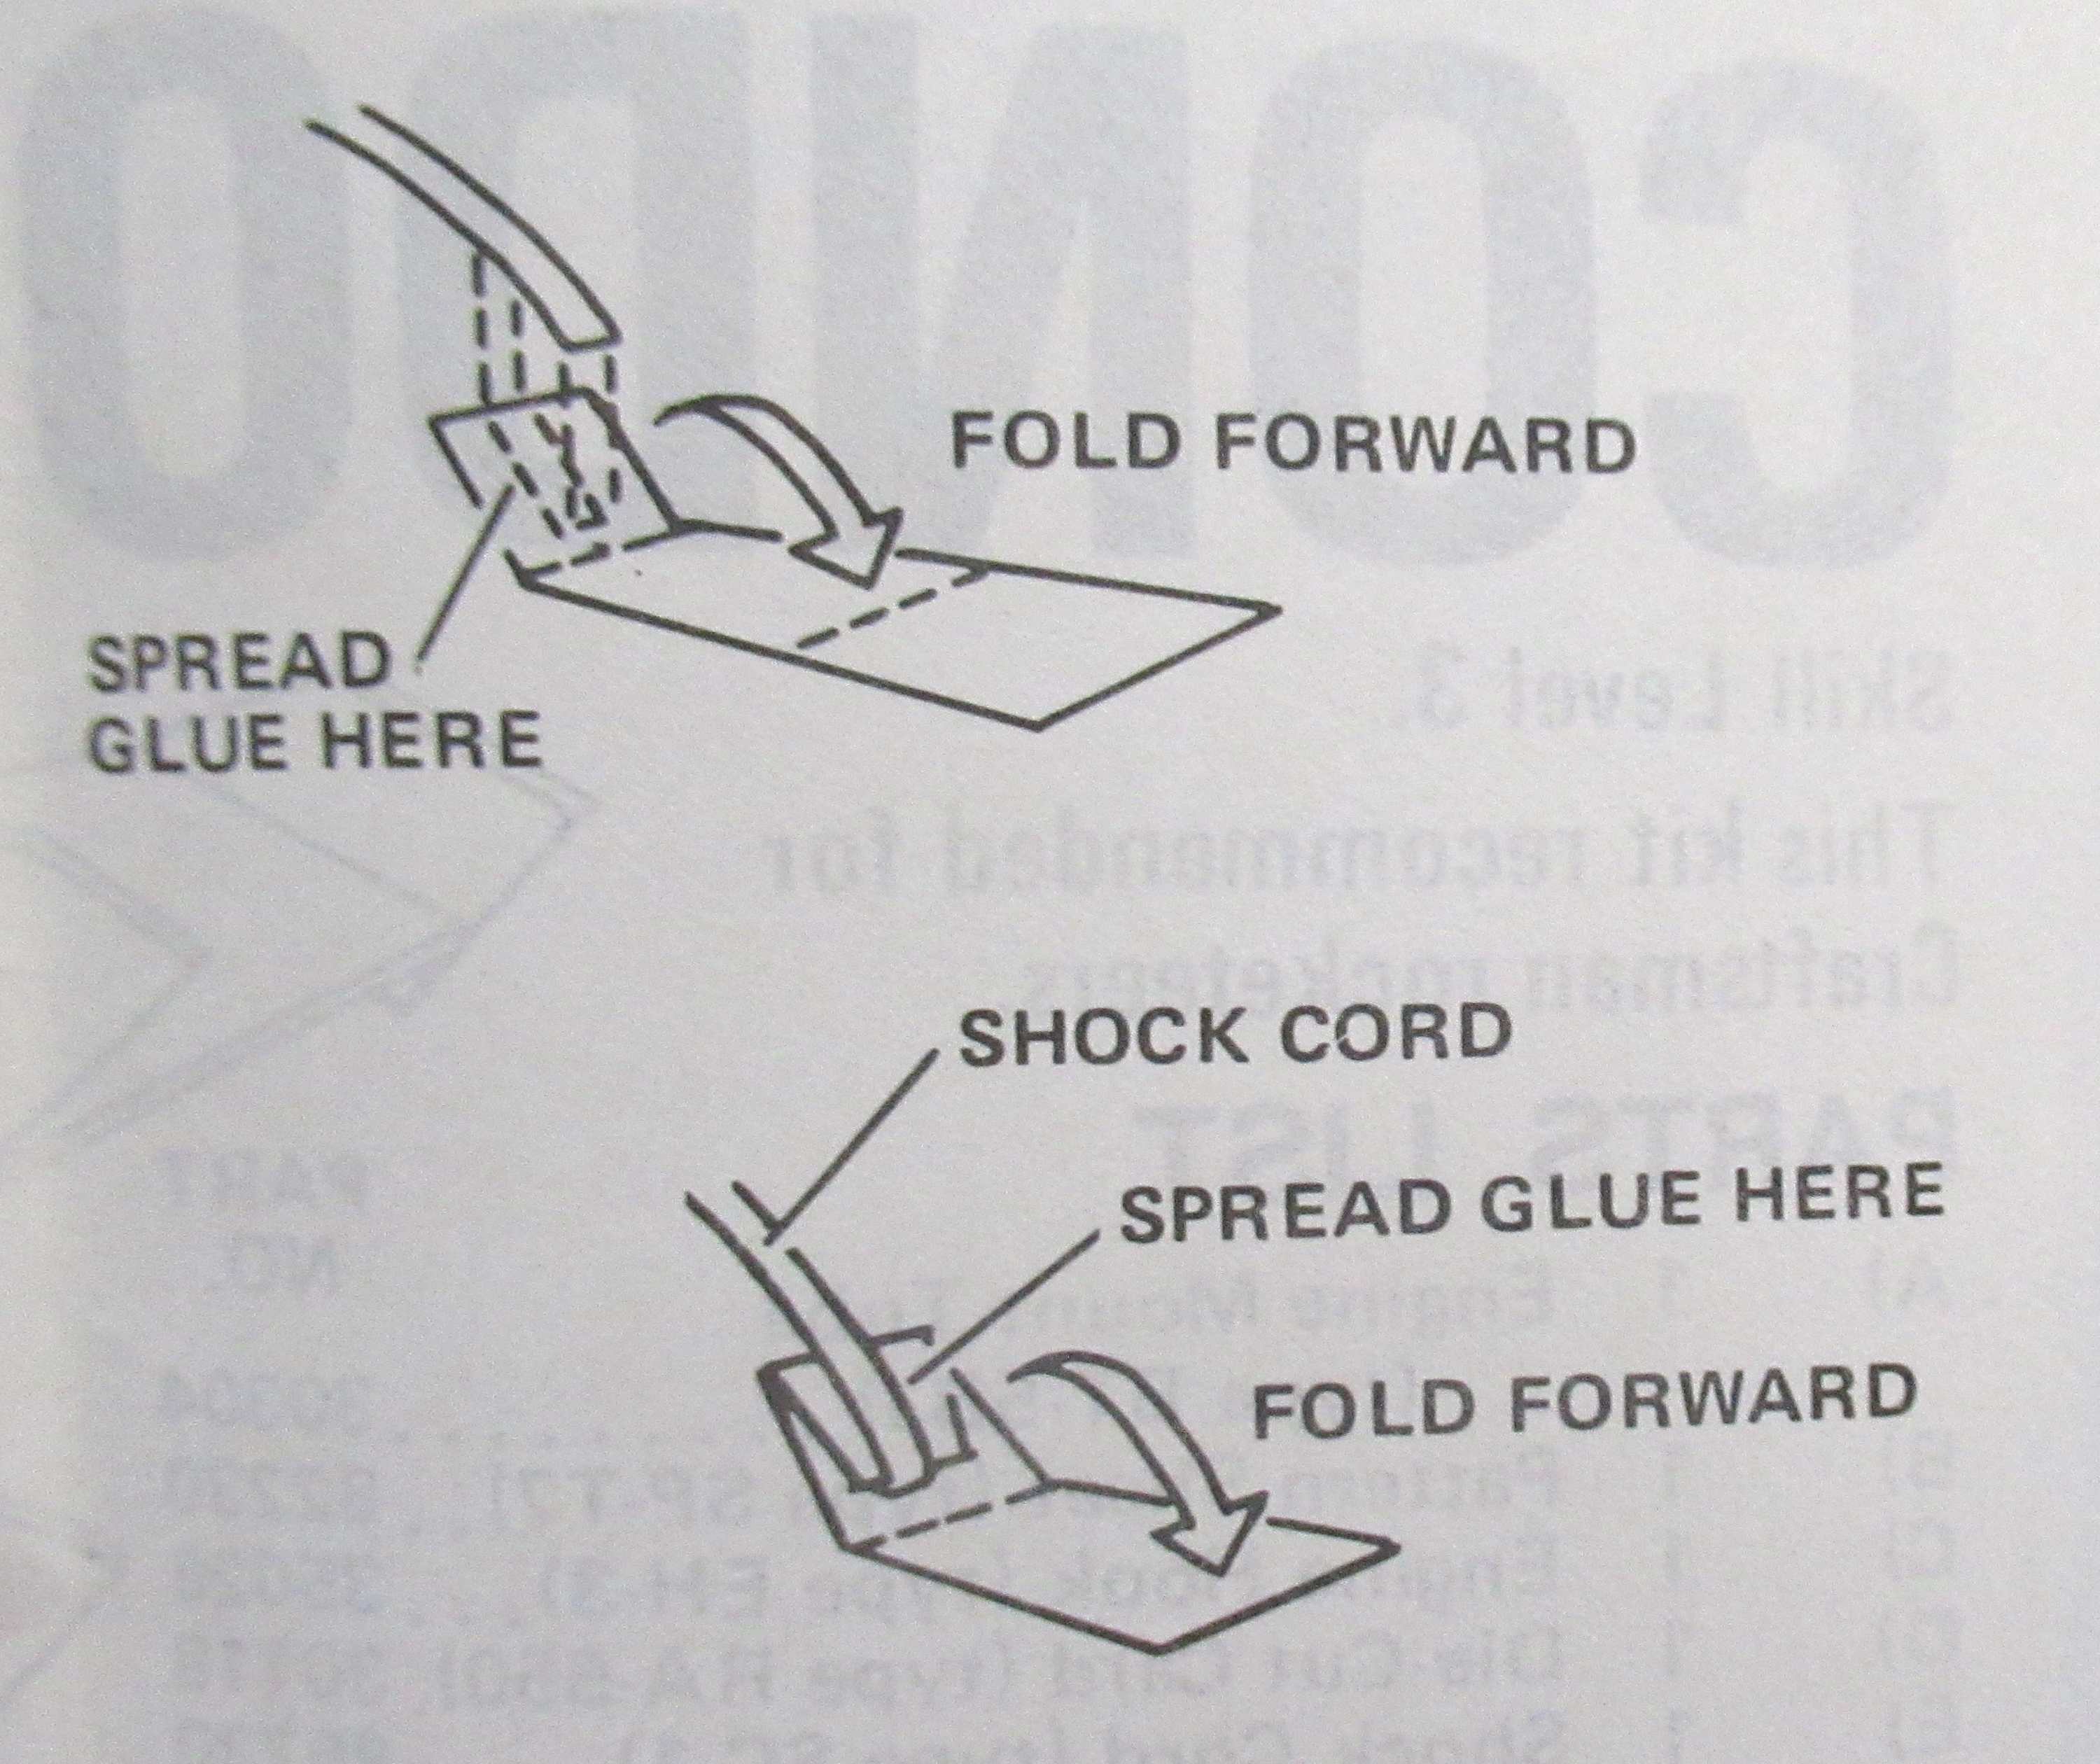
At the arrow point in the illustration, look how short the free end of the shock cord line is! If you've tied a "granny" or "false knot" that short end could easily pull through. Tie so the free end is longer, maybe 3/8" to 1/2".

You can use fancier knots, but a "square knot" is easy and shouldn't come undone when tightened.
In the third picture below, note how both ends come out side by side. Both lines come out under the turned line on one side and over on the other side.

Instruction once said to use a drop of glue to "set" knots.
If you tie and tighten a knot correctly it shouldn't need the glue.

TIP: NEVER, no, no NEVER apply super glues (CA glue) to a knot!
CA dries hard and makes the shroud line or shock cord brittle. 
If you want, you could apply a small bit of white or wood glue to a knot. Again, if you tied a good knot correctly, it won't need the glue.

I tie parachute shroud lines using square knots. In the past, some shroud lines found in Quest kits would come undone by themselves! Those Quest lines did require a small drop of white glue to help hold them closed.

Sunday, May 5, 2024

Estes Condor #0807 Build, Part 9, Tri-Fold Mount TIPS

I usually don't like using tri-fold mounts in smaller tubes like a BT-5, 20 or 50. But on this older kit I'll (almost) follow the instructions 

Here's how the instructions show how to glue up a tri-fold mount. 
Three folds and three bends of the shock cord.

Older kits included a mount printed on 65 lb. cardstock.
Current kits have the mount printed on the 20 lb. stock instruction sheet.


Over the years tri-folds have evolved to two folds of rubber.

The original tri-fold mount had you glue the shock cord at an angle. This makes a flatter finished mount inside the body tube.

I run a light line of glue at an angle down the cardstock. The elastic shock cord is pressed into the glue and allowed to dry. 
Apply a skin of glue over Section 1. Note I wrote "skin" of glue. When gluing paper to paper you don't need a heavy glue coat. Be sure the glue coat covers all of the section area - side to side.

On the left I'm burnishing the first section. 
On the right you can see how much glue is placed before folding it over onto section 3.


Shape the mount into an arc to better fit the inside curve of  the body tube.

On the right - you can see how the angled shock cord ends up in the folds. The finished mount is flatter than it might have been otherwise.


Monday, January 1, 2024

Estes Great Goblin, #9724 Build, Part 16, Shock Cord Mount


The fold lines on the tri-fold shock cord mount can be "pre-creased" using the dull tip of a butter knife.

I glue the rubber to the mount before gluing the flat fold areas. Notice the angle of the shock cord. This makes a flatter mount, important for easier ejections in smaller diameter tubes.


On the left is how much glue is applied. This is a cardstock mount, paper doesn't need much glue to adhere well.

On the right is how much glue is left after smoothing and removing the excess.


Before the two glued sections dry,
Shape the mount by pressing it into the inside curvature of the body tube. No glue on the back yet.


The mount is to be glued 3 1/2" below the top lip of the body tube.

Mark the rubber cord with pencil using a ruler at the 3 1/2" length. Use the pencil mark as a depth gauge. Drop the glued mount into the tube until the pencil line is at the tube edge.
 

Thursday, May 18, 2023

MPC Lambda Payloader Build, Part 13, Stine Shock Lock


Here's how the instructions show the lacing of the round elastic shock cord. 
They suggest gluing the mount down 1" from the top of the tube.


The next illustration shows the mount in place - but not recessed a full inch.


Here's the kit enclosed shock cord mount. It's 110 lb. cardstock with three holes punched in line down the center.

I pre-curl the cardstock to better fit the inside of the body tube.


The round elastic is laced through the mount

On the right, the back gets a thin coat of wood glue.
TIP: Set the elastic line beside the other exposed line to keep the mount as flat as possible.


The glued mount is pressed against the inside wall with a dowel.

Lightly pull on the elastic to pick up any slack and to tighten the laced line.

Saturday, January 28, 2023

Estes BOSS Kit #7316, Build, Part 21, Recessing The Shock Cord Mount

The Tri-Fold shock cord mount is glued up.
Note that I've already got the mount formed into a curve, ready to be glued into the body tube.

The mount is recessed 1 1/2" inside the tube.
Mark with pencil on both sides of the cord. This will be your depth guide.


An even coat of wood glue is spread on the tri-fold mount. 

Drop in the mount without touching the inside wall of the body tube. 
Stop when the pencil mark is at the edge of the tube.

It's hard to see in the picture, but the mount is hanging inside the tube, not touching the tube walls yet.


Now you can press the mount into the inside of the tube.
I use a rounded dowel to lightly press the mount into the tube over the entire mount -  from side to side and top to bottom. Don't press too hard with the dowel, you don't want to dent the body tube.

The parachute and shock cord are tied to the small loop on the shoulder of the nose cone.

Wednesday, January 18, 2023

Estes BOSS Kit #7316, Build, Part 11, Fins, Shock Cord & Windows


The motor tube standoffs are glued 1/4" from the rear of the main BT-50 tube.
Shock cord is a standard tri fold. 
Sometimes I glue the mount in later after the model is painted.

The tri fold mount is molded into a curve to fit the inside of the body tube while the glue in the mount is still wet.
Press it into the body tube (dry) and insert the nose cone to mold the mount into a curve.


The little round windows (Part AA) can be painted black off the model and glued on after the gloss white is sprayed.

The dots were taped down for black spray.


I made a window positioning template out of the upper tube marking guide.

Friday, October 14, 2022

Estes Solar Sailer II, Kit # 2044, Step 9, Tri-Fold Mount TIPS

Sure, I could have tied a Kevlar line, but it would have been very long to reach through the long body! I've brought up tri-fold mounts before - This post is really for those who might not know the inside tips.
   
I cut the mount out of 65 lb. stock, much stronger than the typical 20 lb. instruction sheet print.

Mark a pencil line at an angle down the middle area. The trick to a FLAT Mount is not laying the shock cord directly over itself when folding over the paper.

Set a light line of glue down the pencil line.
Set the shock cord onto the glue and let dry.

Lay a thin skin of glue over just the top section of the mount. Notice the reflection showing how little glue is used. Be sure you have complete coverage over all the first section - from side to side and top to bottom.

Fold, press and burnish over the entire section. If you applied a thin "skin" of glue on the upper section it doesn't take long to dry.
Repeat with the thin film of glue on the middle section. 
Fold over and burnish.

Notice the impression of the shock cord folded over in a "V". The completed mount will end up flatter than if the two thicknesses of elastic were right on top of each other. 

On the right - In the soft heel of my hand, I'm rolling a (inside body tube) curve before the mount sets up.

Tuesday, September 20, 2022

Estes Space Shuttle Columbia Build #1385, Part 9, Rudder Fitting


After the glue fill there was still a dip where the glue had shrunk in.

Some CWF filler was applied then sanded with 400 grit. 

The tube marking guide matched up! The tube is marked on two sides.
The tri-fold Shock Cord Mount is printed inside the marking guide. This old style mount is printed on 65 lb. cardstock, stronger than the usually printing the mount on 20 lb. instruction sheets.


The rudder drag brake still a tight fit in the balsa rudder.

The top and bottom of the rudder cut out was trimmed.


Again, I used very little glue to set the cardstock drag brake.
After the initial tack glue had dried I checked the alignment. It did need some adjustment. 

Glue fillets were applied and tape held the cardstock triangle under tension - pressing and centering the brake in the correct position.

Friday, April 1, 2022

Estes Space Ship One, Kit # 2191, Part 12, Shock Cord & Nose Cone Fit


The Kevlar line was marked just below the upper lip of the body tube.

Feed the Kevlar back through the engine mount and nozzle.


Tie a overhand loop knot in the Kevlar and elastic shock cord. The mark on the Kevlar should end up at the top of the Kevlar loop knot. 
You can join the two lines as shown:              CLICK HERE

This is certainly not the only way to tie Kevlar and elastic together. It's just the way I do it.


The nose cone fit was loose and required almost one full wrap of tape around the shoulder.

For a smoother insertion in the body tube - Roll the tape over the shoulder edge.

Thursday, October 28, 2021

Estes Vesta Intruder #7312 Build, Part 17, More Decals & Shock Cord


These window decals are set around the thinner black canopy.
Note the decal goes around the front and has a break on the right side.

Again, I rounded the angle of the inside left to prevent a decal tear.


The right side picture (above) shows the blue backing being slid under and off. The right side piece was set on afterwards, matching the spacing from the left side decal.

I had to look at the sides of the box to figure out the placement of these decals.


The shock cord mount goes in 2" down from the top edge of the tube.

TIP: Mark the rubber shock cord with a pencil at 2" from the tri-fold mount.
Use the pencil mark as a depth gauge - be sure the mount is placed low enough to allow space for the nose cone shoulder.

Sunday, January 3, 2021

Estes Saturn 1B, #7251 Build, Part 36, Shock Cord & Launch Lugs


A standard tri-fold mount is to the shock cord and  the 18" chute on the lower body.

TIP: With a pencil, mark the shock cord 2" from the top of the tri-fold mount. Use the pencil mark as a depth gauge when set over the top lip of the body tube. 

Trace around the launch lugs.
Some of the paint is scraped off, well inside the pencil outline. Erase the pencil line. The inside edges of the white plastic launch lug were marked with a Sharpie so no white would show at the edge.

Glue the lugs in place with Fabri-Tac or your favorite liquid plastic cement.


The upper lug is attached in the same manner.

Lightly pencil trace and scrape off the paint inside the pencil line. Erase the pencil line and glue lug in place. 
Check the alignment with the lower lug using a dowel or a launch rod set besides the two lugs.

Build time:
Glue in Tri-fold Mount: 10 minutes
Tie up 18" chute (not shown): 10 Minutes
Attach Launch Lugs: 20 minutes
Total build time so far: 28 hours, 05 minutes

Tuesday, October 13, 2020

Estes Terra GLM #7292 Build, Part 3, Launch Lugs & Shock Cord Mount


On the left is the square openings for the launch lug tabs.

TIP: On side of the lug has mold marks. Turn the lug over so they face the bottom and won't be noticed.


Looking from the rear both the two lug pieces line up. They also line up with the engine hook.

TIP: When you can, glue on the launch lugs in line with the engine hook. When sliding the rocket down the launch rod, this sets the engine hook to the back keeping it away from the micro clips and igniter wires - if you bend the igniter wires forward.


On the left is what's left of the plastic tree and two pieces you don't use in the build. On the upper left is the interior shock cord clip and down on the lower right is a third launch lug segment.


The shock cord "cowl" is glued on, over the upper hole in the body tube.
The rubber shock cord is fed through and knotted. The knot end is pulled under the cover.
TIP: Use tweezers to stuff the cord end under the hood.