Monday, February 29, 2016

Thor Able Carded Build Part 13 Main Nozzle Detail


Now that the internal BT-5 upper length has been established, fillet the tube where it exits the lower ind of the BP plate.


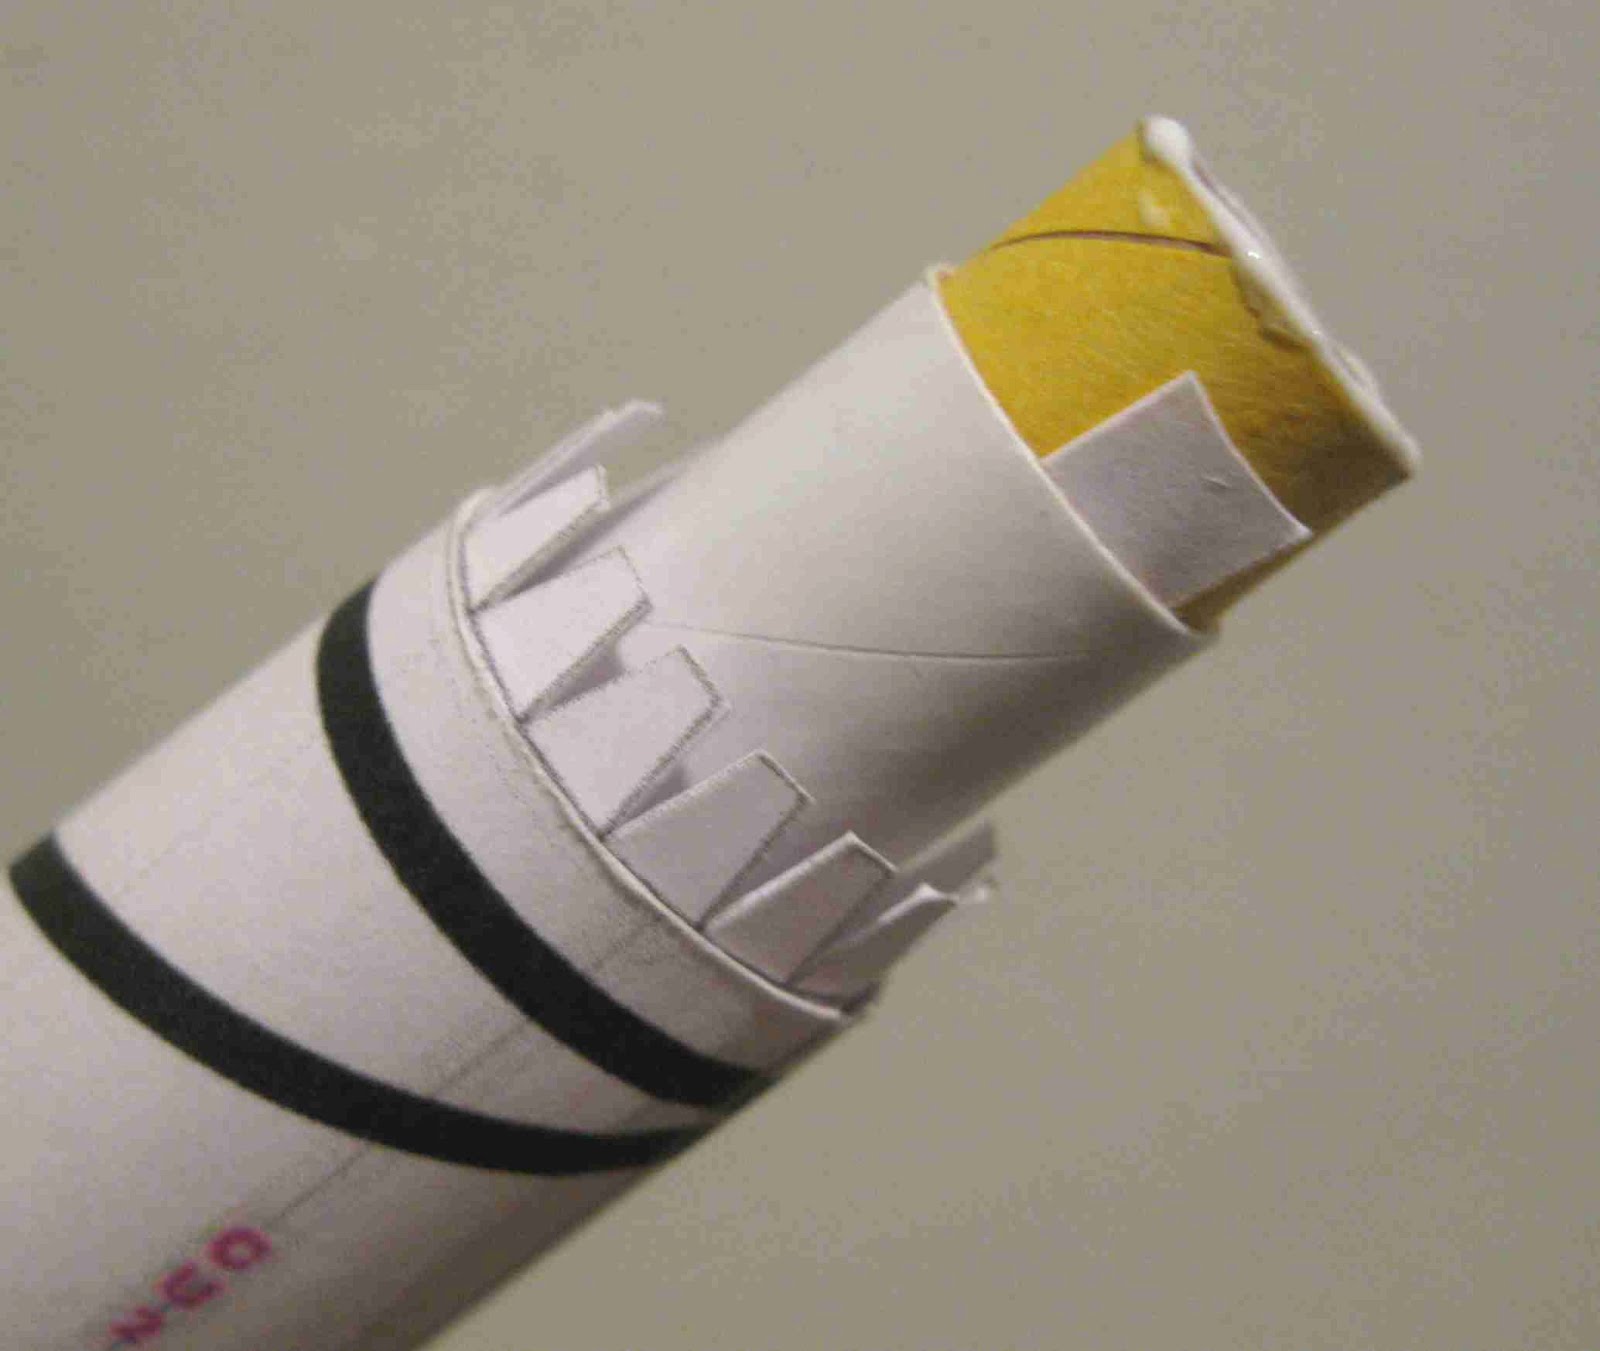
The BT-5 going out the back will end up being the nozzle. It's not the true tapered nozzle, but in a conversion you have to make compromises.

It still needed the gray color though.
I set the cardstock nozzle on the printed instructions and found the gray background of the pictures to be a close match.
Two rectangular bands were cut, the same width as the two cardstock nozzle pieces.


These gray strips were glued around the BT-5.

Friday, February 26, 2016

Thor Able Carded Build Part 12 Separation Point


A rolled clay weight "snake" was pressed into the Bic pen tube inside the top section.

I used the plastic pen barrel so the clay wouldn't discolor the white cardstock over time.

The model will separate between the B1 and B2 sections.


The B1 section was glued to the A2 already glued to the uppermost A1.

To smooth out the seam, a clean dowel is rolled over the edges. Whatever wet glue is in the edges makes the cardstock pliable. You can roll over any edges that stick out.


The (longer than needed) BT-5 is pushed through the lower body centering rings and out the top. Don't glue the internal BT-5 tube in place yet.
I don't know what the cut length will be yet.

A coupler needs to be glued into the upper section so the BT-5 will join to it.
A 1/2' long section of an Estes engine spacing tube was cut and friction fit with cardstock into the BT-5 extending out the top of the lower section.
(I'll need to pull the BT-5 out after the coupler is glued in place.)
You can see the glue ring at just the top of the yellow coupler.

The upper and lower halves were pressed together. When the yellow coupler made contact with the support ring inside the upper section, the BT-5 slid down through the lower half until both halves of the model were joined.

When the glue was set up, the lower half was removed leaving the yellow coupler glued to the upper half.

Out the back end, the long BT-5 will be made into the nozzle. For the time being, the extended tube is used for a handle to help when building the low end of the model.

Thursday, February 25, 2016

Throwback Thursday Pic 2

Here's a picture of the first time I saw Vern Estes in person.

This goes back to 1975 at NARAM 17 in Orlando, Florida.
Mr. Estes walked into the room and you could hear the whispering: "Hey look, Vern Estes is here." I felt like I was seeing a real celebrity.
This was back when he had a full beard and was wearing flight suits.

Thor Able Carded Build Part 11 Upper Stage


These boxes are small!
Score the fold lines before cutting them out.


One box is shown, glued in place below the antenna.


The finished upper stage.

It's pretty clean - for now.
I can't stress enough, keep your hands clean!
After all the handling, my model was a little dirty in the end.

Wednesday, February 24, 2016

Thor Able Carded Build Part 10 Antenna


From the back end of the A1 tube you can see the Bic pen barrel inside.

Because this is a hard plastic, the antenna holes will have to be drilled.


I used my small pin vise drill to make the antenna holes.


The antenna wires would bump into each other at the center of the A1 tube.

The wire on my work table shows the bend in the wires so both will fit around each other inside the A1 tube.
The center of one wire will be above, the other below.


Once the wires are place and sticking straight out of the tube, glue was applied with the tip of a toothpick.

Sunday, February 21, 2016

Tacky "Inn Of Tomorrow"

I visit a few other rocketry blogs each day.
On Wayne Hill's "The Rocketry Blog" he posted some pictures of space based hotels called: "Family Road Trips In The Space Age."
To see the post, CLICK HERE

On picture postcard caught my eye -


These two hotels were right on the border roads of Disneyland. Many hotels tried to capture the Disney spirit and failed.
In 1972 or 73 I planned a Disneyland trip with best friend Ron. I was in charge of picking the hotel. I found the tackiest one I could, Stovall's Inn Of Tomorrow.

This hotel had to of been constructed in the mid to late 1960s.
I remember Ron saying: "Boy, you sure can pick 'em!"
Along with the many topiary animals there was an employee who would dress up in a well-worn space suit and visit with guests at the pool. You could take the courtesy bus to the park, the front end had a fiberglass alien face.


The hotel lobby face doesn't look the same these days. But, that pool "globe" is still there along with a few distorted topiary animals.

Thor Able Carded Build Part 9 Upper Stages


Forming the nose cone takes just a few minutes.
A clean dowel was used to start rolling over the nose points.

After they start holding the rounded shape, apply some white glue and continue rolling and molding the points into a rounded nose.


The finished nose.
Don't use your fingers to roll it, use a clean dowel or it will come out a dirty gray.


A2 is rolled into a cone.
You can see the internal glue tab overhanging the left side edge.

Friday, February 19, 2016

An Open Letter to Mark Zuckerberg,


Dear Mr. Zuckerberg,

I am $53.00 in debt.
Could you please send me $100.00 so I can bring my rockets to the world?

Chris "Kanye" Michielssen

Back to the HAL Oosterdam

The last cruise shows went very well.
I called my agent the day I got back home to give a report. A half hour later I had a return engagement, this time from February 19 - 29.
So . . .
If there is free Internet at a port, I'll do a post or two. Back to normal on March 1!
This cruise is the same route as before, the Caribbean.

Thor Able Carded Build Part 8 Upper Stages

The A1 section was pre-shaped and rolled around a dowel.
This model will need nose weight and clay would probably be used.
A plastic Bic pen barrel was just about the right diameter to glue the A1 section around. The internal plastic pen barrel will also protect the white cardstock from oil stains from the clay.


The CA-1 conduits were cut from the cardstock.

These are very thin, be sure your straitedge doesn't slip.


The backside of a very dull razor blade was used to help straighten out the glued strip.

Thursday, February 18, 2016

4,000 Posts!

I just took a look at the blog post totals -
The "Throwback Thursday" post was number 4,000!

And they said it wouldn't last.

Throwback Thursday Pic 1


Here's an old picture from the mid 1970s.
This is a convention, display model I built for AVI (Aerospace Vehicles Incorporated)
It's the old MPC Nike Patriot.

What's so interesting about this picture . . . maybe not the rocket.
I took this shot with the rocket set on our living room ottoman. The ottoman was vinyl covered and matched the new recliner chair.
Underneath the adapter is a "waffle" pattern melted into the vinyl. That melted grid was indirectly caused by my Estes Cineroc.
Before this picture was taken, I got my first developed Cineroc film back from Estes. I watched that film over and over.
Under the projector was a fan to keep it cool. I set the projector on the new ottoman. The fan cover got hot and melted right into the vinyl!

Thor Able Carded Build Part 7 Upper Body and Conduits


The upper body separation point is above the B2 section.
Here's the pre-shaping the B1 shroud for gluing.


All the shrouds in this "kit" have internal tabs so the shroud seams edges butt up against each other.
You can roll a clean dowel over the seam to flatten it out.
This is the same method I used on the largest Estes Saturn V shrouds.


The conduit parts are formed to a semi circle down their length.
I ended up coaxing them around the small end of my diamond file.
The inset picture shows the cross section.

Wednesday, February 17, 2016

Thor Able Carded Build Part 6 Upper Internal Support Rings


Disk 1 and Disk 2 are glued to the star shaped 1A and 2A.


While those dry, the connectors B1 and B2 are glued into the upper two transition pieces.


Here's the internal support "star" ring being glued inside the larger transition.

Don't press these in too far, you don't want to see the star shape through the card stock body.

Colorcombos.com

From a Rocketry Forum post, some food for thought regarding color choices:
dixontj93060's Avatar

. . . "others may be like me and have a hard time deciding on what colors might look good on your rocket. I have picked a few that clash pretty drastically. To help us "color challenged" here is a website I found that looks like it would really help. For instance in the link below I wanted to look at some suggestions for highlight or alternate colors with silver and red so I entered grey and red and it came back with 23 different combos of 4 to 6 colors each and I particularly liked ColorCombo36 which is probably what I'll use."

From www.colorcombos.com


Some of these combinations were probably assembled for interior home painting, but the same ideas could work on a rocket.

Tuesday, February 16, 2016

New Cherokee Goon Decal - The Big Fix


My Cherokee Goon has been through 12 flights, many were Quest B6-4s
The upper wrap decal was dirty from the Quest ejection charges. The rocket is BT-60 based, short and very strong.
With a new decal wrap it would look like a new build.

Here's the Cherokee D decal you can find online.
I used this to do the re-draw.


The new decal draw had to be shorter. If it were the original height it would run over the Cherokee - D name decal.
The old wrap decal was pretty dirty. There was a lot of soot from the many Quest B6-4 engine flights.
The rest of the body and decals were clean.


The old decal peeled off clean without using any tape.

On the left you can see how dirty it was.


I replaced the Estes logo with "GOON".
I tried to get the right width but is never seems to come out right.
The overlap was set right above the launch lug.


The "new" improved Goon!
I'll add some Future clear coat to protect the new decal. I may not have done that the first time around. The ejection smoke sure stuck to that upper decal wrap.

Thor Able Carded Build Part 5 End BP Plate


I had to cut a circle in the center of the BP end piece to fit the BT-5.
As before, the tube was centered and a line drawn around the end. Cut and sand round to fit the tube.


This is the notched BP connector ring in place.
It is slightly recessed down to the printed blue line so when the BP end piece will end up flush with the end of the main body.


As expected, I had to cut off the gimbal motor pods and make new ones that were lightly smaller.
These pods butt up against the engine bell. My engine bell will end up being the BT-5 tube.

Monday, February 15, 2016

Nike / Evader?


Sometimes the burst mode on a cheaper camera can distort the images. That's why so many of my posted launch shots haven't cleared the launcher.

On the left is my MPC / Quest Nike Smoke on a Quest B6-4.
And yes, it was going up at that angle! Later I had to get it out of a tree.

I thought the fin distortion was interesting. It reminded me of the OOP Quest Evader design.
You never know where that next fin design might come from.

Thor Able Carded Build Part 4 Internal Rings


The Support Strips were already glued inside the B3 Lower Body.
The rings you made will sit against these rings.

TIP: I found I had to sand away a little of the edge to fit better against the B# Connector Tab.


The rings were pressed into the tubes until they rested against the support Rings.
Glue was applied with a toothpick tip once I was sure the rings were seated against the support rings.

In the picture, a Q-Tip was used to smooth out the glue and remove excess.

Sunday, February 14, 2016

NEFAR Launch February 13, 2016

I only flew two rockets at yesterdays N.E.F.A.R. launch!
NEFAR runs a very smooth operation.
After LPR launches you watch the MPR and HPR launches. You recovery your rockets, grab another and get in line.
I'm not complaining, it's great to see so many new young people there. The eleven pads were very busy. The two rockets I flew were great performers.

The new Estes QUINSTAR turned a few heads. Many had questions about it.
The Estes C6-3 got it up with a accelerating spin to about 150'.
It turned over at apogee and spun slower on the way down.
After another C6 launch, I'll definitely try this one with a D engine.
I'm hoping that Jimmy Yawn got the flight on video. If he did it'll be posted on the nefar.net website in a few days.


The Mercury Engineering (BMS) 3" SCHOOL ROCKET was probably the best flight I've had in a long time.
The Estes E9-4 gave a slow, long 3 second boost.
Apogee was about 600'. The 18" Odd'l parachute brought it down safely near the trailer seen in the back of the animated GIF.

This soon to be released kit is a great demo model, a new favorite. Retail price will be about $15.00!
It's like a Big Daddy, only 10" taller, very similar to this one: CLICK HERE (no decals, though)


Lynne joined me yesterday for her first club launch.
She was impressed by how well the launch was run and the loud MPR flights.

Saturday, February 13, 2016

Mercury and Apollo Capsules and Towers from Estes

From YORF, Rich Holmes found this on the Estes website:

Mercury Capsule Parts - CLICK HERE
Little Joe II Capsules - CLICK HERE


Looks like we can all build the Mercury Little Joe II from the old Enerjet News!
CLICK HERE
Last year I bought some golf tees to use as recruit motors!

I wouldn't be surprised if Estes doesn't come out with a MR Little Joe in the next year.