Showing posts with label Primer. Show all posts

Wednesday, December 18, 2024

Estes Constellation Build Part 12, Primer Sanding


Here's the body tube and nose cone after the primer filler was sanded down.
The nose cone was slipped into the body tube for primer painting.
The clear payload section will be trim painted later.


The fin and fin pod transition joints looked pretty good after spraying with the primer filler.
The primer was sanded with 400 grit
.


There is plenty of inside edges that need to be sanded.

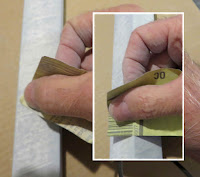
TIP: Here's another use for the Q-tip swabs.
Roll a piece of 400 grit around the cotton tip.


This gives you a small, round cushioned sander with no sharp creases in the rounded end of the sandpaper.

Tuesday, September 26, 2017

Estes Scout Ship Nova Build #1392, Build, Part 3, Nose Cone and Fins


The nose cone tie lug is thin. Instead of cutting out the center square, I rounded the hole using a rat tail diamond file.


The fins were already filled with CWF and sanded. I thought they were like the Starship Nova and had square edges. Good thing I double checked the instructions - the leading and trailing edges were rounded!
I went back, rounded the correct fin edges and filled the fins with CWF again.


The fins were taped down to some cardboard and sprayed with primer/filler. The launch lug is also getting a shot of primer/filler.

The root edges of the wings are butted up against each other to keep the primer/filler off the root edges.


The same pieces after most all the primer/filler has been sanded off. The only primer/filler left is in the remaining balsa grain.

Saturday, September 2, 2017

Apogee Shrockets Skonk Wulf Build, Part 5, Balsa Filling

The large wing fins are two-piece.
In Step 15, the instructions would have you glue on the rear fin piece after the engine mount and main fins are glued in. I didn't see any real reason to glue the rear fin piece afterwards. It just meant more joint filling if you waited until Step 15.

After the CWF was sanded smooth I did some test fitting before gluing in the engine mount. The root edges of the fins are a little above the body tube. Some light sanding of the fin tangs brought the root edge down.

This is not a problem, I'd rather have the fin tangs a bit long for a custom fit.

The balsa is taped down to a piece of cardboard for a spray of filler/primer.

TIP: On the forums I read about others doing many coats of primer and sanding to fill balsa. As mentioned before, I do just one coat of CWF and sanding then one fairly thick coat of Duplicolor Filler/Primer and sanding. That's all you should need to fill the balsa pores.
Sure, the Duplicolor Primer/Filler is more expensive than the $1 a can crap from WalMart. One can goes a long way. One coat of the good stuff sure beats four or five coats and sanding between coats of the cheap stuff.

These are the wing tips and forward fins.

On the right is the sprayed and dried grey primer/filler.
On the left is the primer/filler sanded down. Notice most all of it is removed with sandpaper on a block. The only primer/filler that remains has filled whatever grain is left after the initial CWF coat.

Sunday, March 26, 2017

Estes Nike Smoke #7247 Build, Part 11, Ends and Edges


On the left is the longer Estes nose cone shoulder. The pencil mark shows how long the Centuri nose cone shoulder was.

The inset picture shows the original slot cut at 1" above the tube end. The new slot marking is at the desired 1 7/8" mark from the bottom.

Before painting with primer/filler I had to fill the seam in the short BT-5 body tube extending out the top of the nose cone.

The entire nose cone was shot with primer/filler. I didn't sand the entire surface staying away from the raised hatch and bolts. The bolts got a rubbing with a soft cloth to smooth out some of the rough surface.

The fins got a primer/filler shot and careful sanding.
This filler is your last step in getting a sharp edge on the tapered fins. Notice how the filler on the raised edges is not sanded off but helps define the sharp high edge.

Monday, March 6, 2017

Estes Skydart II #3229 Build, Part 12, Primer / Filler

All the wood parts got a one good shot of Duplicolor Primer/Filler before assembly.

The rudder in the back is before sanding, the rudder in front is after sanding with 400 grit.
Where some builder look at primer as a paint prep, this primer/filler is used for a final wood grain fill.
Enlarge the picture to see some of the gray filler left in the remaining wood gran.
I was curious how much weight was added after CWF and sanding then primer/filler and sanding. The weight of the bare wood parts before any filling was 0.93 oz. The final weight of the filled three main wood pieces after sanded CWF and sanded primer/filler was 1.16 oz.
The total filler weight was 0.23 oz.

Notice how most all the primer/filler is sanded off. For me it's not so much for priming the surface, I use it more for filling any remaining wood grain. After a single coat of CWF and sanding there is usually some remaining grain lines left.

Monday, February 6, 2017

Estes Sprint XL #7224 Build, Part 5, Fin Shaping

In the original Sprint kit you had a choice to either airfoil the fins or round the edges.
These new instructions say to round just the leading edges. That didn't make much sense given the shape of the fins. I decided to round it all - the leading edge, outside tip and trailing edges.

The edges are knocked off with a sanding block with 220 grit. (See inset)


The real rounding is done with a small piece of 220 grit and fingertips. The final round is shown in the inset picture.


The fins were filled with CWF and sanded smooth. One fairly thick coat of Duplicolor Filler/Primer followed. The filler/primer fills any remaining wood grain.

I read on the forums where some builders do many applications of filler, then three or four coats of primer sanding between coats.
That's an awful lot of work!
For me, brush on one coat of CWF and sand, then one (somewhat heavy) coat of Duplicolor spray primer/filler and sand.
Many use the cheaper Rusto Filler/primer. I tried it and it was very rubbery, too hard to sand. Try the Duplicolor Primer/Filler once and you won't use anything else.
White undercoats follow that, usually with a bit of smooth sanding to remove any rough spots.

Wednesday, January 25, 2017

Estes Galactic Taxi #1914 Build Part 7, Primer and Sanding

The balsa pieces were filled with CWF and sanded smooth.
Here they were taped to cardboard for a shot of primer/filler.

Shoot one side and let dry.
You can flip them over and stick them down to the same piece of tape to spray the other side.


Here's the body tube and nose cone after the primer/filler was sanded to surface. You can see where the primer/filler is left in the seams and small recesses left after the CWF filler.


The fin positions are marked.
The primer filler will be scraped off where any gluing will be done.

Tuesday, December 27, 2016

Getting Around To Painting?


Eric Specht posted this picture on the NAR Facebook page.
Eric commented: "I need to get around to some painting it seems."

I counted 38 rockets on that table. Currently I have four models in the process of painting.
Thanks Eric, I'll sleep better tonight.

Thursday, December 8, 2016

Estes Long Tom #3016 Build, Part 9, Sustainer Paint Mask


On the forums, some builders do three or fours coats of primer / filler, sanding between coats. I don't think that's necessary and adds quite a bit of weight to the rocket.

After filling the wood grain with one application of CWF and sanding, I only need one wet coat of Duplicolor Primer /Filler. The picture shows how it looks after sanding. Most all the primer is sanded off. Any grain pores that remained are now leveled off with the primer.


Here's how the instructions lay out the masking.
Most all the rocket is gloss white. The low end of the sustainer and booster fins are black.

I used a 3/8" wide Scotch tape strip for the horizontal white band.
The end is slightly tapered so the squared end won't mask a small corner tick at the end of the wrap.
Note that the launch lug is below the mask. The lug was glued on lower than the instructions showed so it wouldn't have to be in the mask area.

3/8" to the right will be another tape wrap. The rest of the upper body is masked off.

Saturday, July 23, 2016

Estes Red Max Build, Part 6, Launch Lugs and Primer


The launch lugs are short, shorter than I remember.
After they were lightly tacked down and the glue dried, a rod was used to make sure they were in line.

TIP: When gluing lugs and fins try using very little glue initially.
It doesn't take much glue to tack them on. If they dry and end up out of line, it's easier to remove the parts and try again.

The fins and body tube will be shot separately with primer/filler.
A strip of masking tape the length of the root edge was set down the fin position pencil lines.


After the primer/filler dried you can see some raised pore lines.
The was also some open pores. The open grain got a rub of CWF and smooth sanding.


The primer/filler helps to fill whats left of the nose cone molding seam. You won't see this until the primer/filler is sanded down.

Monday, June 20, 2016

Estes Interceptor Build #1250, Part 7, Primer and Fixes


After the Primer/Filler was shot, some balsa grain remained. Enlarge the picture to see the open pores.
CWF was rubbed into the grain and sanded smooth. Another primer coat followed with more sanding.

I mentioned earlier that the glasseine layer overlapped where the seam gap would normally be. I thought maybe this would be taken down when the primer was sanded but a raised ridge remained.

I had to go in with a knife and cut out the overlap.


The left picture shows the (overlapped) glasseine cut off. Now it looks like a normal tube with a spiral seam.

More CWF was set in the seam and sanded down. Another coat of primer/filler and sanding!

Thursday, April 14, 2016

Estes Hi-Flier XL, #3226 Build, Part 13, Fin Primer Fill and Sand


The fins were stuck to a cardboard scrap for primer/filler spraying.
There are six fins here, I'm building two Hi Flier XL kits.

Spray one side, let dry.
Flip the fins over and spray the other side. Don't miss spraying the leading, outside and trailing edges.

Enlarge the picture and you can see the grain pores left after the CWF fill and sand. The primer/filler will fill the remaining grain after it is sanded.
Wet sanding could be a little iffy. I tend to remove most all of the gray primer/filler and the CWF filler underneath is still water soluble.


The bulk of the primer/filler is removed using some old Norton Premium 220 grit sandpaper. Newer 220 might make some deep scratches.
After 220 grit, 400 git follows removing most of the remaining filler/primer.


TIP: Here's that older piece of the Norton Premium 220 grit. On the left the sandpaper is loaded with grey primer/filler dust.
Here's more about the Norton Premium Sandpaper: CLICK HERE

Run the sandpaper under water and scrub out the dust with a soft brass wire brush.
On the right is the same piece of sandpaper, ready to go again.

After one side of one fin is sanded the paper is pretty well loaded up. Use the brush to clean it off and sand off the other side of the fin.
That one small piece of 220 grit was used on both sides of all six fins.

Saturday, March 12, 2016

Centuri Astro 1, Build, Part 6, Fin Primer and Decals


The fins were set down on some sticky side up masking tape.
The root edges are butted up against each other to keep the primer off an area that'll be glued.
That's two sets of fins, I'm building two Astro I kits.
I wasted a full sheet of decal paper.
You can do all the measuring and planning you want, but a wrap around decal never seems to match up on the first try.
It is easy to go back into the drawing and shorten up the width of the wrap.

On the left is the orange and black roll pattern from the 1969 catalog.
On the right is the black pattern from the 1972 catalog.

The black stripes were meant for the fin root edges. The orange stripes run down the body between the fins on the 1969 catalog model.

Here's a comparison picture, taken a little farther on in the build.

This shows the size comparison between the Centuri Astro I and the Estes Alpha.
The Astro I is a much taller, more elegant model. The ST-10 tubing is around the same diameter as a BT-50 but the tubes walls are thicker. The longer body tube on the Astro I makes for a more stable model and some extra room for parachute and wadding.
As a first time build, I'd prefer the Centuri design over the Estes Alpha.

Thursday, January 14, 2016

New Way A-20 Demon Build Part 9, Primer Sand and Fin Gluing


Here's the before and after sanding down the filler/primer.


The flat sides were sanded smooth first. I tried to avoid the corners, it'd be easy to sand them down and raise a fuzzy edge.

The inset picture shows me lightly sanding the corner edges.


The fins were sprayed with primer/filler before gluing onto the body tube.
After sanding the fin surfaces smooth, the primer was completely removed near the root edge for better adhesion.


Here's the fin slots after the masking strips were removed. Mentioned earlier, the tape strip was a little wider than the slots so the fillets will adhere better.
The paint ridges left from the tape were sanded smooth.


The first fin was glued on.
One good thing about a square tube, it won't roll off the table.

Wednesday, January 13, 2016

New Way A-20 Demon Build Part 8, Fin Gluing and Primer Mask


The fins were filled with CWF and sanded.
Here I turning the fin sides away from a bright light to see if there is any remaining CWF brush marks or grain that needs sanding.
Enlarge the picture and you can see the brush marks that have to be taken down. Any slight remaining balsa grain recesses will be filled with upcoming primer/filler coats.


Primer / Filler will be sprayed and sanded on the body tube before the fins are glued on.
The fins were dry fitted and traced around the leading and training edges with pencil. This will be a border outline for the masking tape strips.


Thin strips of masking tape are applied down the root edge gluing areas. The tape strips are a bit wider than the slots so the glue fillets will adhere after the primer/filler is sanded down.


A painting dowel with casings was fitted into the engine mount.
Paper towels strips were pressed into the open area behind the rear centering ring. This will keep paint out of the engine mount.

Friday, August 14, 2015

Estes Lynx, Kit #7233, Build Part 7, Seam Fill, Primer and Kevlar

The body tube seams were filled with thinned CWF.
Even the exposed seam on the rear of the engine mount got filled.

Fill the BT-5 intake tube seams before cutting.

Everything got a shot of Filler / Primer and light sanding with 400 grit.
The small vane pieces were stuck back on the tape after sanding. These would be easy to lose.


The engine mount got a length of Kevlar tied and glued beneath the upper centering ring.
The outside of the upper centering ring was notched for the Kevlar. This prevents the main air frame body tube from bulging out.