Showing posts with label A Mini Condor B/G. Show all posts
Showing posts with label A Mini Condor B/G. Show all posts
Monday, July 2, 2018
Apogee Mini Condor Boost Glider Build, Part 9, Pop Pod Paint & Finished
The blue nose cone needed a coat of gloss white before the fluorescent paint could be applied. I didn't paint the body tube, it was already white.
Maybe I should have painted the pop pod body tube an overall white. Fluorescent paints are almost transparent and any discoloration on the tube will show through.
Some of the rough, flat paint was polished so the decal would adhere better.
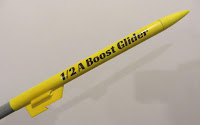
The 1/2 A Boost Glider decal was applied over fluorescent yellow.
Here's the bottom of the boost glider. The black felt tip marking trim was widened so it could be better tracked from the ground.
This is an interesting boost glider design. The wing attachment piece sets the dihedral automatically. The pop pod hook is one piece cast plastic.
I was a little concerned about the 1/32" thick tail surfaces. Once they are glued on they did feel much stronger.
To trim the glider, the wing is slid up or back down the fuselage stick. After you get a good glide, mark the wing position then glue on the wing.
I asked Tim at Apogee if the Mini Condor could win a boost glide competition. He said: Oh, yes!" Wish me luck!
Saturday, June 30, 2018
Apogee Mini Condor Boost Glider Build, Part 8, Pop Pod Details
Here's a picture from the Apogee website.
That pop-pod tube seems very long!
The front end of the launch lug got trimmed at a 45 degree angle for less drag.
I cut about 2" off the pod tube. I would think it'll still be stable a little shorter. I'll be using this in 1/2A BG competition, a full A engine is heavier.

The blue plastic nose cone has a slight burr at the lip. 400 grit was used to sand it down.
The outside diameter of the nose cone now matches the body tube diameter.
The shoulder is loose though.
It took two wraps of masking tape to bring it up to a good fit.
The overhanging tape edge was slit with my Army knife scissors. Those pieces were wrapped over the rounded shoulder.
Friday, June 29, 2018
Apogee Mini Condor Boost Glider Build, Part 7, Wing Gluing
A bead of medium CA is run down the flat glue surface of the dihedral support. The root edge of the wing is pressed into the glue.
With the angle I cut into the wing front, the corners of the dihedral support piece stick out the front. This was sanded even with the wing.
Here's the finished glider. The wing assembly is slid onto the boom.

And, the more interesting bottom surfaces.
Tuesday, June 26, 2018
Apogee Mini Condor Boost Glider Build, Part 6, Tail Gluing, Wing Airfoil
I did round the edges of the tail surfaces. Go light with the sandpaper, there isn't much balsa thickness.
The horizontal tail glued over a tab on the back of the boom. The fit was tight and once set in place was perfectly aligned.
The rudder is glued on one side of the boom with the back edges even.
The instructions say you can airfoil the wing for a better glide. I used my sanding block with 220 grit for initial shaping. After that, 400 grit was used to smooth the surface.
The inset picture shows the airfoil profile from the outside edge.
 Here's how the dihedral support piece sits on the fuselage. The pre-set angle is molded into the bottom slot.
The forward end is to the right of the picture. The dihedral support piece is not glued in place yet, it is adjusted forward and back when doing test glides.
Monday, June 25, 2018
Apogee Mini Condor Boost Glider Build, Part 5, Marking The Tail Pieces
The horizontal tail piece was also marked on the bottom.
Here I'm tracing the middle line of the forward red area. The upper line was already traced and the template cut down for this second line.
This is the small rudder, it was inked on both sides.
The instructions say to apply some CA glue to the outside of the rudder to protect it when it skids on landing.
The tail surfaces are thin at 1/32" thick. I ran a wipe of CA glue all the way around the edges of the tail pieces but not near the wood glue areas.
Here's all the marked bottom surfaces.
After the model was assembled I realized the colored areas were probably not large enough to be easily seen. More on that later.
Sunday, June 24, 2018
Apogee Mini Condor Boost Glider Build, Part 4, Marking The Underside
The wings and tail pieces are pretty plain. The wings are chunky rectangles, the tail pieces are also squared off. I decided to round things off hoping for a lighter model with less drag.
The pieces are shown here trimmed. Underneath the balsa is a tracing showing how much wood was removed.
The span of the pieces is still the same, things have just been tapered and rounded off.

I wanted to color the bottom surfaces so the flight duration tracker can see it easily in the sky. Some builders use markers to darken the wing bottoms without adding any real weight to the glider.
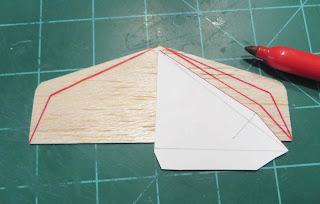
I did a card stock drawing of a color template. Colors will be red and black for a good contrast against the sky.
While holding the template steady a sharp marker was traced around the sides.
I went back and filled in the outlines. A ruler was used and many straight lines drawn to fill it in. I wanted the color as even as I could get it using markers.

Here's how it turned out with the wing halves butted together. The root edges are not glued together.
Saturday, June 23, 2018
Apogee Mini Condor Boost Glider Build, Part 3, Pylon Fit
The 1/16" overhang of the white plastic pylon overhang was sanded even with the front angle of the hook plates. That left a flat front and high drag.
The hook plates and fuselage front were rounded. The front of the pylon was also re-rounded.
The resin pylon is almost 3/16" thick. The instructions don't mention doing this, but I sanded a curve into the bottom to better fit and better adhesion to the small diameter BT-5 tube.
The pylon is glued on with medium CA glue. CA glue can get brittle over time and I wanted the best bond I could get.
The bottom of the pylon got a swipe of a Sharpie. 220 grit was wrapped around a 13mm T engine and the bottom curve sanded. The ink lets you see what is removed and visually helps you keep the line straight.
The pylon is glued on 3/8" from the rear of the body tube.
A bead of medium CA was applied to the round recess. Set the back of the pylon at the 3/8" mark and rock it forward to seat it on the tube.
Friday, June 22, 2018
Apogee Mini Condor Boost Glider Build, Part 2, Fuselage Front Hook
This is a dry fit showing how the hook pieces are glued to the side of the fuselage boom front. The plastic pylon piece was slipped onto the fuselage to check the position before gluing.
With the hook plates even with the front of the fuselage, the pylon piece overhangs the front by less than 1/16".
The hook pieces were glued onto the sides of the fuselage using the pylon piece to help with alignment. Two clothes pins were used as a clamp as the glue dried. Son't let any glue get into the pylon joint.
On the right the pylon was slid back after the hook pieces were in the right place.
After the glue dried it only took some light sanding to even up all three layers. Don't sand too much off - just even it up.
Thursday, June 21, 2018
Apogee Mini Condor Boost Glider Build, Part 1, Parts
Here's another build for contest flying at the August NARAM. There aren't many competition boost glider kits available. This one fits the bill for a 13mm A engine model.
This Apogee produced kit is a downscale version of the Chinese Sky Condor boost glider. I have built and launched the larger Sky Condor with good success. The larger Sky Condor B/G kit has tung wood parts instead of the traditional balsa we know.
This picture from the Apogee website.
All the parts:
The instructions are very well drawn and the steps well explained.
The BT-5 pop pod tube seems long.
An engine block is included but not really needed for a competition model

Parts of interest:
The boom (glider body) is laser cut from spruce.
The white parts are cast at Apogee from urethane resin. They are well molded with no bubbles.
3 feet of 100 lb. braided Kevlar shock cord.
2" X 18" Mylar streamer
1/32" thick (actually thin) balsa horizontal and vertical tail pieces
This Apogee produced kit is a downscale version of the Chinese Sky Condor boost glider. I have built and launched the larger Sky Condor with good success. The larger Sky Condor B/G kit has tung wood parts instead of the traditional balsa we know.
This picture from the Apogee website.
All the parts:
The instructions are very well drawn and the steps well explained.
The BT-5 pop pod tube seems long.
An engine block is included but not really needed for a competition model

Parts of interest:
The boom (glider body) is laser cut from spruce.
The white parts are cast at Apogee from urethane resin. They are well molded with no bubbles.
3 feet of 100 lb. braided Kevlar shock cord.
2" X 18" Mylar streamer
1/32" thick (actually thin) balsa horizontal and vertical tail pieces
Subscribe to:
Posts (Atom)


