Friday, September 30, 2016

Semroc (Estes) Starship Excalibur Build, Part 4, Shuttle Bay

The Shuttle Bay is a rounded balsa housing that holds and conceals the forward launch lug.

In the old Estes plan you shaped the shuttle bay out of a single piece of wood. You then reamed out the center to fit the launch lug.

The Semroc instructions have you make the housing from three strips of wood then glue the lug in the middle.
I did a dry fit. If I glued the housing together first, the lug wouldn't fit in the recess.


Glue the lug in the center of the larger end piece.
Let dry then glue on the sides. You can see the side pieces overhang the outside edges with the lug in place.


I rough rounded the outside with my sanding block.
It was still a little square. The final rounding was done with a scrap of 400 grit.

Saturn V Blog Posts - Book Form!

Estes has re-released the Saturn V kit - CLICK HERE
This new version has injection molded two-piece plastic fins, a big improvement over the two-sided vacuform fins. There are probably other updates in the kit but many of my build posts still apply.

Here's my original blog post from a few months back:  
I received an email from Andy Stobie. He was getting back into rocketry and was interested in buying an Estes Saturn V on Ebay.
I told him to wait, as Estes is coming out with a new version of the 1/100th scale Saturn V kit in late June.
EDIT: After delays it was just released in September, 2016.

Andy had found my Saturn V build posts. The problem has always been that the posts are retained in the dated order, from finish to start. The Saturn V build was LONG, leading to a lot of backtracking to get to the first post.

Andy took the time to put the entire build into a WordPad format, from start to finish!

The blog goes into detail on many steps. There are lots of tips and kit enhancements along with a timeline showing how long each step took.

If you request this "book form" build, please be a serious builder. It takes a few minutes to send the files via DropBox. As explained earlier, this build document goes from start to finish. The original blog posts go from finished build to the beginning requiring some backtracking.

This document is available to Patreon members, email me at oddlrockets@bellsouth.net
and request the Saturn V blog build in DropBox formats.

Many thanks go out to Andy for taking the time to put the build in an easier format!

Thursday, September 29, 2016

Semroc (Estes) Starship Excalibur Build, Part 3, Engine Mount Assembly


I dry fit the centering rings to find the center point. This is where I place the tape wrap.

The rings were a little loose and would move when smoothing out the glue fillets.
You can lightly tack them in place with thin CA. After you are sure of their positions and straightness follow up with glue fillets.

The aft ring is 1/2" away from the end of the engine mount tube. This is important for the shroud location later on.


The Kevlar end loop goes under the top bend of the engine hook.

The kit didn't include an engine block.
I added a 5/20 centering ring.

Open Rocket User Manual


For those needing help getting started with Open Rocket, A User's Manual is available at the following address: CLICK HERE


From the Website:

Contents
1. Introduction
2. Downloading & Installing
3. Getting Started
4. Basic Flight Simulation
5. Basic Rocket Design
6. Advanced Rocket Design
7. Advanced Flight Simulation
8. Rocket Analysis
9. Simulation Listeners
10. Other Stuff

Appendices:
A. Component Details

Wednesday, September 28, 2016

Semroc (Estes) Starship Excalibur Build, Part 2, Engine Mount Tube Prep TIP


Here's how the engine mount tube comes in the Semroc kit.
You can see it's a wedge "stab" cut made with the tip of a #11 blade.

You could punch the engine hook in but you'd probably teat the left side of the narrow punched slot.

Turn your #11 blade so the dull top is facing out, to the left.
Press the square dull top of the blade against the left side widening and squaring the end of the cut.

The inset picture shows what you are going for.


A little preview of things to come - 
I wasn't able to use the laser cut balsa pieces provided in the kit! The picture shows what was thrown away.
The kit wood was very light and spongy. This model will take some time to assemble. I don't want to break a fin on a hard landing.
I went to Michael's crafts with my 40% off coupon and picked out some better grade wood.
I'll have to go old school and cut everything out by hand - Horrors!

D.I.Y. Launch Controller Housing?

After a few years in the hobby, this is the controller I wish I could have had. Even as a "Lone Wolf" flyer I wanted the best.
The Centuri Professional Firing Panel, $14.95 in 1972.
It had a safety key you inserted and turned to make contact. The housing was aluminum.

Most of the project boxes available today are plastic. At one time Radio Shack carried an aluminum box, but most of those stores seem to sell cell phones now.

Last year I bought some Alto Sax reeds and guitar capos from Banggood.com.
Both were very cheap, sent from China. Quality was just okay, the guitar capos were knock-offs of American designs, not the same quality as those made in the USA.

Banggood sends me occasional emails and these caught my eye.

These Aluminum Project Boxes could work well as D.I.Y. launch controller boxes.
Aluminum isn't hard to drill through and is certainly much stronger than the thin plastic boxes. These "Stomp Box" cases are meant to sit on the stage floor and hold stronger switches that are hit with your foot.

The middle sized "B" size box measures 4.4" L x 2.5"W x 1.3" H.
Price is $8.99 with free shipping.
To see the listing, CLICK HERE

Tuesday, September 27, 2016

Semroc (Estes) CONSTELLATION Ebay Auction

A finished Semroc
CONSTELLATION 
is up for bids on Ebay

To go to the auction, CLICK HERE

This is a Semroc clone of the Classic Estes K-35 kit.
It's a very clean build.

The fin tip teardrop pods were shaped from a dowel,   smoother and stronger than making them from balsa.
Clean masks and correct period decals.
The "1" decal has a hand cut white border outline added. This border was in the original Estes kit, not included in the Semroc kit.
Stop by, make a bid and support the blog!

Semroc (Estes) Starship Excalibur Build, Background

I wanted to build this one since seeing the Estes plan in the early 1970s.


The Starship Excalibur was a very elaborate design for the late 1960s. The only other sci-fi spaceship model to compare it to would have been the Mars Snooper.
The Starship Excalibur has just about as many nose cones are the Mars Snooper. The wing pods are about the same as on the Snooper.
This may have been the first design to use split body tubes and nose cones. There are some built up parts including the crew module and shuttle bay.

For the original Starship Excalibur plans: CLICK HERE

From the Semroc instructions:
"The original Starship Excalibur was released by Estes Industries in 1968 as free plan #55. Unlike many of the other free plans at the time, it was not published in the Model Rocket News. It became a popular model as many rocketeers ordered parts to build their own version. Estes released a kit by the same name and similar lines in 1984, but it was a simplified version of the original and only had a two-year run in production."

Here's the simpler Estes kit design from the 1984 catalog:


And the Estes kit instructions: CLICK HERE                  The build starts tomorrow!

Monday, September 26, 2016

Estes Gemini Titan #1978 Build, Part 11, Decal Wrap & Finished


A spray paint decal was made to wrap around the capsule base.
This was sealed with a coat of Future.

This was an interesting build.
Anybody that built the original big Estes Gemini Titan (OOP two engine cluster model) might be disappointed by this smaller, BT-60 based model.

The kit decals would be very hard to lay down over the tunnels on the body tube. There is no allowance or cutouts to form around the tunnel ends.

The nozzles are meant for display and like the clear fin unit, lock into the end with a twist.
Could Estes bring this one back? Maybe - If they fix the decal problems.

Sunday, September 25, 2016

Estes Gemini Titan #1978 Build, Part 10, Wrap Around Roll Pattern Decals Part B


The bulk of the black fill was done with a larger permanent marker. I blackened the area wider than the tunnel so even if the cut open decal was too large I would still have black coverage.


Here's how the decal band was cut to fit over the tunnel.
First it was marked and triple checked before a hole made with a rotary punch. The sides were cut with a knife straight down from the circle.


The UNITED STATES and 12558 decals were home printed.
The kit supplied vertical UNITED STATES decals were too tall to fit the paint masked areas as shown in the instructions. My home print decals fit the area and better matched the decal placement shown in Alway's Rockets Of The World.

I see now why this kit did not last long in the Estes lineup. The mistakes in the masking  instructions and (even when new) unusable decals probably made some unhappy customers.

Estes Saturn V Fins Update


From the Estes website, added to the Saturn V kit description:

"One new feature worth mentioning are the fins. This version now has two-piece injection molded plastic fins for added durability during flight!"

I think they might mean - "Added durability upon landing!"
That's when the old style vacu-form fins would crack open.

Saturday, September 24, 2016

Estes Gemini Titan #1978 Build, Part 9, Wrap Around Roll Pattern Decals, Part A

I had real trouble with the decals, they were over 30 years old! Even after a coat of Micro-Sol, the decals would not release from the backing paper no matter how long they soaked.
I had to make up my own roll patterns by spraying black paint onto blank, clear decal paper and cutting the bands to size.


The kit decals and placement instructions are vague. The decals supplied in the kit made no allowance for the tunnels running down the body tube.

I started with my vertical cut sprayed decal. The piece that went over the tunnel was cut a little wider to allow for the extra width going over the tunnel.
A wet paint brush pressed the decal into the inside corners of the tunnel.


The only decal that cooperated and released from the backing paper was the cut outs roll. Thank goodness for that, this would be a hard one to draw up to the right diameter. it was placed next.

Mentioned earlier, the kit decals are meant to go over the tunnels. No kit decal could fit over something like this without cutting.
I decided to "paint" the black at the top of the upper tunnel.

First the tunnel was outlined with a fine point Sharpie. Continued next post . . .

Past Apogee Peak Of Flight Articles


Sometime I don't go into a lot of detail when I repeat a building technique on the blog. That information has been printed before, sometimes in the Apogee Peak Of Flight newsletter.
The recent "TIPS 1 & 2" were my eleventh and twelfth articles published in the P.O.F.

Here's some links to past articles.
They are listed in what I think would be the order of importance.


REPLACEABLE KEVLAR LINES IN LARGER DIAMETER MODELS
https://www.apogeerockets.com/education/downloads/Newsletter338.pdf

REPLACEABLE KEVLAR LINES IN MINIMUM DIAMETER MODELS
https://www.apogeerockets.com/education/downloads/Newsletter343.pdf

SHAPING NIKE STYLE FIN TAPERS
https://www.apogeerockets.com/education/downloads/Newsletter357.pdf

MAKING A SUPER SHROUD
https://www.apogeerockets.com/education/downloads/Newsletter349.pdf

ACHIEVING A EVEN, GLOSSY PAINT FINISH WITH SPRAY PAINT
https://www.apogeerockets.com/education/downloads/Newsletter421.pdf

MAKE AN 18mm ENGINE RETAINER FROM A WATER BOTTLE
https://www.apogeerockets.com/education/downloads/Newsletter317.pdf

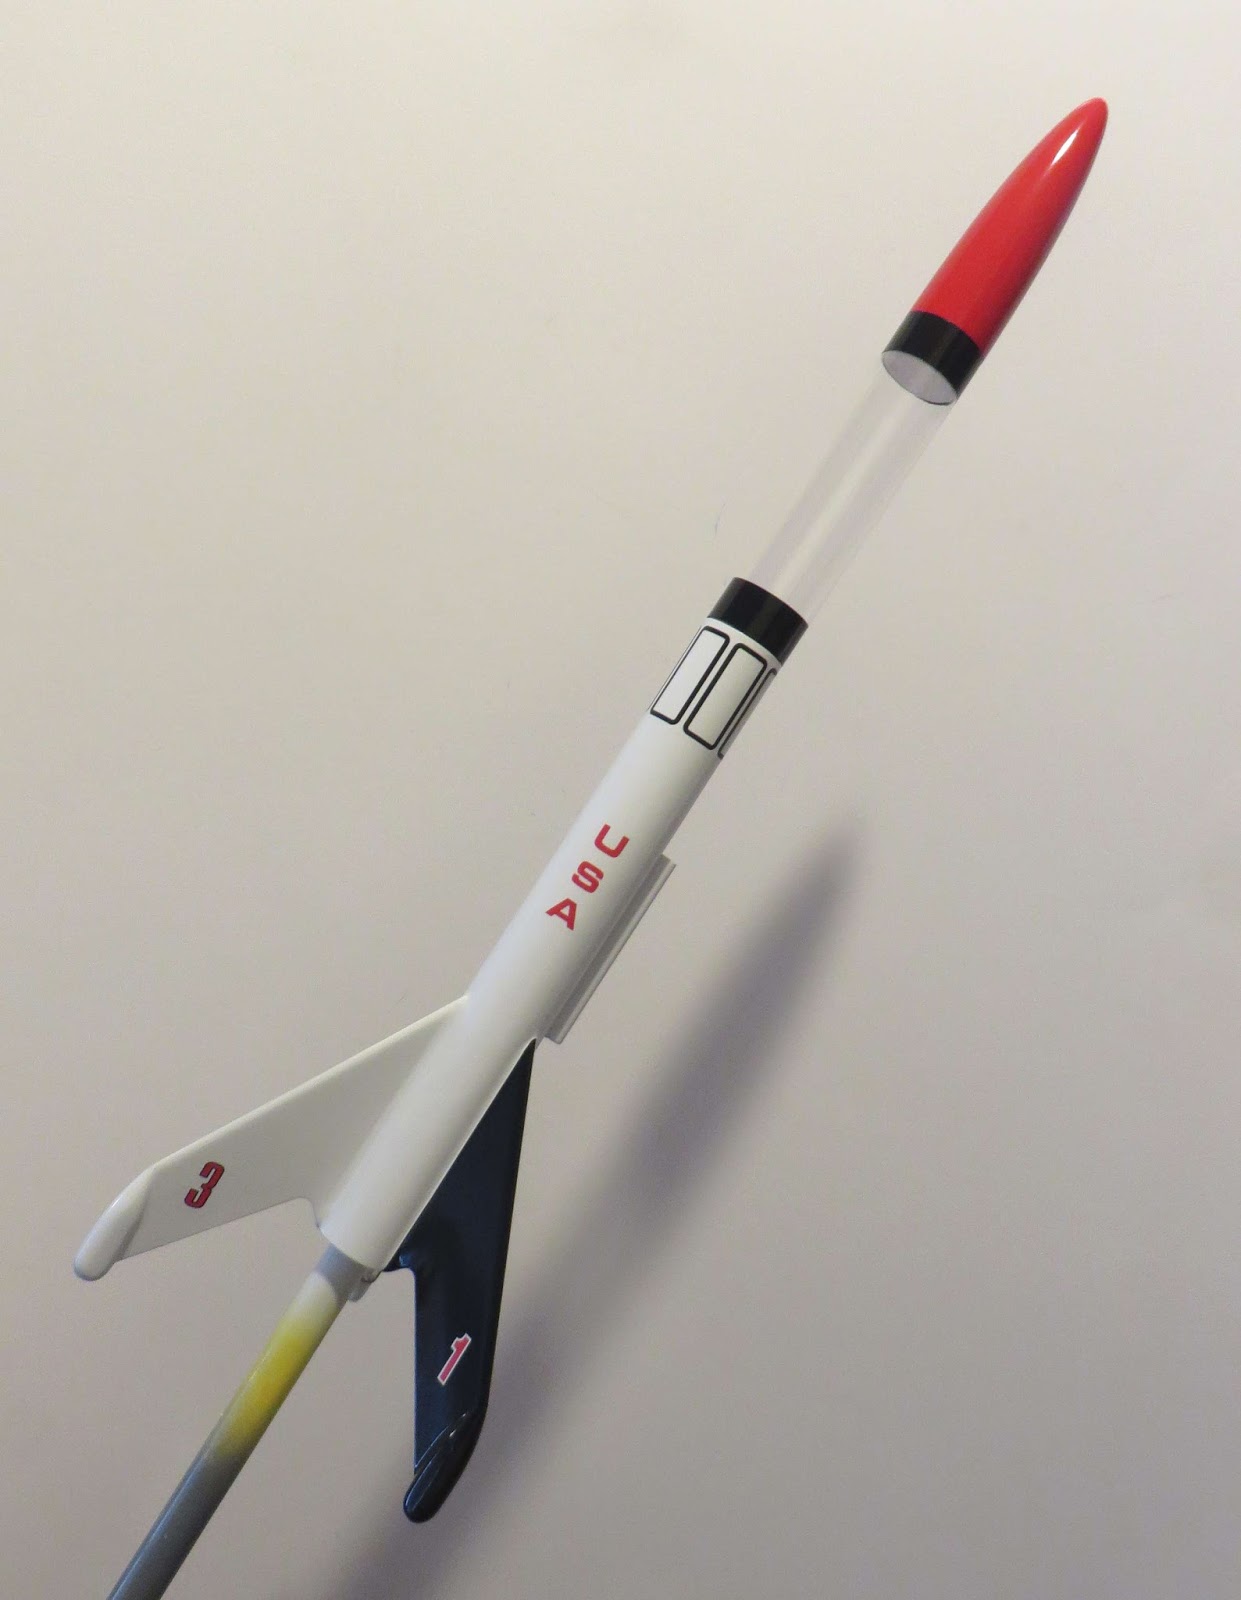
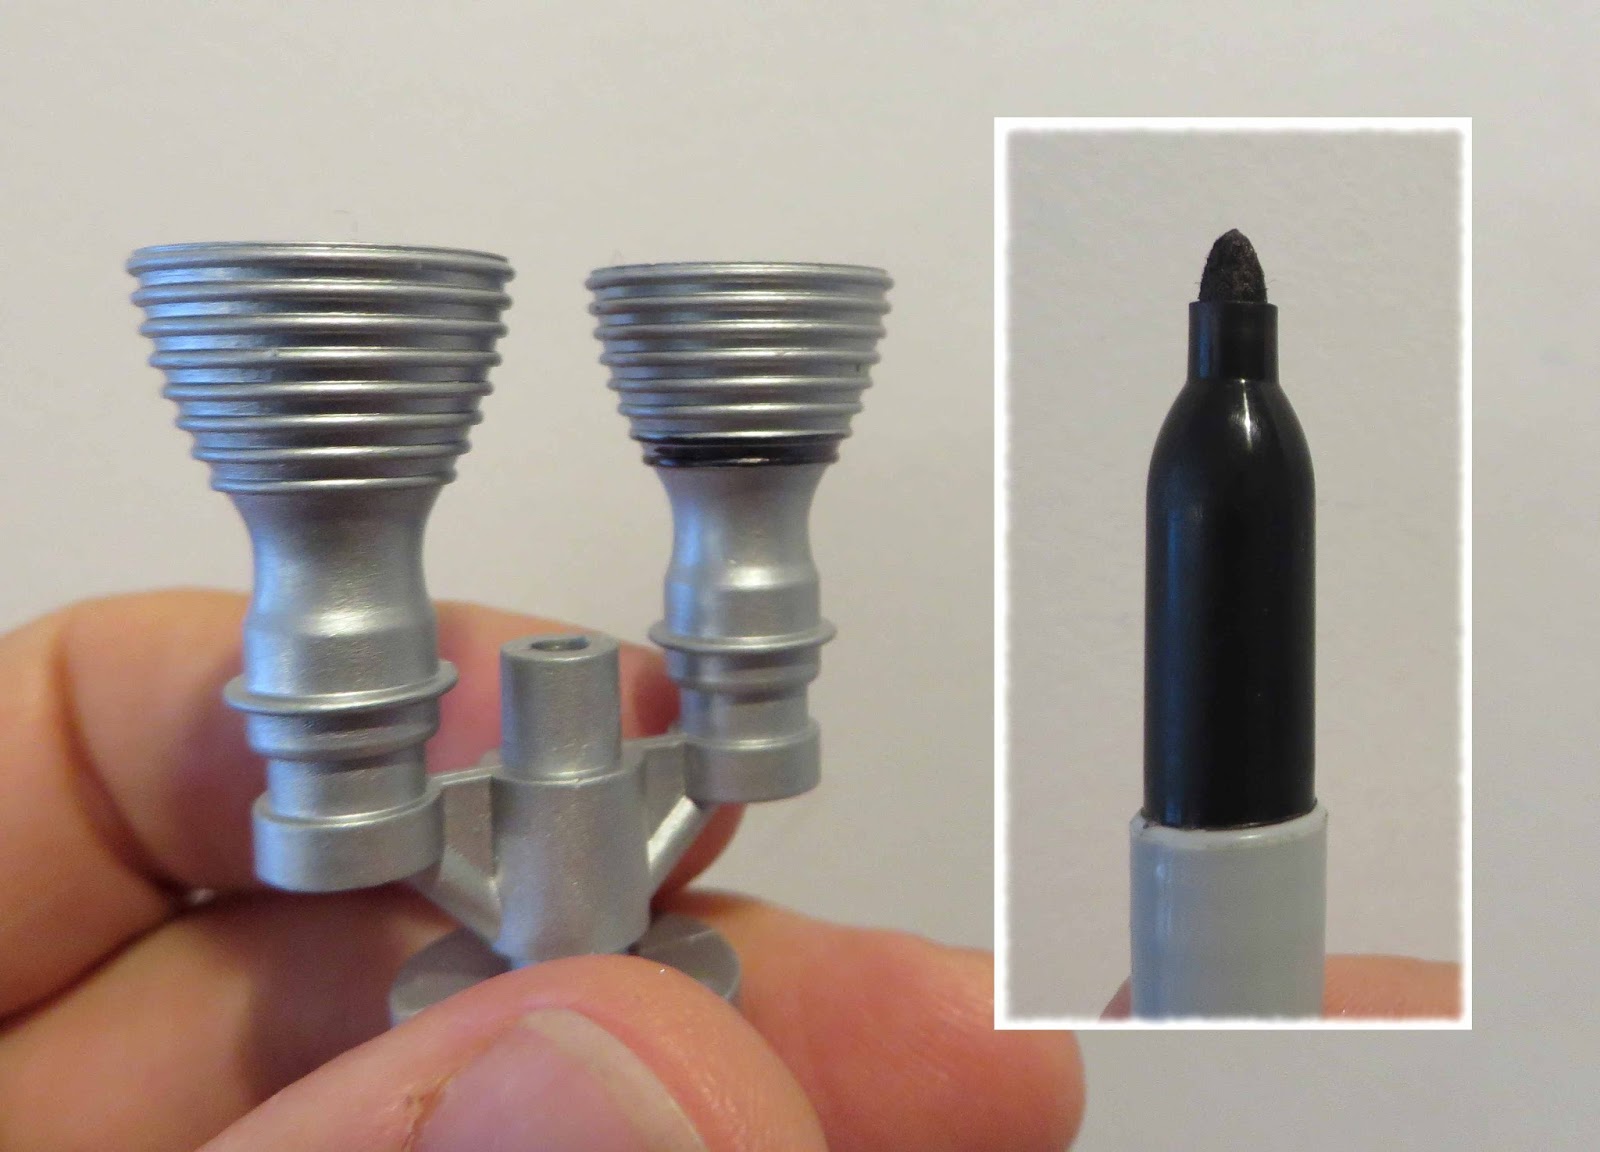
MASKING AND PAINTING A NOSE CONE TIP
https://www.apogeerockets.com/education/downloads/Newsletter306.pdf

ADVANCED FINISHING TIPS - Lexx Jet
https://www.apogeerockets.com/education/downloads/Newsletter281.pdf

BUILDING A ROCKET WITH JUST A TEXTBOOK
https://www.apogeerockets.com/education/downloads/Newsletter391.pdf

BUILDING THE SKY CONDOR BOOST GLIDER
https://www.apogeerockets.com/education/downloads/Newsletter269.pdf

Friday, September 23, 2016

Estes Gemini Titan #1978 Build, Part 8, Lower Capsule Tan Ring


On the shoulder end of the capsule is a tan band.


The closest color I had is Rusto 2X Gloss Almond.
This was sprayed on some white backed decal scrap.
This will be cut into a strip and transferred onto the model as a water slide decal - No Masking! 

Model Rocket News Idea Box - Shock Cord Attachment

From the Estes Model Rocket News, Vol. 3, #1, Feb/March, 1963.

Here's an early shock cord retention using an engine block. It's similar to using just a segment of body tube used in the Enerjet Mercury Little Joe I.
This tip came from 1963 when the the illustration showed a minimum diameter tube, a BT-20 or BT-30. I wouldn't try this in small tube models. Tube segment retention works best in BT-55 tubes and larger.

Thursday, September 22, 2016

Saturn V Kit Fins????

A posted question from James Duffy on TRF:
"Can anyone confirm that the rumored new injection-molded fins became a reality? The instruction sheet posted elsewhere in this thread appears to be from an earlier release, and makes no reference to the new parts."

James

______________________________________________________________

Answer from Estes:
James,
"Yes there are new injection molded fins in this release of the kit." 

John Boren

______________________________________________________________


And the response from rocket building 
nerds around the world . . .

Estes Gemini Titan #1978 Build, Part 7, Capsule Mask

Florida is VERY humid in the Summer. While the body tube dried in two days the white on the capsule stayed sticky for a week! I had to wait before doing any masking. The sticky back of the masking tape could go right into the paint if not fully dried.

There are raised details on the blow molded capsule that are right at the mask line.
I used a fine point Sharpie to define the black line. On the left you can see some practice passes I made on the upper part of the capsule. The pen tip easily stayed in the grooves.

On the right is the low end of the black. I blackened above the the line so the masking tape could overlap the black slightly without worry.

Small pieces of Scotch tape were set slightly above the line edge and all around the capsule.

Masking tape went below that and a grocery bag covered the shoulder.

On the right, the capsule after the mask was removed. Some very light scraping with a knife sharpened the mask line even more.

Where Have I Seen This Design Before?


I thought I had seen elements of the new Estes Expedition design before. Well, at least the cut tapered tubes at the rear.


This D.O.M. winner goes back to 1969.
To see the plans - CLICK HERE

I'm not saying the Estes was taking anything from the Omega.
But sometimes you can get great design ideas by looking at some old plans.


Wednesday, September 21, 2016

Ebay Interceptor Auction Ending


The auction for the Estes Interceptor finishes up 
Wednesday night (tonight) around 11:00 p.m. EST.
You can make a bid and support the blog - CLICK HERE

Estes Gemini Titan #1978 Build, Part 6, Nozzles 2


Well, how can you mask something like this?
There is no way to get masking tape around the nozzles being so close and the nozzle bands are in the way!


I took the easy way out and used a permanent Sharpie marker.

The marker tip fits into the groove between the nozzle bands.
The nozzle on the right shows the first blackened band.

Here's how the finished nozzles came out.

The inside of the nozzles were "brush" painted using a Q-tip dipped in the silver/aluminum paint.
After the interior was painted and dried I made one more pass over the nozzle lip with the Sharpie.

Tuesday, September 20, 2016

It's Back! The Estes Saturn V


Just up on the Estes Website - CLICK HERE
EDIT: At the moment it is showing as "In Stock".
Retail price is lower than the last batch at $79.99.

No news about parts changes. We can hope the fins aren't vacu-form anymore.
Recommended engines now include the D12-3, E12-4 and E30-4.

Will I build another? Maybe. I'm not looking forward to the masking.
I'll probably buy a couple to have on hand. You can never have too many Saturn Vs.

Estes Gemini Titan #1978 Build, Part 5, Nozzles 1

I used Plastruct Plastic Weld to join the nozzle halves together.
Take a moment to line up the two halves before applying glue to the inside of the nozzle bells.
On the left is a first fit, the inset shows a better match after moving the nozzle halves the slightest amount. Gluing the halves together with matched seams leaves you with less to clean up later.


With the seams lined up and flush, there was very little to clean up.
A piece of 400 grit was folded and run over the seams in the nozzle bands.

I'll probably paint the nozzles before gluing the nozzles to the adapter plate. It's easier to mask the nozzle bells without the plate in the way.

Estes Alien Invader #3003 Build, Follow Up


In a comment, Naoto Kimura mentioned the older instructions at the Jim'z website. CLICK HERE

I should have checked the original Alien Invader instructions and face card for the correct decal placement.
Normally when I have a assembly question on a reissued kit, I'll look up the older instructions. This time I didn't.

Shown on the old face card picture -
The three line wing decal is short of the right ring pod. It sets into the fillet and up the side of the body tube.

The smaller winged decal goes on the body tube to the right side of the upper wrap decal.


Here's what I had to work with with the reissued kit. The face card shows two different three stripe decals on the right side wing, the decal spans the wing width.
They don't show where the winged decals go. Oh well! The second build will have the correct decal placement.

Monday, September 19, 2016

Estes Gemini Titan #1978 Build, Part 4, Plastic Tunnels


The tunnels are glued on 1 1/4" from the launch lug line. This centers the tunnels between the two fins to the right of the launch lug.

The tunnels are a little warped. Light finger bending got them back to a straighter line.

The tunnels are already contoured to fit the body tube.


The tunnels didn't fit the tube well, there was small molding "nubs" on the underside.
Some quick sanding over 400 grit wrapped around an engine casing smoothed them off.

DR. Zooch Saturn V TIP


On the DR. Zooch Saturn V kit you use quite a few printed wraps. This makes most of the masking and painting much easier and more detailed.

At the bottom between the red USA decals, you do have to paint the black vertical bands. Not an easy task if you try to paint after the wraps are glued in place. You run the risk off tearing the printed wraps when the tape is removed.


Today on TRF, GlenP took a smart approach:
Rather than painting the black stripes on the bottom section between the two wraps, I printed a duplicate wrap and cut the black stripes from the upper wrap. I had to Sharpie the white bands, then just glued those partial wraps in place on the bottom. My printer did not exactly color match the original, but comes close. A real fun build.