Showing posts with label Fix. Show all posts

Thursday, February 27, 2025

The Big Fix!

I had broken a fin or two at the last launch.
To glue these back, I needed a small clamp that wouldn't dent the balsa.

Previously, I had adapted some small clamps from clothes pins. 
Notice the regular clothes pin on the left. The wooden halves have been flipped on the right.
For a better explanation: CLICK HERE


The glue line shows the unusual break.
Normally I'll clean off the glue before applying the clamps. I left the glue line for the picture.

Be sure the squeezed out glue is cleaned off where the clamps sit or you might glue the clamps to the fin!


After the glue dries and the clamps are removed - 
I hit any breaks with a Sharpie pen.

Ready for flight.

Tuesday, August 27, 2024

Estes #2157 Saturn V Tower Fix

I've run into delays while spray painting the Astrobee D. August rains and humidity have delayed the build. 
Here's another small project I've been working on.

A contract build of a Saturn V had broken tower. The tower was broken beyond repair. Luckily I have an extra #2157 capsule and tower kit.
This was a display build, not meant for flight. 
I wanted to figure out a way to prevent a future tower break if the model were to fall over again. 

I decided to do a friction fit of the legs into the holes at the top of the capsule. If the model fell over, the tower could flex and pop off in one piece. That's what I'm hoping for anyway - 

The problem - 
The tower legs have too loose a fit into the capsule holes.

I squeezed a small drop of Beacon Fabri-Tac glue into the holes and cleaned off the excess glue. Don't use much glue, you don't want it to melt the plastic. 

I used the thicker Fabri-Tac as it would fill the holes. Liquid (brushed on) cement would be too thin for this.

The glue completely covered the holes and if allowed to dry you couldn't push in the tower ends.

Open the holes slightly with a round toothpick. You want to leave some glue on the inside hole wall to make the inside diameter a bit smaller.

Let dry and test the fit. I did two applications with the glue and toothpick.


I got a good fit of the tower.

Many builders won't fly a delicate tower on their scale models. The older Centuri Mercury Redstone instruction say to insert the top spike (no glue) for display, remove it for flight.

Sunday, August 25, 2024

Enerjet by Aerotech, Astrobee D Build, Part 19, Fin Tip Lift Fix


Like the leading edge sticker lift,

The rolled over tip of the strip was starting to lift.
This would show as a swelling on the finished model.


A drop of medium CA was set on scrap cardboard.
I dipped the tip of an old X-Acto blade into the CA.

The glue was dragged down into the open gap.


The gap was pinched between my thumb and forefinger while covered with a paper towel.

Pull up as you squeeze the sides together so the paper towel absorbs any glue that is worked out.


Here's the formed tip with the sticker swelling glued down.

This had to be done on all four fins.


Thursday, August 22, 2024

Enerjet by Aerotech, Astrobee D Build, Part 18, Paint & A Fix

Finally get to add some color!
It's been difficult with the afternoon rain. I like to wait two days before masking and spraying over the first color. Just when I'm ready to spray around 2:30 p.m. (when the humidity is low) the rain starts.

The low end of the lower body tube gets a around the tube mask and black paint sprayed. I know it's gloss, but I'll follow up with a clear dull coat.
The high end of the upper tube gets a darker gray.
The picture on the left shows the mask, the right side picture is after the tape was lifted.

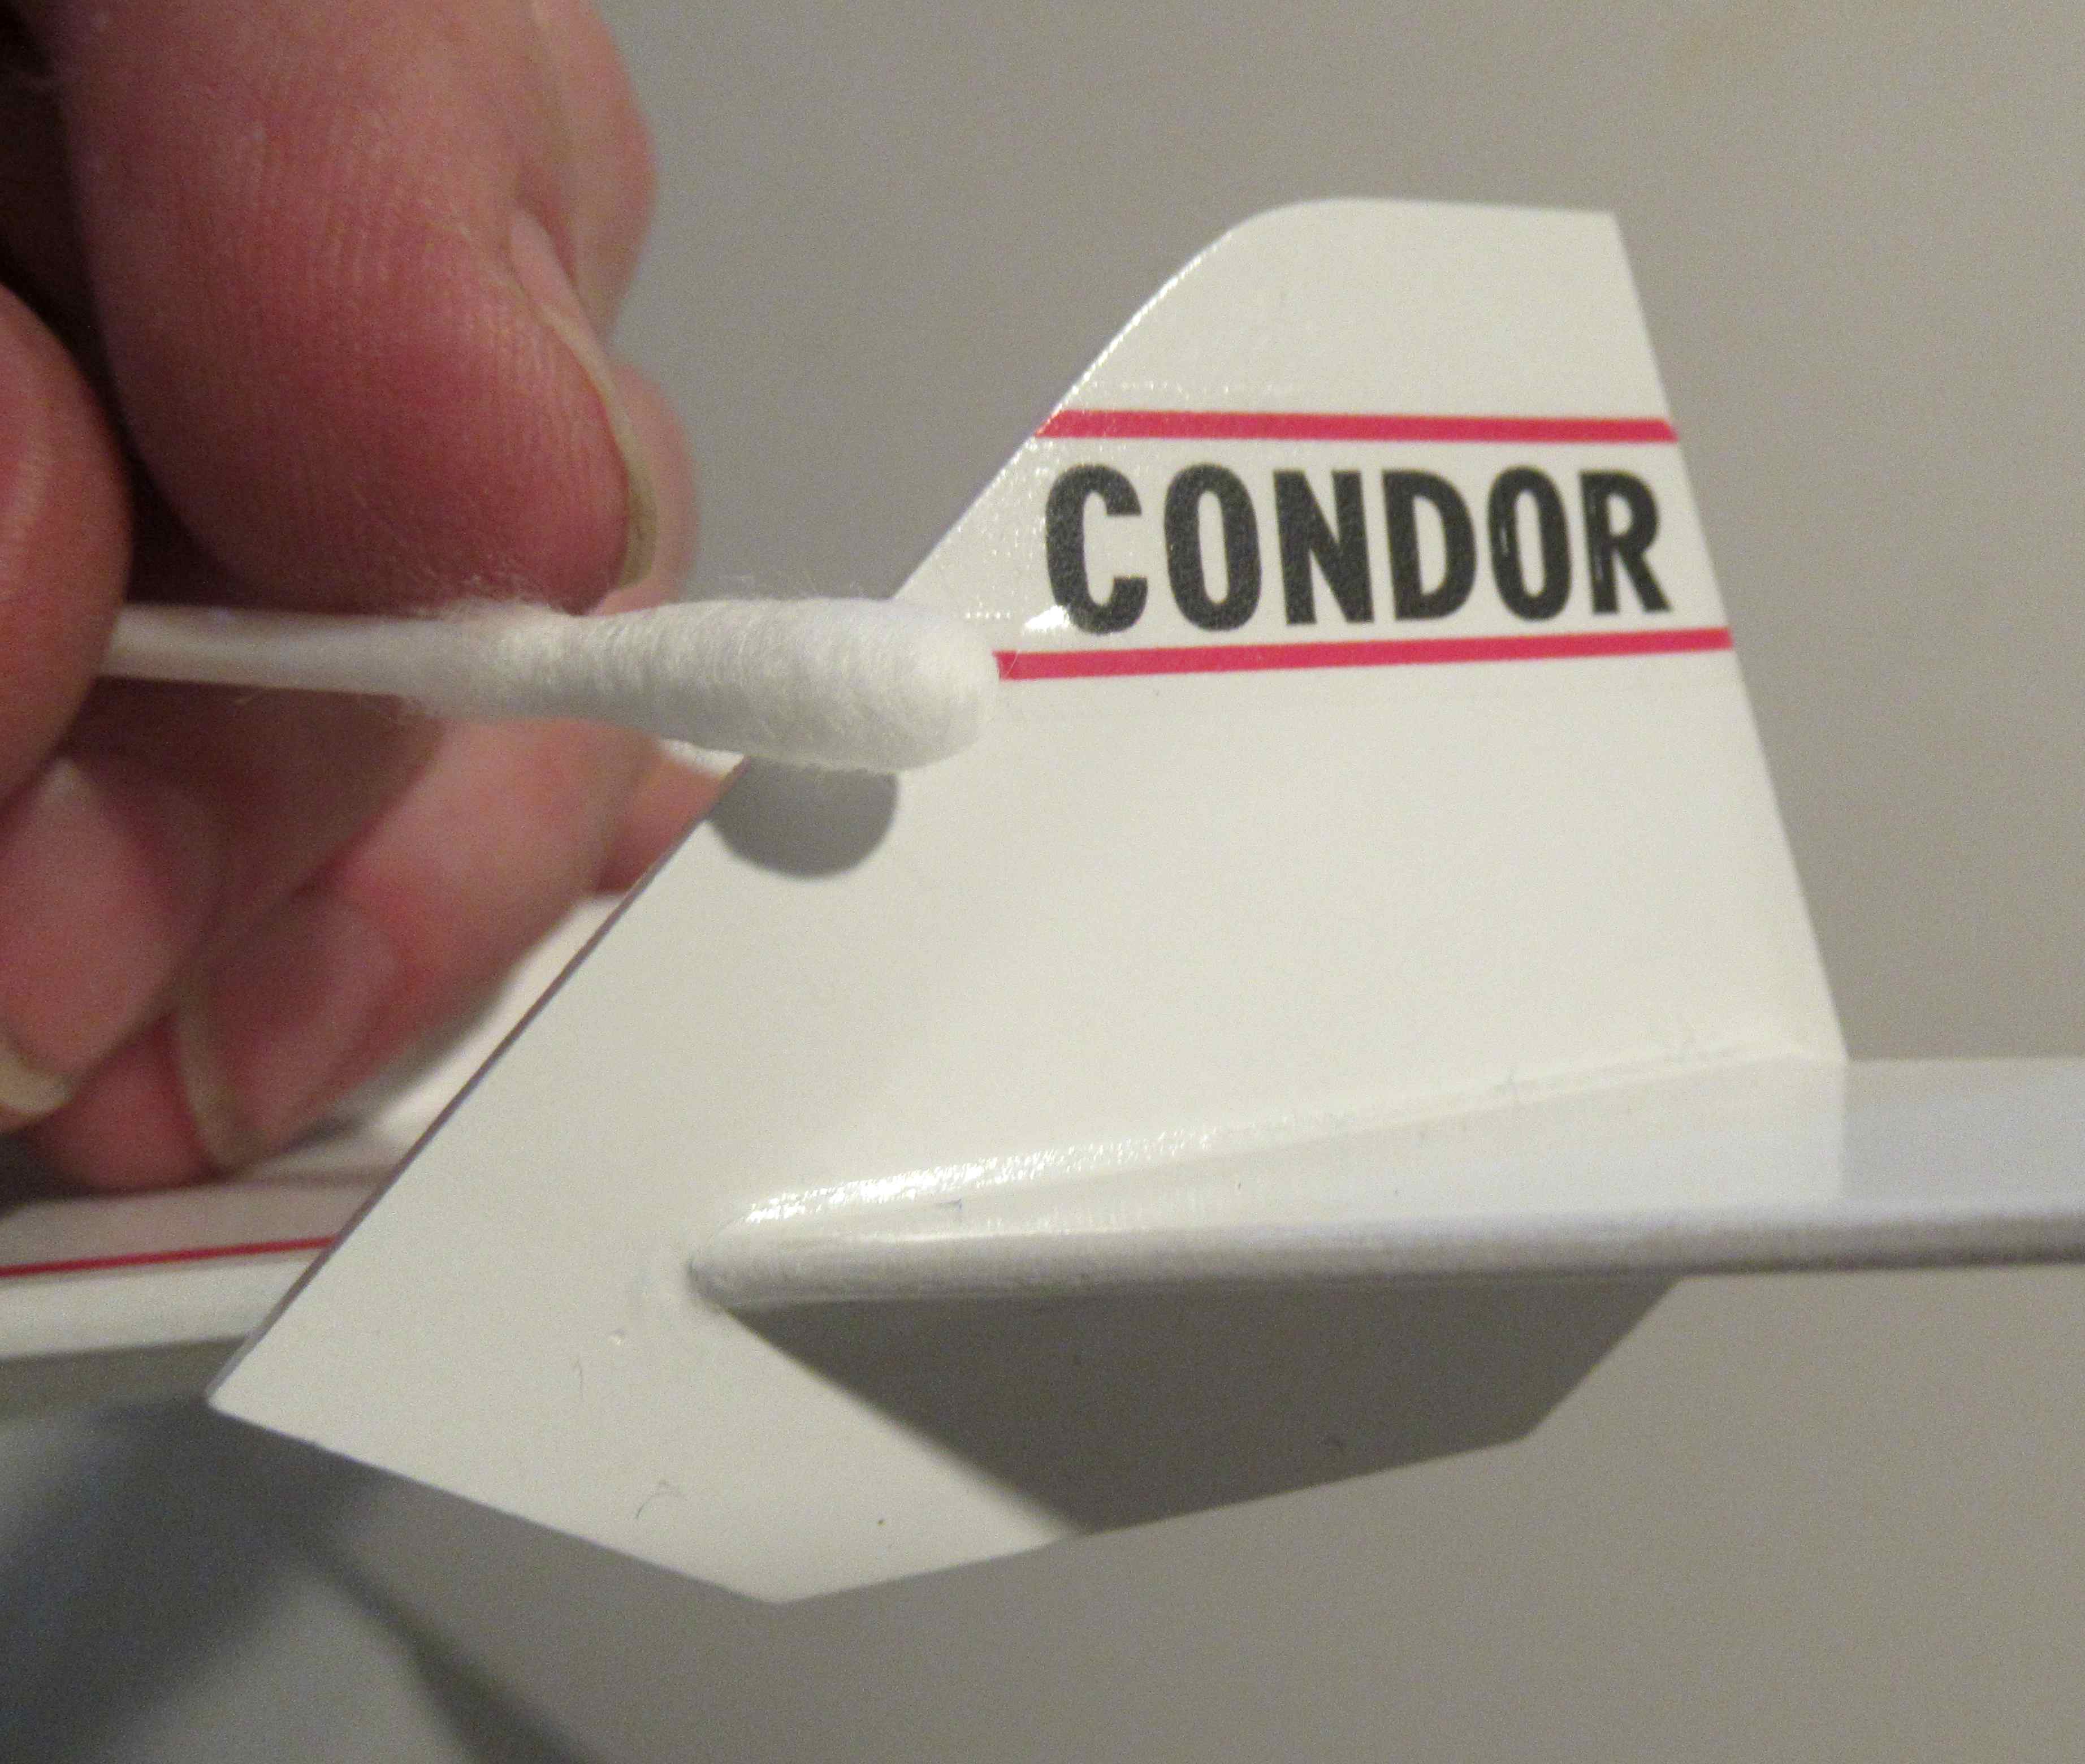
There are actually four different colors on the main body. From the bottom up is black, then insignia white - a very light gray.
The upper tube is insignia white and a darker gray is at the top. 
The nose cone is sprayed a light gray which is darker than the insignia white.

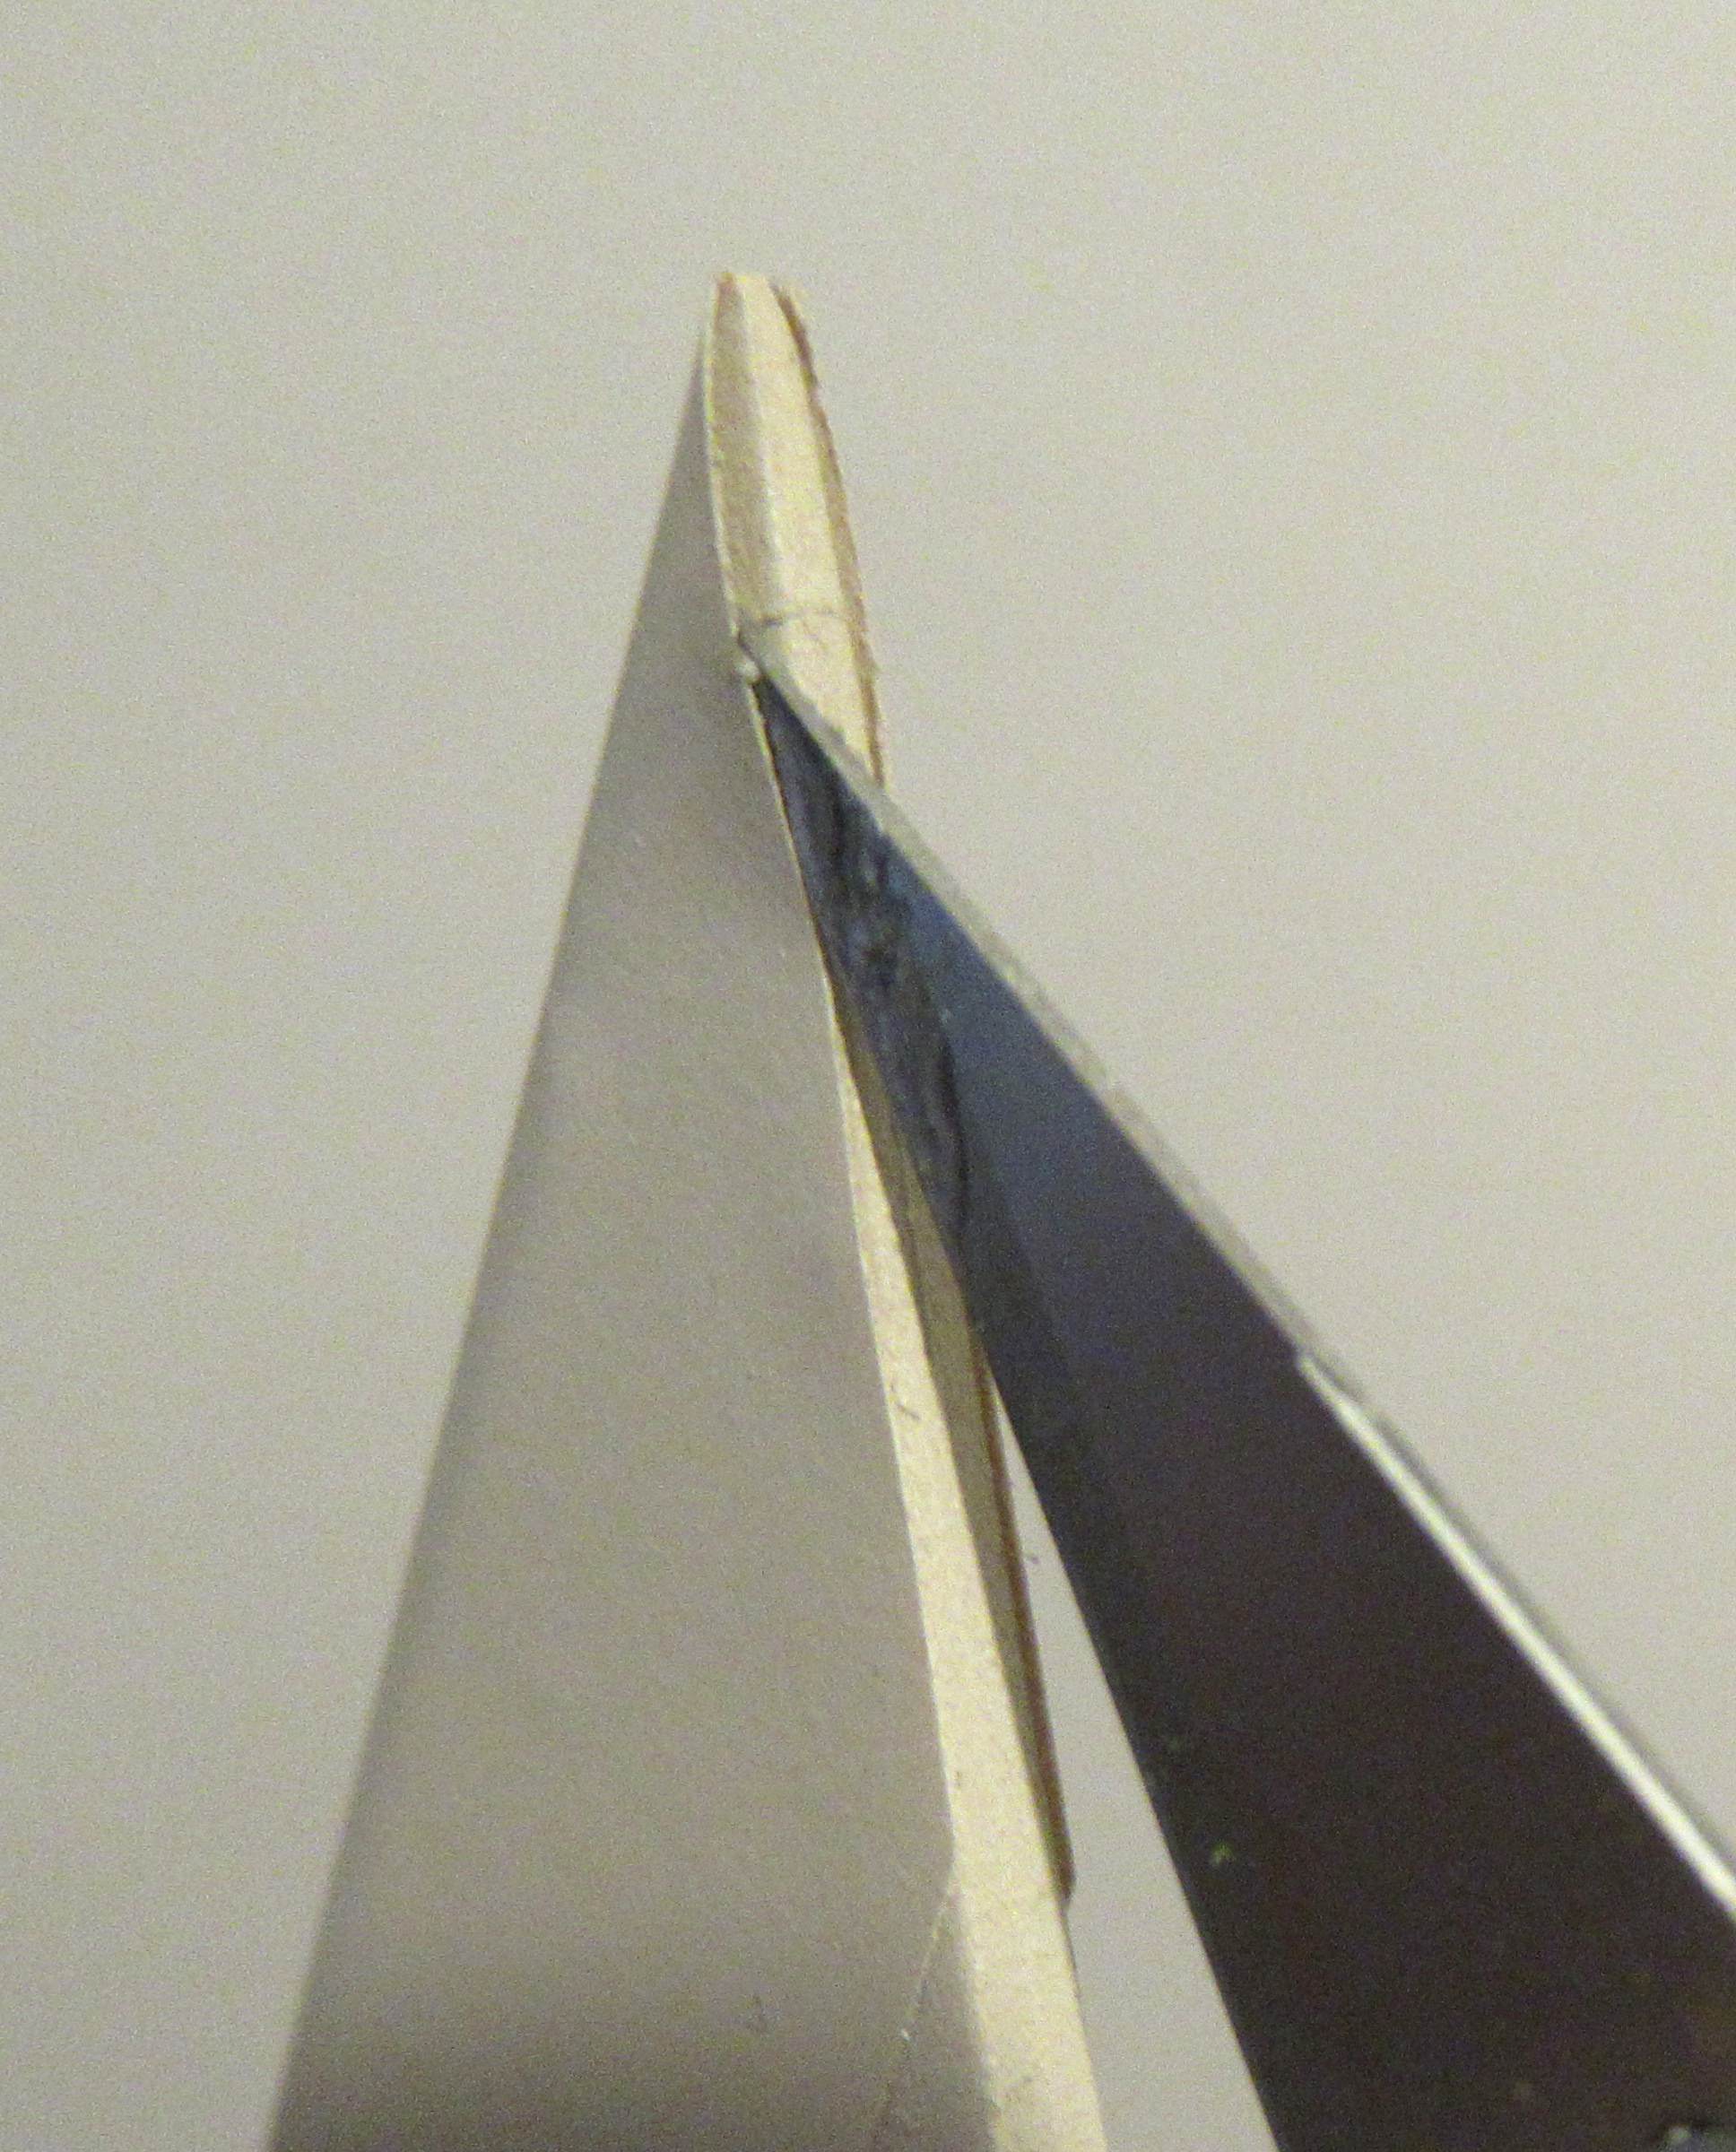
I placed the sticker strip over the leading edge as evenly and tight as I could.
Two days later, a lift shows. 

FIX: I carefully cut through the center of the lift area. One side was pressed down, the other side "flap" was folded over. The right side picture shows the fix. 
Maddening.

Sunday, August 18, 2024

Enerjet by Aerotech, Astrobee D Build, Part 15, Flat Finish & Fin Fix


Now that more paint has arrived - 

Here's one of the two body tubes after spraying with the insignia white. You can see there is a bit of tan and gray in the color mix.

TIP: This is a flat finish paint, so I'm handling it with a paper towel. Oils from your skin can mar and stain the finish.
Here's one of the fins after painting with a flat tan. I painted the fins before adding the "decal" sticker strip over the leading edge. (More in the next post)
That sticker strip would get in the way of any sanding or scratch smoothing.
 
There was a bubble under the paint in the "skin" surface of the fin. 

I didn't want to cut out and leave a depression that would have to be filled. I lightly sliced into the bubbles with a sharp knife.
I didn't remove the thin, loose plastic flap.

A drop of medium CA was set on scrap cardboard. Some glue was picked up and rubbed in using a toothpick allowing the glue to get underneath and into the bubble.
The surface was pressed and rubbed smooth.

The glued  area was sanded with some old 400 grit followed by 1200 grit to smooth.

Tuesday, May 21, 2024

Estes Condor #0807 Build, Part 23, More Decals


Well, I did my best to draw the decals correctly, but the red border lines on the wing tips came up short.

I cut a small piece of one of the extras to extend the line to the edge.


The red bar over the body tube had to be trimmed so the width matched up with the red lines on the wings.


I don't usually use a clear coat but I did apply some clear acrylic Pledge with a Q-tip. I was concerned that the front edges could lift.


Earlier in the build, the instructions said to glue in the engine mount with the centering ring even with the end of the tube. I recessed the mount so I could apply a glue fillet around the low end.

Interesting that the decal placement picture shows the mount slightly recessed.

Monday, May 20, 2024

Estes Condor #0807 Build, Part 22, Home Print Decal Fix


I was stuck and had to draw and print new decals.
I will keep the larger wrap around decal on the model so I didn't draw that one.

I made double decals.
Here's why I made two of each.
Home print decals aren't opaque and when set over bright white, the red turns to dark pink. This piece will need a two-layer decal.

If the home print red decals are set against some sprayed red paint you can tell the difference. It requires a double layer decal to slightly darken and match the red paint next to it. 
Red decals an inch away from red paint aren't as noticeable.


The red stripe decals on the wing fins are difficult to get straight and evenly spaced.


Notice the decal strip is a little long. It bends and continues up the inside of the wing tip.

To cut the end even with the joint - 
Wait for the decal to dry.

With a new single edge razor blade, cut through the decal extension and peel off the excess.

Thursday, May 16, 2024

Estes Condor #0807 Build, Part 19, A Quick Re-Spray

I found this design difficult to get good coverage on all surfaces. When trying to spray one area you get a light misting on other areas. This can result in a duller finish.

On one wing plate I had to go back and re-shoot some white. The picture shows the mask so paint would only cover one flat outside surface. 


When spraying the same color, you can mask right at the root edge. It won't be seen after the tape is lifted.

In the left side picture above you can see a grayish dot on the wing plate.

This second spray of gloss white covered this marking.

Saturday, June 3, 2023

Decals On The Second Klingon Battle Cruiser

When I built the two Klingon models, one set of decals transferred fairly easily. The second decal sheet was unusable. I finally got around to drawing up and home printing a second set.


Here's a wing decal from the Estes kit.
These have a white background.


Here's what I drew up.
I think it works, just looks a little dingier.


On the left is the Estes decals.

On the right are the home print.


The red dash decals are close.

My home print (right side) were spaced a bit wider. I don't know why I did it this way.


Comparing the original and new decals - 
The radiator lines are real close.

The bottom is straight, there is some camera distortion.
The new home print decals are in both pictures here.

On the left, some of the black flaked off where the new decal was cut to fit over the raised plastic ridge.
On the right, some black touchup was done using a fine point Sharpie.

FINISHED! Now I can sleep through the night.

Tuesday, May 2, 2023

Rusto 2x Nozzle Fix?

From the Facebook Estes Model Rocket page: 
Roy Dawson shared this short video.

"I don’t know for sure this might be a workaround. Please test this idea."

To see the video, CLICK HERE
Hit the redirect address to see the short video.
______________________________

I haven't tested this to see if it works.
Rusto 2X paint nozzles will usually clog long before you've used up 2/3 of the can. This might clear the nozzle, but could leave some WD-40 in it. Do some test sprayings to clear any oil before spraying the model.

Saturday, April 29, 2023

Wolverine Phoenix AIM-54A, Fix!, Part 8, New Decal & Finished


To place the home print decals, I had to consult the online instructions at Jim Z's: CLICK HERE

Nothing too complicated, simply center the decal in the open space.
Here's the decal in place, another is directly on the other side.

I centered the large lowest line "SERNO 20115" between the yellow bands.

The kit included a single 18" chrome Mylar parachute. The original Estes kit had a larger 24" parachute. These fins are delicate. I'll probably put two (duel) 15" chutes in.


Here's the 4" taller original build - 


And the same corrected, shorter Phoenix. 
A much better look.

Friday, April 28, 2023

Wolverine Phoenix AIM-54A, Fix!, Part 7, An Interesting Mask

This was an interesting mask. I had to work around the rectangle plates so the paint ridge would be hidden.
For whatever reason, I used yellow Trim Monokote for the yellow stripes. This allowed me to set marked Scotch tape masks on the yellow tape. If this yellow was a water slide decal, the tape would probably lift the ink.

It took quite a few small pieces of tape to outline the raised plates,
The picture on the right shows the lower mask again set over the yellow Monokote bands. 

I crossed my fingers and used Rustoleum 2X Gloss White. I've had a bad history using white Rusto 2X, sometimes it sprays out a rough flat chalk no matter how long you shake the can. I wanted to match the white I used back in 2012.

This time it went on smooth.
On the left is the tape lifts. The paint ridge is "hidden" by the yellow trim edge and raised plate thickness.


Here's the finished patch and paint.

You can see a slight ridge where the tubes were joined. I did a better job of filling the ridge the first time around.

The next time I print decals I can add the missing wordage. That will take the focus off the slight tube joint bump.

Thursday, April 27, 2023

Wolverine Phoenix AIM-54A, Fix!, Part 6, Filling The Tube Joint

Some CWF was set in place on the tip of a dull knife blade much the same way I normally fill a tube seam.
Some masking tape was set down surrounding the filler line so I wouldn't sand too wide an area around the fill line. 400 grit was used to sand the filler to surface.


The filled seam was masked off about 1/4" on both sides to direct the filler/primer spray. I didn't want primer anywhere else except on the seam.
When the tape was removed the filler/primer was left on the seam area.

400 grit was used to sand the filler/primer to surface. The gray was only left in the low areas. 

This probably won't be an invisible fill but will look better than the long body tube.

Wednesday, April 26, 2023

Wolverine Phoenix AIM-54A, Fix!, Part 5, Gluing Together The Tubes


My older Bob's Epoxy was dried up. I rarely use epoxy on LPR builds.
I did want epoxy for this one. I would hate to have the upper tube freeze up in the wrong position. The upper rectangle details have to line up with the four fins.

Epoxy allows you some working time. It is slippery and will drip! Don't use too much where drips can form. Wear gloves when using Epoxy. Some people have allergies and it can really tear up your skin.

Notice the drawn A ---------A pencil line. After I lined up the upper rectangle plates with the fins, the pencil line was drawn for alignment.

Epoxy was mixed up and spread around the inside of the lower tube. The upper tube was slid into place and turned until the pencil marks lined up.


I also spread a thin coat of epoxy around the inside end of the body tube. The epoxy was spread with a stick off a Q-tip, trying to keep it as even a coat as possible.

A review on rocketreviews.com said there can be some motor charring. The epoxy should protect the back end a bit.

Tuesday, April 25, 2023

Wolverine Phoenix AIM-54A, Fix!, Part 4, Peeling & Squaring Up

This is the 4" extension glued 2" over the coupler.
If I cut through just the tube I can still use the original coupler.

On the left, the outside layer of the tube is carefully peeled off.

On the right, the coupler is starting to show. I was surprised how most of the coupler didn't have much glue. On the original build - after sliding the tube segments together, the glue was pushed towards the bottom.


The coupler was 4" long, 2" extend out the bottom.

Little bits of glue still remain towards the low end. This was sanded clean with 220 grit on a block.


The lower cut above the fins was sanded flat using a block.

This low end can be squared up - the upper part can't with the coupler in place. I tried to get as straight a cut as I could.

Monday, April 24, 2023

Wolverine Phoenix AIM-54A, Fix!, Part 3, Tube Cuts


At the pencil lines - 
A straight piece of 110 lb. cardstock was wrapped around the tube and taped closed.

Tape was also added to the bottom edge to keep the cardstock guide still while cutting.
I started with a razor blade but switched over to my X-Acto knife with a new #11 blade.

The cardstock guide edge made the cut pretty easy to do.

As always, don't try to cut through a tube with a single pass. Ease up on the knife. It should take a few rotations of the tube to cut completely through.

TIP: Turn the tube under the blade. Keep the knife blade still. 


This was a pretty clean cut. 

With the upper tube removed, repeat the second cut at the line 4" above this lower cut.