Showing posts with label Jayhawk. Show all posts

Friday, November 4, 2016

Rockets Thrown Away?


I've got a lot of rockets. Sometimes you've got to make room for the new kids. I hate throwing them away, I've got some time invested in the build.
But sometimes you get past the point of repairs.

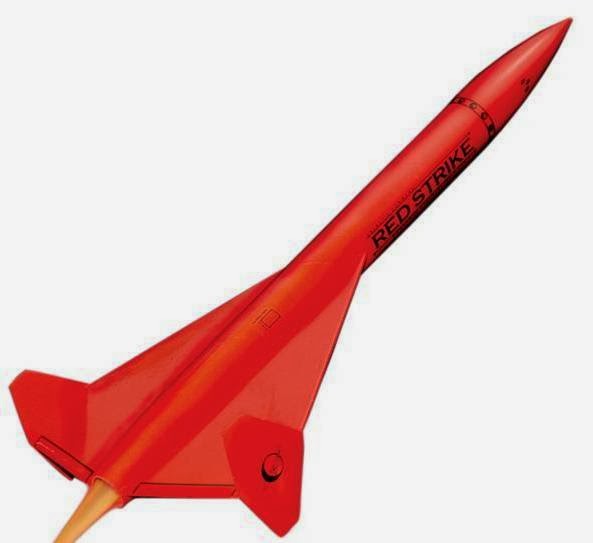
This is a BT-50 based Jayhawk, the original produced kit Starlight. The kit is now being sold through Uncle Mike's Rocket Shack.
This is about the same size as the OOP Centuri kit but has 3/32" thick fins instead of fibreboard.
I've got an attachment to this kit, I drew up the instructions for Bob at Starlight.
There was some extra detailing. A tailcone and conduit were added. The small forward fins were set higher on the nose cone. I did a variant of the all orange missile.
I'm okay letting this one go - I have two more in bags upstairs along with the big Macow Jayhawk waiting to be built.

Thursday, January 23, 2014

Kit Design Inspiration


From a blog comment from last week:
Anonymous - January 11, 2014 at 2:16 PM
"Great build so far. You should pick up an Estes Fusion X25. It's a fun build, a bit Jayhawk-like."

On the left is the Estes design, the Fusion X25.
On the right a Rocketarium Jayhawk.
And people wonder where some kit designs come from!

I'm not taking anything away from the Fusion X25 design. The paint and decal pattern make the model.
Still, it might be fun to make a Jayhawk style model from the Fusion X25 kit.
Not Jayhawk "scale" still fun if the Fusion kit was painted orange with the black nose cone tip.


Here's another Jayhawk inspired model,
from Red River Rockets - The Redstrike.

Tuesday, April 19, 2011

Starlight / Centuri Jayhawk Follow-Up


Before it's first flight, I did add some clay weight inside the nose cone of the modified Jayhawk kit.

The nose cone shoulder was already glued in place so I drilled a hole to stick the clay worms in.


I cut off two pats of clay. Total weight of the clay was .25 oz.

The clay was rolled into thin "worms" and set into the drilled hole. A squared dowel tamped the clay forward into the nose cone tip.

The Jayhawk flew on a B6-4, April 16 at the Tampa TTR monthly launch.
Even in a 20 m.p.h. wind it had a straight, stable boost. There was a slow turn of the body during the thrusting stage.

Wednesday, April 13, 2011

Starlight Jayhawk FINISHED!

The finished JAYHAWK


This build was a good stretch.
Adding the tailcone shroud, flare tube, moving the canards up on the nose cone and adding white to the decals took extra time but I think the final result was worth it.
After all the decals were in place, the entire rocket was shot with a clear dull coat.


The next build: DFR Technologies Delta II

Tuesday, April 12, 2011

Starlight Jayhawk Build Part 26 White Decals

The white rectangle was set down first, followed by the white circle.

TIP: I learned the trick to layered decals - let them dry before laying down the second and third layers!

The three layers were slipping and sliding. Let one set up a bit before adding the next layer.


The lower decal shows the final result.

The upper decal was set down (wet for removal) to show the difference without the white color underneath.
The result was worth the extra effort. I was concerned about the thickness of three decal layers, it's hardly noticeable.

TIP: You get better results laying decals on a glossy surface. On a flat finish surface you can get "silvering". That happens when the decal doesn't have a smooth enough surface to grab onto.

Monday, April 11, 2011

Starlight Jayhawk Build Part 25 White Decals

The tricky part was precutting out the white back ground just inside the stars and bars decal edges.

The decal was taped down and the white sprayed decal paper set next to it.


Using my straightedge I cut just inside the blue bar line.

The circles were cut separately, freehand with small scissors. My concern is the final, three layer decal thickness.

Sunday, April 10, 2011

Starlight Jayhawk Build Part 24 White Decals


The Starlight kit includes decals, but these were printed on clear decal paper. The stars and bars decal on the wings need a white overcoat when set on the orange background paint.

Someone on TRF (I wish I could find the name to give them proper credit) suggested spraying the decal paper with colored paint.
What a simple, brilliant idea!


We already spray printed decal paper with a clear coat to seal it.
I figured you could spray the sheet white and cut out the underlying white area.

To test this, I found some scrap decal paper and sprayed it gloss white.

You can see I've already started doing the decals.
Here's the white spray test piece transferred onto the orange fin.

It's opaque and pretty thin. This might just work.

Starlight Jayhawk Build Part 23 Nose Cone Masking

After the tape was removed, I cut off the centering ring with wire cutters. after cutting, it lifted off easily.

I didn't want to slide the ring off the front and smear or scratch the paint.


After a little scratching and cleaning up the line with my knife tip, here's the finished color separation.

Is it perfect? No. But it's a better result than I could have got using masking tape.
The ring insured the line would be straight.

Saturday, April 9, 2011

Starlight Jayhawk Build Part 22 Nose Cone Masking


When the ring reached the color separation point, it was slid down fairly tight against the nose cone surface.

Not too tight - I didn't want the ring to mark up or scratch the white paint.

The back white side of the nose cone was masked off.

When spraying the black I first concentrated on just the tip, keeping the line of paint away from the centering ring mask.

I then came back and sprayed nearer the centering ring. I sprayed directly over the outside edge of the ring, from the side.

In painting the tip first, I wouldn't have to do any more spraying from the tip back and running the risk of the paint getting under the ring edge.

Because this isn't a real masking medium, I didn't want to take any chances with paint going under the ring.

Starlight Jayhawk Build Part 21 Nose Cone Masking

The old Centuri instructions have you paint the entire nose cone black.
After it dried, you stick the top into the engine mount then spray the entire rocket orange/red.
I'm not convinced that's the best way to go. Painting orange over the black won't give a good color match of the orange body.
But how do you mask the top of a nose cone?
Here's the best solution I could come up with.

I found an extra Quest centering ring that would almost slide down to the black/white separation line in the nose cone.

I wrapped 150 grit sandpaper around the barrel of a Sharpie pen and used that to widen the inside hole.


I didn't want a fuzzy edge along the sanded inside edge so I applied CA to give me a harder surface to sand smooth.


I switched over to 400 grit, sanding at an angle to match the nose cone contour better.
Notice there is a card ridge under the bottom of the ring. I concentrated on keeping the top inside edge smooth and flat.
The wider ridge at the bottom will help give a better seal.

Friday, April 8, 2011

Starlight Jayhawk Build Part 20 Orange Masking


Sorry this shot is so out of focus!

This is the white mask for the orange to follow.

Clear Scotch tape went down first along the large wing/fin root edges. Masking tape went over that.

All the edges were burnished with a sharpened dowel.


All of the wing/fin areas were sprayed orange.

I let everything dry hanging over the edge of my table in the patio.
When I came out to pick it up it was on the ground!

It was caught in the wind and the dowel in the engine mount rolled it right off the table. I'll use more weight on the dowel next time.


I won't go into too much detail about this new fix except to say it was filled and sanded as best I could this far into the finishing.

TIP: Here's one way to remove your mask.
I'm pulling it away from the line and the tape is almost folded over on itself. Depending on how dry the paint is, this prevents pullling and tearing of the color separation line.

Starlight Jayhawk Build Part 19 Canard Placement


This shows the canards in place.

The canard on the left is set in it's hole, no glue yet.


Here's the dry-fit Jayhawk up 'till now.

I'm still deciding whether or not to paint the nose cone before glueing them in. If I glued them on after painting the black there won't be any tricky masking.

Thursday, April 7, 2011

Starlight Jayhawk Build Part 18 Canard Placement


Using the same small pin vise, a hole was drilled into the root edge of both canards. While drilling, keep turning and checking the canard to make sure the drill is going in straight.


Two pins ends were cut off to about 3/8" long, a little shorter than the picture shows.


Glue the cut pins into the holes you already glued with CA.

Keep the glue in the holes and not on the root edge. You want to keep that edge smooth so you'll get a good fit against the nose cone curve.


Wednesday, April 6, 2011

Starlight Jayhawk Build Part 17 Canard Placement

To get a "near" correct position of the canards, I looked at the old Centuri Magnum instruction drawings.
I kept messing with the enlargement until I got it to match the length of the model. Notice the diameter of the Jayhawk screen drawing is wider than the model.

This gave me a good idea of where to mount the canards on the nose cone instead of farther down on the body tube.


The root edge of the canards had to have a slight sanding to match curve of the nose cone.


I decided to use a cut needle set into the root edge of the canards for some support.


A hole was drilled through the wall of the nose cone to accept the needle

Tuesday, April 5, 2011

Starlight Jayhawk Build Part 16A FIX!


I don't know how this happened. In handling the model, I broke off a small piece of the tapered leading edge of a wing fin.


I used some Carpenter's Wood Filler to fill the broken edge. I would have just glued the broken piece back in lace but I couldn't find it. The CWF wasn't the thinned stuff in my plastic jar, I used some from the lid that was a little thicker.


The filled area is so small, I was concerned the filler wouldn't stay in the leading edge. I used a light coat of super glue applied with a toothpick to lock the fill in place.

Careful sanding followed with 400 grit on a block

Monday, April 4, 2011

Starlight Jayhawk Build Part 16 Rudder Fillets


The rudders are glued on the main wings.
To get a good bond, I used the "double glue" method. Here's the view from the rear. That's the rear of the flare tube on the top of the main tube.


My friend John Bishop suggested this as a topic for a blog.

I had to cut my fingernail short to get the fillet into the tight 90 degree angle. Otherwise, I would have scarred up the balsa trying to get in tight enough to lay in a fillet.

Sunday, April 3, 2011

Starlight Jayhawk Build Part 15 White Undercoat

I went ahead and did a primer and white undercoat before gluing on the fins. There is just too many areas around the tailcone and flare tube I wanted to be sure were smooth and filled.
The fin lines were masked with a thin masking tape strip. Here you can see the masked area after the tape was removed.


After removing the tape, this white undercoat had a masking ridge. This raised paint area would raise the root edge of the fin when trying to glue it down.
I lightly sanded off the ridge with some clean 400 grit sandpaper. Note I said "clean".
TIP:
When sanding white paint, be sure you use a new piece of sandpaper. Any paint color left on the sandpaper (from a previous color sanding) will transfer onto the white paint.


At the front of the fin joint you can see where I masked the root edge line a little too long. The tape should have only gone up to the taper along the leading edge of the fin.

Friday, April 1, 2011

Starlight Jayhawk Build Part 14 Flare Tube Fit

Here's the final fit of the flare tube at the front.

You can see I've got some paper rolled into the top to keep the gray primer out of the tube.


This is the back end. Notice the second rear piece of the flare tube is cut above the rear of the rocket by about 1/8".

On the real Jayhawk, the rear open end of the flare tube is higher and even with joint at the shroud. On this semi-scale model I made the decision not to bother with the change in the flare tube height.

I made plenty of white glue fillets down the entire length of the flare tube to fill and smooth any gaps.

Wednesday, March 30, 2011

Starlight Jayhawk Build Part 12 Half Flare Tube

To get a close approximation of the tunnel size and diameter, I up sized the Centuri Magnum Jayhawk drawings on my computer monitor.
This gives a rough visualization for the flare tunnel size and diameter.

After going through my scrap body tubes and nose cones, I picked the Quest MicroMaxx MMX2 body tube (#9528) and nose cone. (#19990)

The body tube was cut in half lengthwise down the entire length of the tube using a sharp knife and an aluminum angle.

After cutting, sand the back square and straight on a block.


Then sad the cut tube edges again against the body tube with 400 grit sandpaper. This matches the cut tube sides to the curvature of the body tube.

Starlight Jayhawk Build Part 11 Shock Cord Mount


While the shock cord mount should work fine, I thought the card stock was a little thin.

I re-cut another from 110 lb. card stock. My mount is to the left.

This mount is based on the old G. Harry Stine design used in the MPC kits.


The round elastic cord is knotted and laced through.

Notice the knot is not behind the mount but overhanging the edge at the bottom.

When glued in place, it's actually stronger when the knot is below the lower edge of the card stock mount.