
Showing posts with label Cyclone. Show all posts

Wednesday, August 22, 2012

Cyclone Egg Lofter!

Mike Debreceni (MarmotFL on YORF) has taken the Jonathan Mills Cyclone design to new heights - as an Egg Lofter!

Here's Mike's launch report from YORF -

"This Saturday, we held our egg loft duration contest.
I'm proud to say that my 2X upscaled Cyclone won, with a flight duration of approx 30 seconds and a safe recovery of the egg. The spinning motion was beautiful to watch. The descent was so slow that the rocket appeared to be floating on its way down -- for a few seconds, it seemed to be hovering in place. It was a definite crowd favorite."

"Here are a couple I took on Saturday. These show the separate spin and stabilizer assemblies, and the assembled and launch ready rocket (with egg installed in the plastic bottle).

To give you an idea of the size, the assembled rocket stands approximately 2 feet tall, and uses a 12oz plastic bottle for its egg capsule. The main body tube is BT-50, large enough to carry a D-sized motor."

It's interesting how Mike used a soft drink bottle to hold the egg payload.
Congratulations Mike, the Cyclone is amazing to watch on recovery. With a Egg payload - even more so!
Mike is a member of the NAR FLASH section of Cape Coral, FL.

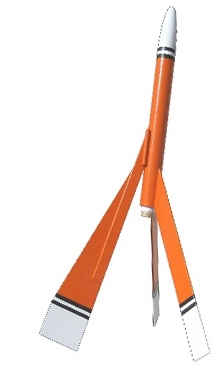
Tuesday, April 5, 2011

NEW Odd'l Rockets Products Available


The CYCLONE Kits are now available!

If you've been following this blog, you should know this rocket well. It was designed by Jonathan W. Mills, PhD.

I can guarantee you've never seen a rocket recover like this one before! I was so impressed by it's performance, I had to add it to the Odd'l Rockets line.


The New UP! Cup is a perfect small field flyer.

All the hard work is done for you.

The cup is pre-drilled for the engine mount and central launch lug.

Stable with a weird smoke trail during boost. The cup actually amplifies the engine thrusting noise!


If you've been launching from a standard starter set launcher, you'll welcome the new ADEPTOR Accessory.

It connects to your camera tripod and gives you an elevated low power launcher. Get up and off your knees!

Use you existing Estes or Quest blast deflector. When you are done launching, remove it and it's a camera tripod again!

Here's my ADEPTOR on a Quest deflector after over 50 launches!

It tightly holds 1/8" and 3/16" launch rods.

Check out all the new stuff at the Odd'l Rockets website at: www.oddlrockets.com The gallery page has been updated, too!
Odd'l Rockets kits and accessories are available exclusively from: www.jonrocket.com

Saturday, January 1, 2011

Cyclone Build FINISHED!

Here's the finished CYCLONE!
The longer adapter / coupler needed a wrap of masking tape for a good fit.


Be ready, the performance of the helicopter recovery will be better than you would expect.


I almost lost the upper unit with just a 1/2A3-2t!
This Cyclone model will soon be produced as a kit by Odd'l Rockets.

Thursday, December 30, 2010

Cyclone Build Part 12 Fin Gluing


While the instructions don't say to do so, I rounded the leading and trailing edges of the fins before gluing them onto the lower body tube.


The two lower stabilizer fins are spaced at 18mm apart.

I drew 18mm tick marks on a paper wrap and marked the center at 9mm.
The 9mm mark was centered over the engine hook.

Extend the fin lines down the smaller tube.


TIP: Getting the longer stabilizer fins to glue in place is tough! Be ready for a little frustration. They are long and heavier than the wet glue will hold.
You will probably have the best luck using the "double glue" method.

Wednesday, December 29, 2010

Cyclone Build Part 11 Engine Mount


This is from a little farther along the build. I didn't get a picture of the engine mount glued in the lower, shorter BT-20 tube. At this point in construction I haven't glued the stabilizer fins on yet.

The engine mount is glued in the shorter BT-20 so the longer adapter sticks out of the top by 3/4".

This adapter extension acts as a coupler holding the two halves of the rocket together. Don't glue this to the upper body!

Cyclone Build Part 10 Engine Mount


A 1/8" wide slit is cut in the BT-5 for the engine hook, 3/16" from one end.

The engine block is glued in place and rests against the upper bend of the hook.

The shorter 5/20 ring is notched to slide over the engine hook.


The shorter notched ring is slid over the engine mount tube until it is 3/4" from the open end. (on the right of the picture)

The longer 5/20 ring is notched to slide over the engine hook from the front. I drew pencil line around the notch I made to better show how it was cut.


The longer 5/20 ring is glued in place so there is 5/32" between the two rings.

Tuesday, December 28, 2010

Cyclone Build Part 9 Engine Mount Prepping

Right now I'm on a cruise ship going down the Mexican Riviera. Internet connections are slow on board the ship, so only one posting. On the days when the connections are good, I'll do my regular two postings, but this morning - just this one!


The instructions tell you to use the Estes Mini-Engine Mount Kit # 303157.

I think the engine mount kit is out of production, so I made mine from engine casings and some leftover BT-5 tubing.

The 1" long AR-520 was cut from an engine spacing casing. I did have to remove some of the interior winds to get a good fit over the BT-5.


This is the 1" long AR-520 adapter after fitting.

Monday, December 27, 2010

Cyclone Build Part 8 Launch Lug and Nose Cone


The launch lug is glued beside the spar, even with the end of the body tube.


To protect the base of the nose cone from the ejection charge, I coated the base with white glue and let it dry.

The nose cone was then glued in the front of the BT-20.


The upper spin unit is complete. Next up, the lower stabilizer unit.

Cyclone Build Part 7 Main Fin and Dowel Weight


The main fin is glued between the spars.


Clothes pins were used again to clamp the fin in place while the glue dried.


The dowel is glued on the trailing edge.
The tapered end overlaps the fin spar.

Sunday, December 26, 2010

Cyclone Build Part 6 Spar Contour


The instructions specify a 15 degree angle of the spar. This is critical!
You can have a variance of + or - 1 degree.

If the angle is much wider the the upper unit won't rotate.
If the angle is narrower, the engine exhaust will scorch the fin.


The picture shows the spar assembly glued in place. I glued the spar assembly opposite the vent hole. You can see the slot for the main spin unit fin.

Look down the tube from the front and be sure the fin spar assembly is in alignment.

Cyclone Build Part 5 Spar Contour


When sandwiched together, the spar is 3/16" thick.

While it could have been glued to the body tube as is, I wanted a better root edge fit on the BT-20.

I wrapped 220 grit sandpaper around a BT-5 tube and sanded the body tube curve into the wide root edge.

TIP: Notice I didn't sand around a BT-20. You'll get a tighter contour fit by sanding over a smaller diameter tube. The BT-5 is the next smallest diameter.


Here's the curvature of the root edge back on the BT-20 upper tube.

Saturday, December 25, 2010

Cyclone Build Part 4 Fin Spar


The fin spar spacer is glued between the two long fin spars.

I cut mine a little oversize so I could sand it down to the outside edges once all three parts had dried. I made sure that the inside spacer's 90 degree edge sat in the right position as the original, slightly smaller spacer.


I clamped the three pieces together with clothes pins for drying.

With the spacer between the two spars, there is a long open "slot" for the upper main fin.

Cyclone Build Part 3 Vent Hole Punch


First up, you are to punch a hole in the longer BT-20 for an ejection charge vent. This went much better than I thought it would.

The smaller side of the hole punch is inserted as far as it will go into the tube.
The punched hole was easy and the cut edges were round and sharp!

Trivia: Just a guess on my part, but this is probably the way the vent hole was punched on the oldest Estes Scouts.

Thursday, December 23, 2010

Cyclone Build Part 2 Parts

Here's (almost) all the parts after cutting them out.


The model will be built in two separate assemblies according to Mr. Mills instructions.


First up in the build is the single finned Spin Unit (to the left)
The 1/8" dowel fin weight is not shown.

The two finned Stabilizer Unit (on the right) holds the engine mount.

All balsa part dimensions are available at Jonathan Mill's website HERE.

The 1" long AR-520 adapter and 1/4" adapter were made from an empty engine casing.

Click on the pictures for an enlargement.

Cyclone Build Part 1 Back Story and Websites


Here's one I found on Wayne Hill's Rocketry Blog at:
http://rocketry.wordpress.com/

This is a fascinating model featuring maple seed (helicopter) recovery.
At ejection, the upper half is a monocopter and returns helicopter style.

The lower stabilizer unit has two fins and helicopters in.

I've flown this one and was amazed by the performance. The upper half monocopter spins fast and you could easily lose it on a breezy day.

Everyone should have this rocket in their fleet!

Jonathan Mills did all the work.
http://www.cs.indiana.edu/~jwmills/EDUCATION.NOTEBOOK/rocket/rocket.html
This should give you a good idea of what goes into design and prototypes.

The build will start with the next blog post.