Showing posts with label C Moonraker. Show all posts

Monday, August 29, 2016

Centuri Moonraker #KB-11, Finished


This is a tiny rocket!
You would need others to help track both sections after ejection and don't launch it in high grass.
Centuri wisely only recommends 1/2A6-4, A5-4 and A8-5 engines. "More powerful engines (B4-6, B6-6 and C6-7) may be used, but there is little chance of seeing and recovering the tiny Moonraker with those exteme altitudes."
Time will tell if I ever launch this one!

Sunday, August 28, 2016

Centuri Moonraker #KB-11 Build, Part 7, Chrome Trim Placement

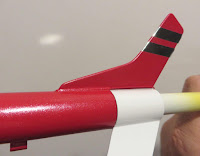
EDIT: I don't recommend using this wrap around this Monokote trim method I tried here. Over time, the trim strip lifted where it folded over the leading edges of the fins.


The trim strips can be difficult to set down parallel to the root edge.
Thin strips of masking tape were set down to the outside of where the chrome will set. It took a few tries to get the masking tape in line, something you wouldn't be able to do with the final chrome trim piece.

My Moonraker will be assembled in the "Raked" configuration with the rear fins facing up.
The ends of the chrome strips overhang the trailing edge for now.


On the left is the leading edge with the trim strip rolled over the tip.
On the right the chrome trim was trimmed off at the trailing edge.


The fit of the trim pieces was good overall except for one piece.
You can press this back down but it'll probably rise up again.


Saturday, August 27, 2016

Centuri Moonraker #KB-11 Build, Part 6, Paint and Chrome Trim

A white undercoat was sprayed.
After it dried I could see glue boogers and some areas that needed cleaning up.

On the left are the sanded ridges left from the Titebond M&TG.
To the right are the sanded nose cone joint and body tube seam.
As mentioned in other builds, the sanded white undercoats can help fill any remaining very small recesses.

I ended up painting the back section gloss white, the upper section in metallic red. The plastic red nose cone looked slightly pink after white undercoats. Painting the upper section red covered that up and blended well.


I liked the trim stripes shown on the face card. I decided to do them in chrome trim Monokote with the hope that the reflected sunlight might help with recovery.

The center line of the stripes have to be cut at an angle to fit over the leading edge.
cut a strip of paper and bend it over the leading edge of a fin.
Crease and mark the overlap at the bend.


Open up the bend and cut out the middle angle "V".

The two sides are taped together for a cutting template.


Set the paper template on the chrome trim, mark and cut with a straightedge.
I cut six trim pieces two for each fin.

Friday, August 26, 2016

Centuri Moonraker #KB-11 Build, Part 5, Luglets and Retainer Wire


The launch "luglets" are short and easy to misplace.

Assemble the segments using an engine casing and visually align the lugs.


Here's how the wire overhangs the back end of the single upper section fin.
Slide the back section and bend the end down over the casing end.


With a casing in place the wire seems too long and is too close to the nozzle flame.
The inset picture shows the wire cut back just a little longer than the inside of the casing.


Some of the new kits introduced in the 1973 Centuri catalog allowed building variations.
The Moonraker lower section can be flipped for a "Traditional" or "Raked" configuration.


Thursday, August 25, 2016

Centuri Moonraker #KB-11 Build, Part 4, Nose Cone and Retainer Wire

At first I couldn't find the nose cone gluing tab. It was stuck under the "Spec-plate" stapled to the face card.

The gluing tab is a pressure sensitive (peel and stick) paper. It is stuck to the nose cone shoulder giving the white glue something to adhere to.
The tab in my kit was much larger than the illustration showed.

Peel off the backing and roll it around the nose cone shoulder.

The retaining wire is bent by setting it over what's left of the die cut fin sheet.
The end of the wire is set on the large fin trailing edge corner. Bending it over the end of the die-cut sheet gives the "hook" the correct thickness to fit over the front of the large fin. A clever step.


Bent as shown in the instructions, the long end of the hook wire does end up at 2 7/16" long.

Wednesday, August 24, 2016

Centuri Moonraker #KB-11 Build, Part 3, Fin Prep and Gluing


The outside fin edges got a smoothed bead of white glue.
After that dried it was rounded and smoothed with 400 grit. Another bead of glue and smooth sanding followed.

The glue bead seals the exposed edges and prevents delamination. It also gives a slight rounded edge to the fin.

The fins were sprayed with primer/filler and sanded smooth.

The root edge was sanded down to get a better glue bond. The fillet area was also sanded down.


A vertical alignment guide is printed on the instructions sheet.
These work well and insure the fin spacing is correct.


With the fins glued on the sections were slid over an engine casing. An empty casing is needed to hold the halves together when displayed.

Tuesday, August 23, 2016

Centuri Moonraker #KB-11 Build, Part 2, Fin Prep

I'll be spending some time on the fibre fins. Most builders would simply punch them out and immediately glue them to the body.
Die cut fibre (mat board) fins require some edge prep to get smooth.


The hold down tabs were larger than normal. Don't punch these fins out! You would end up with more to clean up later.

The fins were removed using an X-Acto knife.


After removing the fins you can see the corner hold down ticks.
These will be cut back and the edges sanded.

The sides of the fins were lightly sanded with 400 grit on a block.
The picture shows the darker sanded edges where the raised sides were taken down a bit. These edges are rougher now and will need to be smoothed out.

Monday, August 22, 2016

Centuri Moonraker #KB-11 Build, Part 1, Parts


At $.85 how could you go wrong? This was one of those models you'd throw to get your order total high enough for free shipping. I would think the price of the packaging was more expensive than the actual parts in the kit. For such a little rocket there are some few, interesting parts.


Taped to the instruction sheet is the engine retaining wire. This isn't an engine hook but is meant to flex out of the way at ejection.
At ejection the engine does eject and the two body section separate. the upper section has one fin and nose cone. The lower section has two fins.

This wire goes around the top longer fin, down both sections and bends under the engine casing. It helps hold the rocket together.


Here's the fibre fins.
The top side (where the die-cut blades strike first) has rounded edges.
The back side edges are squared off. Look at the tip of the longer fin and you can see where the die-cutting has slightly pressed out and creased the leading edge.

Below that is a black dot. I don't know what caused it. It doesn't go into the fin area. A black dot of oil or ink would be hard to cover up with spray paint.


The Centuri plastic nose cones were of great quality, injection molded with no seams.

Below the body tube is a small depression. I'll flip over the tube and glue a fin over it.


The launch lug "luglets" are short, only 1/4" long.
They were set over a Q-tip so I wouldn't lose them.

Sunday, August 21, 2016

Centuri Moonraker #KB-11 Build, Background


The Centuri Moonraker was introduced in the 1973 catalog. New kits and supplies were added as extra pages to the outside of the 1972 catalog format. To see this page, CLICK HERE
A few of the new kits had "pre-cut fibre fins". The fin material was like mat board, approximately .050" thick. This material is similar to what fibre centering ring are cut from.
The Hummingbird, Moonraker, Jayhawk, Nomad, Excalibur 2 and Arrow 300 had die-cut fibre fins.

"Two sections gyro-flutter safely back to earth. Features changeable shape, pre-cut fibre fins."
I have a lot of experience with the Cyclone maple seed monocopter recovery model. With the Moonrakers shorter fins I have to wonder if it helicopters in or flutter tumbles.


I don't know where I picked this kit up.
In the upper right corner is a handwritten price of $1.00, a second price says $.90. The original catalog price was $.85 so this was probably produced after 1973.

Not much in the bag. All you can see is a nose cone, two short body tubes and small launch lugs.


The metallic "Spec-Plate" was a new kit bonus feature in 1973.
While a great idea on a larger model, this plate might be too much on this little rocket. (Note the pressure sensitive nose cone tab stuck under the Spec-Plate.)