Thursday, December 31, 2015

Estes Klingon Battle Cruiser, #1274, Build Part 11, Warp Drive Assembly


This shot from the instructions shows how the warp drive is assembled.
A small BT-2 body tube is glued inside the two halves for strength.

The line at the pylon cut out notch isn't straight. This area has to be removed, see the next picture.
I'll use a straight edge to get a cleaner, straight cut.


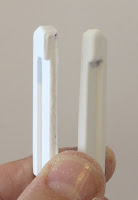
As careful as I was cleaning up the two drive halves, the edges don't meet up with the BT-2 tube inside.


I'll cheat on this one by sanding down the wall thickness.
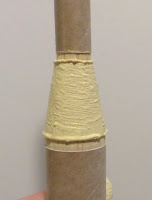
The tube will be compressed to fit inside the two sides. More on next post - 

Wednesday, December 30, 2015

We're Back!

Ten days and no posts! My cruise shows went well.
My ship cabin? Probably the worst accommodations ever.
The Prinsendam is an older ship. While the guest rooms are routinely remodeled, in my room I felt like I was going back in time. Everything was old, worn and moldy.

I did have a chance to hang out with old friends and entertainers. Comedian Gabe Abelson was a former head writer for Letterman and Leno. That's always a highlight of cruising - telling show horror stories and writing new material.

Estes Klingon Battle Cruiser, #1274, Build Part 10, Hanger Side Pieces


These are the hanger side pieces before the flat base is glued on.
I took this picture to show how thin the vacu-form walls are.


After the flat plastic base (cut off the master sheet in Step 1) is glued to the bottom, the edges are sanded even with the side walls.

On the left piece you can see some raised areas. If I were to sand down any more I might go right through the wall.


Sanding the sides of vacu-formed parts flat and smooth is a compromise. You can only take them down so far without weakening the side walls.

On the left piece the plastic has been sanded to the point where some of the raised areas are almost too thin..


On the left is the side of a hanger piece, a definite long dip is in the plastic wall.

I used some White Squadron to fill the recess. Don't use too much putty, the solvents might melt the already thin plastic.

After the putty dried, it was sanded down to surface.

Saturday, December 19, 2015

No Blog Posts!

I'll be entertaining on a cruise from December 19 through 28.

Sorry, there won't be any blog posts during this time and probably a day or two after I return.
I used to keep up with the blog when I was away. Now I refuse to pay for internet time. Holland America has raised the fees for it's employees to the point where I can't justify it! Ship internet "wait time" is frustrating.

I've done my yearly "TOP 10" list early this year. You'll find that post below.
So if you miss the daily post, CLICK HERE to see previous year TOP 10 successes and failures.
Follow up with searches under "Finished" or "Tips".

We'll pick up again when I return. Until then - MERRY CHRISTMAS!!!
If you take offense to a Merry Christmas greeting, you're probably not much fun at home either!

Top Ten list for 2015

Here's this year's TOP 10 . . .
#10 is the worst counting down to #1, or the best build and news of the year.
(These are simply my picks, based on the build and flight experience and blog postings.)
Click on the Name to go to the blog posts.

10. MPC Cadet Cruiser
This build and flights were so bad it inspired an unstable blog head!


9. Centuri Draconian Marauder
Face it, it's an ugly, HEAVY model. A waste of a C6-3 engine.


8. QCC Explorer
A great price for a big model. This one showed what is possible with laser cut parts.
The intake tabs recesses were hard to fill, this build sat for a long time before finally finishing it up.


7. Igniter Dip, part 1, part 2
For whatever (shipping regulation?) reason, Estes quit using pyrogen on their igniters. I had to resort to Quickburst dip to get a quicker ignition using my old 6 volt controller.


Replace those flimsy yellow engine mount tubes and you've got a great, two engine cluster sport rocket.
The rest of the rocket is sturdy and inexpensive!

This one was on my rocket bucket list for a few years.
After a few launches it ended up in a tree! It eventually came down and dried off.
New decals have been printed. Weather worn, it will fly again!


A great new uspscale of a favorite design.
I was a little concerned with fin adhesion to the plastic fin can, but all is good - so far.
An impressive model in the old Centuri test round colors.


Semroc is producing Semroc kits again! Randy Boadway is keeping the extensive product line alive.
The bad news.


Many builders celebrated this reissue. A new Estes booster with the classic Centuri Mercury Capsule and Tower.
Sure the decals may have been wrong but bringing it back makes up for the small stuff.


And the #1 Build of the Year is . . . 


This was a rewarding challenge. The three stacked nose cone shrouds might be too delicate for some.
It was fun to finish it in the old Estes Maxi Brute decor.
It's a shelf queen for now, one day I'll get the nerve to fly it.

If you'd like to see other TOP 10 listings for past years, CLICK HERE

In 2015, 17 rockets were built on the blog.
According to my Flight Logs, 112 rockets were launched. (Thanks to rocketreviews.com)

Friday, December 18, 2015

Estes Klingon Battle Cruiser, #1274, Build Part 9, Adapter Shoulder Filling TIP

The balsa adapter shoulders aren't sharp but rounded over.
I've already done the wider base of the adapter, this post will show how to build up the top.
On the left side, CWF has been brushed just over the lip.
In the inset picture, the BT-5 is slid down, pressed and turned into the wet CWF.
This makes a raised bead of filler. The bead is wider than the shoulder lip.


Turn and raise the tube.
You will end up with the raised bead that will be sanded down after it dries.
Pressing the tube into the filler makes a very sharp, compressed edge.

I also do this on most nose cone shoulders.


And after sanding - 
I use a sanding block to keep the taper flat.

Look close at the bottom lip. You can see where the filler was left a little thicker. The edge lip is thicker and more square. Right out of the box the adapter lips were rounded and not a good fit to the body tube outside edge.

Thursday, December 17, 2015

New LED Foot Switch


What's this got to do with rocketry? Read on . . .

You probably know I entertain doing shows. I play strange instruments, sing and talk way too much between songs.
Last year a bought a new Yamaha mixer on on-board effects. While the board has too many effects, I'm only concerned with reverb.
Too many musicians don't know that reverb is used on recording to simulate the echos in a performance hall. Some use way too much in a live performance.

If a room is "dry" I'll add a slight amount of reverb to my vocals and live instruments. I use it so subtly that from stage I couldn't tell if the reverb is on or off between songs. I didn't want to turn my back to the audience and punch a button on the mixer, so a bought a on/off foot switch.

Very few companies make an on/off foot switch with a light. It's simple, the light is on when the reverb is on.
You've heard the name Marshall, they make guitar amps. After some searching, Marshall seemed to be the only company that makes one of these lighted foot switches. I figured if anybody knew how to make a good foot switch, they would.

I bought the foot switch and it was unusable! The small red LED was so dim that onstage you couldn't tell if it was on or off.

Enter rockets:
At the last Orlando R.O.C.K. launch, Tom Dennon mentioned he was going to Sky Craft, a local "old school" electronics surplus store. I said I have to stop by and pick up some LEDs, but I didn't know how to wire them up.
Tom volunteered to pick up a bright LED and install it in the foot switch!
Now the foot switch works! It's plenty bright for live show use.

That's one reason I like the rocketry community.
It seems they are there to help out, sometimes beyond rocket advice.
While he didn't expect anything in return but for his help, Tom got some Odd'l Rockets parachutes. He liked the gore pattern and thought they would look better in his scale models.

Estes Klingon Battle Cruiser, #1274, Build Part 8, Balsa Filling

I'm building two Klingon models at the same time. There is a LOT of balsa to fill.

First up are the small detail pieces that go under the primary hull.
Masking tape was set down sticky side up. The four pieces were stuck down to the tape. It's just easier doing it this way than trying to hold onto the small pieces.

The wings are pretty large.
The left side shows the large wing piece with only one side coated with CWF. There is warping but the camera did over distort the bend.
The inset picture it the same piece after the other side got a coat of CWF and dried. The warp is almost gone.
I didn't dry this under a weight, it dried in the open air.


Here's another fin. You can see the grain on the right side.
If any piece would have warped, this is the one.

Many builder's panic when they see the balsa warping with CWF on just one side. Paint the other side and most all of the warp will go away.

Wednesday, December 16, 2015

Estes Klingon Battle Cruiser, #1274, Build Part 7, More Details


Two small detail pieces go on the underside of the primary hull.
Why these couldn't have been made on the vacu-form sheet is beyond me. Check out the sanded "diamond " shape.


I'll give it a try anyway.
Punch out the card stock pieces and glue them to some scrap balsa.


The balsa tops were sanded down to 1/16" high.
The sides were tapered. These pieces are small, very hard to get to the shape shown in the instructions.


The hanger side pieces are glued to the flat piece off the vacu-form sheet you saved from the first step.
Plastic cement was brushed along the edges. After drying the edges will be sanded smooth.

Tuesday, December 15, 2015

Estes Klingon Battle Cruiser, #1274, Build Part 6, Filling Gaps


I didn't sand down the edges of the filler pieces that would fit into the bottom of the primary hull top.
You can see how badly they fit into the vacu-form piece.
The instructions say to sand and trim them so they fit precisely into the hull top piece.


With the hull top flipped over there are round dimples that prevent the balsa pieces from fitting flat in the recess.
I simply pressed the balsa down hard on the dimples making a round indentation to fit over them.


The two pieces are glued in with a 1/16" gap that fits the overlap edge of the two round hull sides.
Check out the outside edges and all the gaps. These will have to be filled. As it stands now the assembly is flexible and weak.


I cut small slivers of balsa and wedged them into the gaps without distorting the thin plastic shell. When the fill strips were friction fitted in, medium CA glue was set over the top.
It took quite a few pieces to fill the gaps.


After all the filling, the bottom was sanded flat.
After some CWF the bottom should be very smooth.

Monday, December 14, 2015

Estes Klingon Battle Cruiser, #1274, Build Part 5, Die Crushed Balsa


The 3/32" balsa is die cut.
The cuts were very shallow, not even through to the other side.
The only way to see the cut lines was to flex the sheet.


You kids don't know how good you have it today with laser cut parts.
Edges like this were typical of kit supplied fins before laser cutting was used.

Balsa edges were rough requiring more filling. Crushed ends often weakened the fins.

The two large wing pieces are glued and butted together.
I used yellow glue here, the epoxy bottles were just used as weight.

I tend to use a counter top for a flat surface. Wax paper is set down over the counter before the fins and weights are set into place.


These look to be the only fins that have rounded leading and trailing edges. The four fins weren't on the TV version of the Klingon Cruiser. They were added by Estes for additional stability.


Looking ahead, I'm not going to round the small edge nearest to the root edge. It looks like it should be left flat for a better gluing surface against the bulkhead pieces.

Sunday, December 13, 2015

N.E.F.A.R. Launch, Bunnell, FL December 12, 2015

December launches aren't as busy as last months two-day Bunnell Blast. Still, a good group showed up. Temperature and the winds were moderate.


My Odd'l Rockets PIGASUS flew first with a Quest B6-4.
There was a slight weather cock into the wind and it landed just just to one side of the (toxic) runoff trough. Estimated altitude was near 300'.


I was pleased to meet Leo Nutz today.
If you haven't already, stop by his website. It's a great compilation of kit data. CLICK HERE So you think you're a collector?
Leo knows about and still flys Vashon rockets. The first rocket I ever owned was a Vashon Valkrie 2. We compared some memories about the Estes "Cold Power" series of Freon propelled rockets.
I did a test flight of the soon to be released Mercury Engineering (BMS) 3" diameter SCHOOL ROCKET.
With a D12-3 it had a straight boost to 300'.
At ejection the Kevlar shock cord actually broke through the plywood centering ring! I've never had that happen before.
The nose cone touched town easily under the 18" parachute, while the body tube nosed in.
Even though the body tube was 1" into the soft soil there wasn't any damage or crimping of the strong 3" tube.


Mark Laiuppa brought his two stage Estes Omega.
He adapted a small digital spy camera to replace the Super 8 film Cineroc.
A beautiful flight with a D12-0 to a D12-5.


The Quest STILETTO was my best flight of the day with a Estes D12-5.
Altitude was an estimated 750'.
At ejection the chute got hung up on the body, the rocket slowly spun and fell horizontal with no damage.


After last month's engine mount ejection I had to give the Quest MAGNUM another flight.
With two C6-5 engines ignited by Quest Q2G2s, the Estes Altimeter read 483'. That's still not as high as I would have expected. The instructions predict 900 feet with two C6-5s.
At ejection one chute shroud line broke. No damage at recovery.
The wasted engine of the day - 
I thought I'd loaded a Quest B6-4 in my CHEROKEE GOON.
Altitude was low and it turned out the engine was an A6-4. To make up for my mistake, it was reloaded and flown again with a Quest B6-4.
Apogee was around 450'. No damage under the 12" red Estes parachute.

Six up, six down with two needing minor repairs.

Saturday, December 12, 2015

Estes Klingon Battle Cruiser, #1274, Build Part 4, Engine Mount


After all the cutting and sanding of the vacu-form parts, I needed a break and moved onto the engine mount.

It's a typical 20/50 engine mount, the only typical thing on this rocket.
The split 20/50 centering ring was de-laminating. A little white glue was slipped in with my knife blade.


To hold the ring together while the glue dried, it was slipped in to the BT-50 main body tube.


After all had dried, the end was sanded flat and smooth with my sanding block.
That engine hook is pretty wide and stronger than normal. It moves easily out of the way when sanding the ring and tubes flush.

The kit didn't include an engine block, I'll add one above the top bend of the hook.