Showing posts with label Built Up Fins. Show all posts

Tuesday, May 28, 2024

Carded Mini Goblin Build, Part 5, Cutting The Fins To Size


After the fin skins have dried - 
Cut out the fins on the border lines using a straightedge and sharp knife. Only cut on the side that says "Root Edge" with the thin black border.

Cut through all three layers.


Here's the other side showing the cuts. Notice this flip side has the yellow ink outside the cut lines. Drawn and printed this way you get full ink coverage on both sides. 

After cutting, you may feel a wider swelled edge at the cut lines.

You can compress these sides down with a burnisher.

I'd recommend rubbing in a small bead of white glue down the cut edges to seal them. Keep the glue off flat sides of the fins. Remember - white glue dries clear, wood glue dries yellow. 

Four fins, ready for gluing onto the rocket body.
I used the decal placement from the 1970s original Goblin kit.

On my first carded model, I remember being surprised at how strong and stiff the fins were.


Sunday, May 26, 2024

Carded Mini Goblin Build, Part 3, Fin Prepping


One side of the cereal box (central core) has printing on it.
Sand down and rough up the inked side with some 400 grit.

Be ready, that dust can get everywhere.


Using a straightedge and sharp knife, cut one edge straight and square. This will end up being the leading edge of the fins.

Roll over the flat leading edge with some 400 grit sandpaper.
This rounding will give you a tighter fit of the folded 110 lb. printed skin cover.


Before cutting out the fin cover skins, 
Spray the printed side of both the 20 lb. and 110 lb. with clear acrylic. Paper skinned models can get dirty from handling.

Emboss a fold line down the leading edge with a straightedge and a non serrated tip of a butter knife. 


Here you can see the embossed line down the leading edge fold.
The emboss line helps get a sharper, straight fold.

Note one side of the fin skin is wider than the other. This guarantees full color coverage when the fin is cut out.
 

Tuesday, February 20, 2024

New Way Nike Ajax Build, Part 5, Booster Fins

Instructions say to sand both sides of the sheet before using a knife to remove the fins. 
I don't see any reason to sand while the fins are still on the sheet. Back when fins were die-cut, this sanding helped the fins release from the sheet. 
You'll be sanding the face of the fins after the two halves are glued together anyway.

The lower fins come off two separate sheets of balsa. Sometimes there can be a slight difference between the thicknesses of the two kit balsa sheets. 

Before you lose track of which fin came off which sheet - 
You can check a matched thickness by dry fitting the two sides and feeling the joint with a fingertip.


After matching up the thicknesses,
Glue the two halves together and set a weight on top to keep things even.


After the glue dries, you can sand the flat faces.
Start with light passes of 220 grit, smooth with 400 grit.

Wednesday, December 20, 2023

Estes Great Goblin, #9724 Build, Part 6, Gluing Up The Fins

I'm building three kits so I tried to keep track of the two piece fins. With four different sheets of laser cut balsa (per kit) sometimes there is a slight difference in density or thickness. 

The single dot on the left side designates Kit #1, the dots on the right will match up fin pieces 1 through 4.


You'll have some useable extra balsa left.
Hang on to it for some scratch build designs.


The edges of parts F and G were glued together and placed under a clear Plexiglass cutting board. 

More weight was set on top after I made sure the root edges on the TTW tabs were lined up. You can sand and match up the outside edges later with a sanding block.

Monday, December 18, 2023

Estes Great Goblin, #9724 Build, Part 4, Two Piece Fins


It is suggested that you sand both sides of the balsa sheets before removing from the sheets.
I don't see why it's necessary. Years ago, sanding die-cut balsa might help free up a fin that wasn't cut all the way through the sheet.
Now, a laser cuts all the way through.

You'll sand the flat sides when sanding off the filler.

All you need is a knife blade to free the fins, cutting through the hold-down tics.
Never punch out laser cut fins without cutting through the tabs. I use a break-off blade to remove the fins. I save the more expensive X-Acto #11 blades for more delicate cuts.
As mentioned many times before,
Laser cuts diffuse and widen when burning through the balsa. 
The bottom side of a laser cut is wider than the top. You can see line widths by flipping over a fin sheet. The laser cut is a wedge cut.   

On the left is a before and after sanding of the slightly angled sides. The butt joint (right side) after sanding is much better.
More in the next post . . .

Thursday, September 21, 2023

Estes Black Brant XII, Kit # 9723 Build, Part 7, Shaping The Thick Fins TIP

I can hear the voices: "That's not the way I'd do it!" Well, go with what works for you. 
With this method it's easier to see a consistent width on the leading and trailing edges.


On the left is one of the lower, larger fins after lamination.

On the right is the fin edges trued up using 220 grit on a sanding block.

When shaping the diamond taper, it's difficult to judge the width of the leading and trailing edges on the light colored balsa. I blacken the edges for a better contrast.


Don't blacken the edges until you seal the balsa - the ink can't soak in and stays on the surface. 

Squeeze out a drop of medium CA on some scrap cardboard.
Dip in a Q-tip. Run the CA glue down the leading edge letting it soak into the balsa. Get a complete coverage down the leading and trailing edge faces. 


Now you can run a wide point Sharpie down the CA glue sealed leading and trailing edges. Go quick, use no more ink than you have to, to get a full black coverage.
The CA glue prevents the black ink from soaking into the balsa. 


Here I've started sanding the diamond taper. 
The black ink lets you better judge the thickness of the leading and trailing edge.

I haven't started sanding to the center high point, just the width of the top and bottom edges.

Wednesday, September 20, 2023

Estes Black Brant XII, Kit # 9723 Build, Part 6, Gluing The Fin Laminations

THIS IS A VERY IMPORTANT POST. 
Don't just glue up the layers and leave them to dry for a few hours. You have to check the laminations every few minutes, reposition and slide the laminate sides back into position.
Gluing up the laminations is tricky! Read this entire post before layering up your fins.

You've got to use enough glue to guarantee complete side to side coverage. On the left is how much glue I used. On the right is the glue smoothed out with a fingertip.
But -
The glue makes the layers slippery!

When the glued pieces are pressed together, they will slide.
Line up the first two layers as best you can, use your block to get the root edges flat or slightly recessed as shown in the last post.

Some would be tempted to use Super Glues from the outside of the joint seam - don't!
Super Glues won't give you a strong complete seal. When the fins are sanded and shaped, you might find the layers opening up.
 
You'll need a heavy, flat weight to set on the glued up pieces, like a few very heavy books. I used a marble slab from my leather working days.

After placing the weight on the aligned glued fins, the pieces can slide from their original position.
YOU HAVE TO GO BACK AND CHECK THE ALIGNMENT EVERY FEW MINUTES before the glue sets up. I set the audible timer on the Microwave for three minute intervals.


When checking the laminates - 
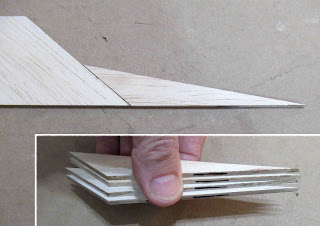
The outside layers can open up, warped from the wet glue.

I set a bit more glue inside and spread it out with my knife. Back under the weight to dry. 


As you are checking the fin layer alignment, remove any glue that has squeezed out at the root edge.
It's easier to remove the glue before it dries. That glue bead won't allow a close fit against the body tube.

Tuesday, September 19, 2023

Estes Black Brant XII, Kit # 9723 Build, Part 5, Decisions, Decisions

You can glue a curve in the root edges of the laminated fins. If all the root edges are flat, there will be a small gap on both sides of the root edge joints. These fins are thick and a flat root edge won't "hug" the curvature of a body tube.


Here's how the fin fits against the lowest section when the root edge three layers are squared up.

To fill the gap the instructions recommend a glue fillet after the fins are glued in place.


Here's after I compensated for the curve of the tube. The fit is better, a smaller root edge gap below (left of) the molded ring.

On some sounding rockets (see below), there is a small gap where the fins root edge is bolted onto the rocket body. 


You can get a stronger tighter joint, but it's tricky to do -
Glue the layers up so the center tabbed piece is very slightly recessed, out from a regular flat root edge.

I wouldn't try this unless you have patience.

Don't laminate the fins until you read tomorrow's post . . . 


Here's a picture of the real BB XII from the old Meatball rocketry website.

Notice the gap where the root edge is bolted onto the rocket body.

Monday, September 18, 2023

Estes Black Brant XII, Kit # 9723 Build, Part 4, Prepping The Fin Pieces

I've mentioned this a few times before - 
Laser cut fins are great! Except, the laser cut beam is diffused when it cuts into the balsa sheet.
Look at both sides of the sheet. On one side of the sheet, the line will be wider. It is a angled "wedge" cut.

Square up the fins setting the at a 90 degree angle on your sanding block. The right side picture shows the fin edge after light sanding. Some of the angle and the hold down tic has been sanded.


After gluing up a few of the fin sets - 

TIP: I recommend gluing together the outside halves (Parts L & M) together FIRST before joining to the center tabbed balsa layer. There will be too much sliding around when the laminate layers are glued up. It's easier with the L and M pieces joined beforehand.


TIP: You can use your block to square up the root edges.

On the right is the "M" piece. Notice the notch and most of the front root edge is slightly raised. Don't sand or remove this raised root edge area.

Sunday, September 17, 2023

Estes Black Brant XII, Kit # 9723 Build, Part 3, Prepping The Fin Pieces

If you don't have a good sanding block - get one!
You'll definitely achieve the best results using the Estes Ultimate Sanding Bar. I have two blocks, one loaded with 220 grit, the other with 400 grit.

You won't have to concentrate on holding onto the sandpaper, the paper has an adhesive back and sticks to the flat face. These are the only style blocks I use for shaping fins like these.

I buy my sandpaper on rolls. I hope Estes can offer sandpaper this way. Cut off the excess with scissors. TIP: The sandpaper cut also sharpens your scissors.


Here's how the lower fins (on the left) and the middle fins will glue up.

Each of the eight balsa fins is made up of five laminated pieces.
On the left is the fit of the outside layer pieces right off the balsa sheet, Note the gap between the pieces from the hold down tics.

On the right, the tics and the laser angle cut have been sanded down using the block. The dry fit is much tighter. 

TIP: That centerline butt joint ends up as the high point of the diamond taper shape. 

Wednesday, April 5, 2023

Estes Klingon Battle Cruiser, #1274, Step 15, Warp Drives & Wings

The sides of the Warp Drive pieces don't want to stay together. When you glue down one side, the other side opens up.
Earlier posts had the interior support tubes sanded down so the edges could touch.

More liquid plastic cement with finger pressure on both sides while the glue set up.


The large wing assembly is are confusing. Darn Klingons!


Here's how they actually look. The root edges are facing each other.


The front hull piece joint needed some CWF fill, the filler/primer and sanding.

On the right the front hull piece fits well over the BT-50 main tube. Do plenty of dry fits before gluing the wing in place.

GOTCHA: Those tips above the round center area do not have to touch! If they touch you might not get the angled "down" dihedral. Most of the gap between the tips will be covered by the Access Boom Detail vacu-form piece. 
Check the decal drawings in the instructions. The outside edge of the wing should be below the centerline joint (pencil line) at the body tube. 

Tuesday, August 2, 2022

Estes Super Orbital Transport Build, Kit #7314, Part 7, Main Wing Extensions

Another example of parts fitting.
On the left, the laser cut edges before squaring up the wedge burn.
On the right the front edge of the wing and "W" Extension Piece fairing sides were sanded. 

The instructions have you glue the extensions on after the wing is glued to the body tube. I chose to glue them on now to save any alignment and seam filling concerns later on.
Before gluing on the "W" extensions, 
Round the leading edge of the the forward extensions first.
Right side picture: Glue in place on the square forward edge of the wing.
After the glue dries, round the wing leading edge feathering into the already rounded edge of the "W" Extension Piece.


Here's a clean look at the wing with the notches left in and the two filler strips set between the two piece wing.

Friday, January 21, 2022

Quest/Enerjet Quad Runner Build #Q5016, Part 5, NC Lug & Fin Prep


Be sure to file away any rough plastic flash on the inside of the shock cord tie loop.
Edges like this can wear on the shock cord.


Here's how the lower fin and upper strake will glue together.

I'm building three models, two for flight and one for show.
With three different sets of fins, I mark the root edges from each set so the different balsa grain and densities remain constant.


After sanding off some of the burnt edges, you might end up with slight differences in length.


Line up the pieces, trim off to even up the tips.


The fin and strakes were glued together with the root edges against a straightedge.

Tuesday, September 14, 2021

Estes Super Mars Snooper #7309, Build Part 4, Upper Fins


I built three pre-production kits. Sometimes there are corrections to be made in the instructions. This "rounding the leading edge" illustration was a little different.


On my 2011 clone build, I didn't remember the upper fins having rounded corners. Some of the older instruction illustrations show sharper corners: CLICK HERE 
These round corners reflect the original Estes Plan #25 and match the lower rounded fins: CLICK HERE


Here's how the two piece fins join up.


I like to sand the rounded leading edge on the forward fairings before gluing to the bottom fin. 
It's a little difficult to sand a rounded edge in the inside corner. Sanding one side beforehand does half the job for me. After gluing the pieces together I just have to feather in the rounded leading edge of the lower fin. 
With the upper fairing fin rounded - 
Glue the two piece fin together setting the root edges on a straightedge.


I also set a weight over the glue joint so the pieces will both be flat and even.